
You're standing in a room with a draft around the window, peeling trim, and a stack of contractor quotes that all use different terms. One quote says “replacement window,” another says “insert,” and a third recommends removing the entire frame. The products may look similar on paper, but the crews aren't proposing the same installation.
That difference matters. Window installation types determine what stays in the wall, what gets removed, how the opening is sealed, how much glass remains visible, and whether hidden damage can be corrected. In a Texas home, the method also affects how the assembly handles heat, wind-driven rain, air leakage, and long-term movement.
Table of Contents
- Why Window Installation Type Matters More Than You Think
- How Window Installation Works Inside Your Wall
- Full Frame vs Pocket vs Insert Replacement Compared
- New Construction Installation With Flange and J Channel Explained
- Choosing Materials and Performance for Texas Climates
- How to Choose the Right Installation Type for Your Project
- What to Expect Next and How to Move Forward
Why Window Installation Type Matters More Than You Think
A homeowner may compare two similar-looking windows and receive very different installation recommendations. The right choice depends first on the condition of the existing frame and wall, then on disruption, appearance, and cost. A sound, dry frame can make a pocket or insert replacement practical. A damaged frame or wall may require full-frame work to prevent hidden problems from remaining in place.
A window belongs to a larger wall system that includes framing, sheathing, flashing, insulation, trim, siding, and the weather-resistive barrier. If those layers have been exposed to water or movement, installing a new glass unit alone is like placing a new door into a warped doorway. The product may be sound, but the surrounding connection can still allow drafts, stains, difficult operation, or future callbacks.
Older wood windows show why inspection matters. The visible sash may be worn while the frame behind the trim remains square and dry. A pocket or insert replacement can preserve that frame and reduce disruption. If the sill is soft, the jamb is twisted, or water has reached the surrounding wall, reusing the frame can hide the cause instead of correcting it.
The main methods are:
- Pocket replacement: The existing frame stays in place while the old sashes are removed.
- Insert replacement: A new window fits inside the existing frame, often reducing visible glass area.
- Full-frame replacement: The old window and frame are removed so the opening can be inspected and rebuilt.
- New-construction installation: A flanged window goes into an exposed or newly prepared rough opening, usually before siding and interior finishes are complete.
These methods affect air sealing, drainage, insulation access, trim appearance, glass area, egress, and code compliance. Installation guidance from Pella identifies hidden-frame damage, design flexibility, egress, and code compliance as factors alongside speed or cost. In suitable conditions, pocket work may take about one hour per window, while full-frame installation gives the crew access to more of the opening for repairs. See the replacement installation guidance from Pella for the distinction.
Material still matters, but it cannot compensate for a poor wall connection. Vinyl is widely associated with low maintenance and energy efficiency in market commentary. A durable material needs the installation method that matches the existing frame and wall, especially where Texas heat, wind-driven rain, and building-code requirements make concealed damage more consequential.
How Window Installation Works Inside Your Wall
Start with a simple mental picture. Think of the wall as a picture frame built around the window, except this frame must carry loads, block air, and send water back outdoors.
The rough opening is the framed space in the wall. The window sits inside it, or inside an existing finished frame, depending on the installation method. Around that opening, the installer works with trim, flashing, sealants, insulation, sheathing, and the weather-resistive barrier, often called the WRB.
A reliable installation follows a few basic layers:
- The opening is prepared. The installer checks whether the surface is sound and whether the opening is plumb, level, square, and true.
- The window is positioned. The unit must sit with the correct clearances so the frame can operate without binding.
- The unit is fastened. Fasteners transfer the window's loads into the surrounding structure.
- Air gaps are sealed. Backer rod, low-expansion foam, or compatible sealants may be used according to the manufacturer's instructions.
- Water is managed outside the frame. Flashing and the WRB create a drainage path rather than relying on caulk alone.
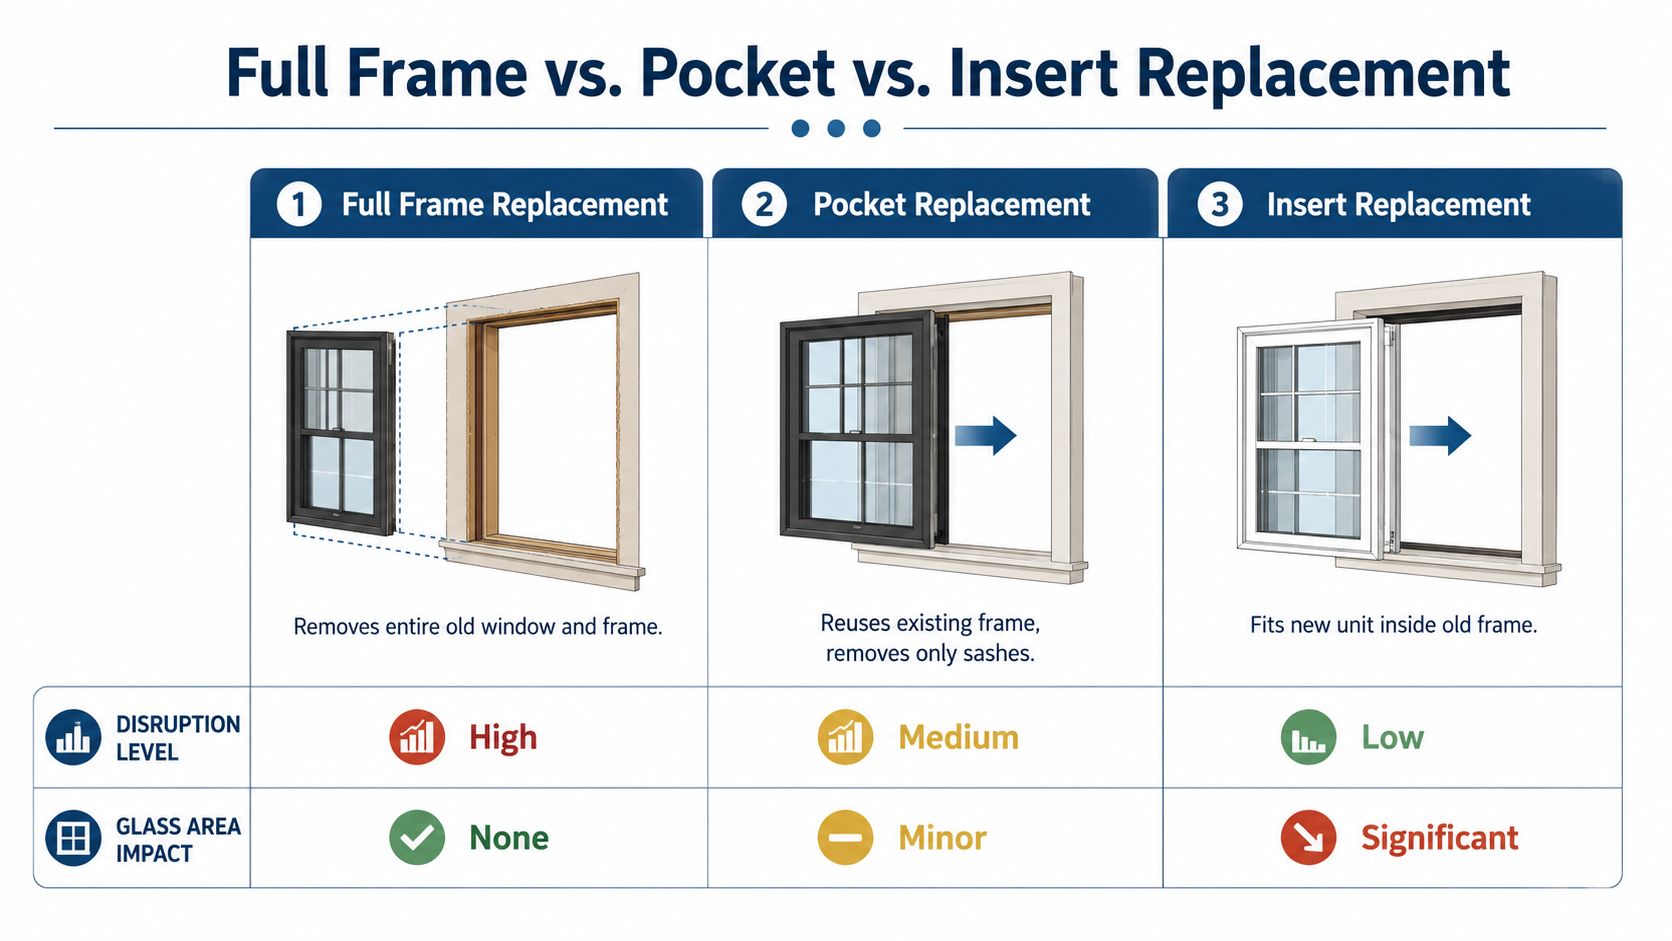
A pocket replacement interacts with the old frame. A full-frame replacement exposes more of the wall interface, giving the installer a chance to inspect framing, replace damaged material, and rebuild flashing. New-construction work begins at the rough opening, where the flanged unit connects directly to the wall's water-management layers.
The frame is only one part of the assembly
The visible casing can make an old window look stable even when the hidden sill is damaged. Conversely, old trim may look tired while the structural frame remains usable. That's why the installer should inspect the frame and surrounding wall before recommending a method.
A window also has to perform as a moving assembly. Tilt-and-turn units are a useful example because their hardware supports two opening positions, one for hinged ventilation and one for tilting inward. The modern mechanism traces to 1935, when Wilhelm Frank patented the first industrially produced tilt-turn fitting, the Roto N. The hardware was refined in the 1950s, and tilt-and-turn windows became associated with European adoption of thermally efficient windows and double glazing, as described in this history of tilt-and-turn windows.
For a homeowner, the takeaway is practical: always ask where the new window meets the wall, what old material remains, and how water will exit if it gets past the exterior seal.
For a visual guide to the basic replacement process, consult this vinyl replacement window installation guide.
Full Frame vs Pocket vs Insert Replacement Compared
The three replacement approaches can serve the same room, but they solve different problems. The right choice depends first on the existing frame and wall, then on appearance, code, ventilation, and project disruption.
Full-frame replacement
A full-frame project removes the old sash, frame, stops, and related components so the installer can reach the rough opening. The crew can inspect the sill, jambs, insulation, sheathing, and flashing instead of sealing over them.
This method makes sense when the old frame is rotted, badly out of square, poorly insulated, or the wrong size for the desired replacement. It also offers more design flexibility. You may be able to change the opening dimensions, recover lost glass area, improve trim details, or address egress concerns that an insert cannot solve.
The tradeoff is greater disruption. Interior and exterior trim may need removal, siding may require careful work, and the opening remains exposed during the installation process. It's more involved, but that access is precisely what lets the crew correct hidden conditions.
Pocket replacement
A pocket replacement removes the old sashes and places a replacement unit inside the existing frame. The installer typically preserves more of the surrounding trim and finishes, which can reduce dust, demolition, and repair work.
This approach works when the existing frame is sound, dry, square, and compatible with the new unit. It's attractive for homeowners who want a quicker, less disruptive project and don't need to change the opening or trim design.
The limitation is access. If damage sits behind the old frame, the pocket method may leave it untouched. It can also reduce the visible glass area because the new unit occupies space inside the old frame. Egress and operating clearances must be checked rather than assumed.
Insert replacement
An insert is designed to fit inside the old frame, often leaving much of that frame and its interior finish in place. It can be an efficient choice where the existing frame is stable and the homeowner wants minimal disturbance.
The phrase “insert” is sometimes used interchangeably with “pocket,” but contractors may use the terms differently. Ask the estimator to identify exactly what will be removed, what will remain, and where the new unit will sit. A drawing or written scope is more useful than a label.

| Installation Type | What It Replaces | Best When |
|---|---|---|
| Full-frame replacement | The entire old window and frame | The frame has damage, the opening needs correction, or design and code changes matter |
| Pocket replacement | The old sashes, while the existing frame remains | The frame is sound and the project prioritizes lower disruption |
| Insert replacement | The old operating unit, with the new unit fitted inside the existing frame | The existing frame is stable and preserving interior finishes is important |
Practical rule: If the installer can't explain the condition of the old frame, the recommendation is premature.
A quote should identify the removal scope, the flashing plan, the insulation method, the trim work, and how the installer will verify operation. Don't treat a pocket and full-frame proposal as interchangeable line items. One preserves more of the old wall interface. The other opens it for inspection and correction.
New Construction Installation With Flange and J Channel Explained
New-construction installation is intended for a new wall, an addition, or a major remodel where the siding and surrounding layers are open enough to expose the rough opening. The window usually includes an exterior flange, also called a nailing fin, that fastens to the sheathing or framing.
The flange isn't just a mounting strip. It becomes part of the water-management assembly. The installer must connect it to the flashing and WRB so rain that reaches the window perimeter has a controlled route back outside.
The drainage sequence matters
The installation begins at the bottom because water management follows shingle-lap logic. Upper layers overlap lower layers, much like roof shingles, so gravity moves water outward instead of behind the wall.
A typical sequence is:
- Prepare the sill. Install a sill pan or sill flashing, with the sill sloped toward the exterior so water has a path out.
- Set the window. Position the flanged unit in the opening, confirm its alignment, and fasten it according to the manufacturer's requirements.
- Flash the jambs. Apply jamb flashing so it overlaps the sill flashing at both lower corners.
- Finish at the head. Install head flashing last, tying the assembly into the WRB above the opening.
- Complete the exterior finish. J-channel and siding are installed so the finish sheds water without blocking drainage.
The ASTM E2112 installation guidance describes this sill-first, jamb-over-sill, head-last relationship. The exact products and attachment details must follow the window manufacturer's instructions and the project requirements.

Where J-channel fits
J-channel receives the edge of siding around the window and helps create a clean transition. It isn't a substitute for sill flashing, jamb flashing, head flashing, or a properly integrated WRB.
A common mistake is treating exterior caulk as the primary defense. Sealant has a role, but a wall should still have a drainage path if water gets past the window perimeter. The sill pan and layered flashing provide that path. If the sill slopes inward or the flashing stops at the frame, water can collect where the wall is least able to dry.
For a new build or open-wall remodel, a flanged installation gives the crew direct access to the components that control water and air. You can review the broader distinction in this guide to the difference between new-construction and replacement windows.
Choosing Materials and Performance for Texas Climates
A window can look right and still perform poorly in a Texas wall. Installation method explains how the unit connects to the opening. Frame material and glass determine how much maintenance, heat transfer, solar gain, and wear the assembly must handle.
Start with the existing frame and wall condition. A sound frame may support a pocket or insert replacement, preserving interior trim and reducing disruption. A soft, distorted, or water-damaged frame calls for more access. Full-frame work exposes the perimeter so the installer can address hidden deterioration, air gaps, and compatibility problems before the new unit is set.
Vinyl, fiberglass, composite, wood, clad wood, and aluminum each suit different projects. Vinyl generally requires little maintenance and can provide a practical replacement option. Fiberglass may fit a project seeking a different frame profile and material feel. Wood and clad wood can support a particular architectural design, while aluminum may suit some commercial or modern applications. Choose the material according to exposure, upkeep, structure, appearance, and the condition of the opening, not by frame material alone.

Use performance labels, not appearance alone
Texas homes often face intense sun and long cooling seasons. The right specification also depends on climate zone, window orientation, glass area, shading, and the quality of the air seal. Compare the complete rated unit:
- U-factor: Shows how readily heat moves through the window assembly. Lower values generally mean less heat transfer through the product.
- SHGC: Shows how much solar heat enters through the glass. A lower value may help on sun-exposed elevations, while shading and orientation affect the final choice.
- Air leakage: Shows how much air passes through the window under a stated test condition. A strong product rating cannot correct a leaking connection between the unit and rough opening.
- Glazing layers: Glass layers and coatings affect thermal and solar behavior. Compare the whole glazing package, not only the frame.
The Lawrence Berkeley National Laboratory window performance resource explains how U-factor, SHGC, climate zone, and air leakage apply across frame types and glazing layers.
European tilt-and-turn windows provide another design option. Their dual-action operation can support ventilation and secure closure, but the appearance alone does not establish performance. Confirm that the complete unit and installation address the project's heat, air, water, and operating requirements. For regional product and installation options, review Texas window replacement services.
How to Choose the Right Installation Type for Your Project
Use the existing frame as the first filter. Budget and schedule matter, but they shouldn't decide the method before someone checks the wall.
Start with the condition of the opening
Choose a pocket or insert approach only when the existing frame is structurally sound, reasonably square, free of significant rot, and compatible with the replacement. If the frame is soft, twisted, leaking, or hiding damaged sheathing, a full-frame replacement gives the installer access to the areas that need correction.
If the walls are already open for an addition or major renovation, ask whether a flanged new-construction unit is more appropriate. Exposed sheathing makes it possible to integrate the window with the WRB and flashing rather than working around finished siding and trim.
Match the method to the goal
Use this decision path:
- Preserve trim and reduce disruption: Consider a pocket or insert replacement after the frame passes inspection.
- Correct damage or air gaps: Favor full-frame work so the crew can inspect and rebuild the opening.
- Change size, style, or glass area: Full-frame installation generally offers more design flexibility.
- Address egress: Confirm the finished opening meets applicable requirements. A replacement that fits the old frame may not provide the needed clear opening.
- Prioritize water management: Ask for a written flashing and sill-pan plan, not just a promise to apply caulk.
- Improve comfort: Compare the complete window's U-factor, SHGC, and air-leakage information, then verify how the installer will seal the perimeter.
Inspect the opening before setting the unit
Technical installation guidance calls for rough openings to be plumb, level, square, and true before the window is set. The same guidance specifies sill flashing extending at least 6 inches beyond the rough opening at both jambs, with jamb flashing lapping over the sill flashing. See the rough-opening and flashing guidance.
Ask every contractor:
- What remains after removal?
- How will you check for rot and damaged sheathing?
- What flashing products and overlaps are included?
- How will you seal the frame-to-wall gap?
- Will the finished unit satisfy operation and egress requirements?
- Which parts of the trim, siding, and interior finish are included?
A clear answer to those questions tells you more than a product name by itself.
What to Expect Next and How to Move Forward
The soundest choice usually follows a simple rule: match the installation method to the condition of the wall. Pocket and insert replacements suit stable frames where preserving finishes and limiting disruption matter. Full-frame replacement earns its place when hidden damage, poor alignment, egress, design changes, or code concerns make reuse risky. New-construction installation fits exposed wall assemblies where the flanged unit can connect directly to flashing and the WRB.
A dependable quote should show the removal scope, measurements, window specifications, flashing approach, insulation and air-sealing details, trim repairs, cleanup, and warranty terms. It should also explain what happens if the crew finds rot or an out-of-square opening after removal.
Before comparing brands, schedule an assessment that examines the frame, sill, jambs, surrounding wall, and project goals. That visit gives you the information needed to compare methods fairly and avoid paying for a quick installation that leaves the original problem behind.
Breaking Glass Co. supplies and installs residential and commercial windows, including replacement, new-construction, vinyl, and European tilt-turn systems, with statewide Texas installation and nationwide product shipping. Visit Breaking Glass Co. to request a same-day quote and discuss the installation type that fits your wall condition.