
You've measured the visible glass, checked the product label, and found what looks like the right replacement window online. Then the old trim comes off and the opening tells a different story. One side is tighter, the sill has settled, and the corners aren't square. That's where a quick tape measurement turns into a delayed order, extra shimming, or a window that never operates correctly.
Learning how to measure window size means treating the opening like a quality-control checkpoint, not a single ruler exercise. You need several readings, a diagonal check, clear notes, and a firm distinction between the existing frame, the rough opening, and the actual unit you'll order.
Table of Contents
- Why Accurate Window Measurement Matters More Than You Think
- Tools You Need Before You Pick Up a Tape
- Measuring the Rough Opening Step by Step
- Translating Measurements Into the Right Window Size
- Common Measurement Mistakes and What They Really Cost
- A Simple Measurement Template and When to Call a Pro
Why Accurate Window Measurement Matters More Than You Think
You can measure a familiar window label, order the matching nominal size, and still discover a poor fit after the trim comes off. Texas homes often have settled framing, moisture exposure, older repairs, or several remodeling layers. An opening may look rectangular while the jambs narrow or the corners drift out of square.
Published guidance shows that window dimensions vary by style, manufacturer, and region. Common product ranges can run from 24 to 72 inches wide and 24 to 60 inches tall (Pella's standard window size guide). Those ranges help with product selection, but they do not describe the opening at your house.
Treat measurement as a quality-control check. Record width at the top, middle, and bottom, then height at both sides and the center. Compare the two diagonals as well. Different diagonal readings indicate a racked opening, even when the width and height readings appear acceptable. The smallest usable width and height control the fit, because a unit sized for the widest point can bind at the tightest one.
The label does not describe the opening
A four-digit nominal code is an ordering shorthand. The first two digits indicate width and the last two indicate height. For example, 3046 means 2 feet 10 inches wide by 4 feet 6 inches tall, while 2436 means 2 feet 4 inches wide by 3 feet 6 inches tall (Oknoplast's window sizing guide).
That code identifies the intended product size. It does not confirm that the existing rough opening, finished opening, or replacement frame has the same dimensions. The finished opening is the visible, trimmed area. The rough opening is the framed cavity behind it. Confusing those two is a common reason a window fits the listing but fails at installation.
Practical rule: Use the existing label as a clue, not an order sheet. Measure the opening the new unit must occupy.
Allowance protects the installation
The rough opening needs room for shims, insulation, sealant, and adjustment. Referenced trade guidance places the typical allowance at about 1/2 inch to 3/4 inch in each direction (Oknoplast's measurement guidance). A tight opening can force the frame out of square or prevent proper operation. An oversized opening may require excessive shimming or corrective framing.
A written record also protects the schedule. One industry guide reports that measurement mistakes account for 18–26% of callbacks. It lists a remake at $450–$1,200 and a truck roll at $120–$200, figures reported by that guide rather than timeless current pricing (Total Seal Windows' measurement guide). Checking multiple points and both diagonals costs minutes. Correcting a misordered unit costs far more time and coordination.
Tools You Need Before You Pick Up a Tape
Use tools that give you stable contact with the opening and make your notes easy to audit later. A steel retractable tape is the primary instrument. It stays straight across a span, holds a clear edge against the jamb, and doesn't stretch like cloth or flex like a soft measuring strip.
Bring a four-foot bubble level as well. The level won't replace your tape readings, but it can reveal a sill or jamb that's visibly out of plumb. That warning helps you interpret inconsistent measurements instead of treating every number as equally trustworthy.
The jobsite kit
- Steel tape measure: Choose a sturdy model with readable inch markings and enough reach for the opening.
- Pencil and measurement sheet: Label every reading immediately by window, position, and direction.
- Four-foot bubble level: Check the sill, jambs, and head for obvious slope or lean.
- Flashlight: Dark cavities can hide framing edges, damage, and old shims.
- Step stool: Use a stable platform for tall or high openings.
- Partner: A second person keeps the tape anchored on long spans and reduces angled readings.
A pre-drawn sheet is more reliable than scattered phone notes because it forces you to write width top, width middle, width bottom, height left, height center, and height right in separate spaces. The Home Depot replacement-window measurement guide also supports the three-point method and recommends checking whether readings remain closely consistent.

Tools I leave in the truck
A laser measure can be useful in some construction tasks, but it's not my first choice for this work. Bright outdoor light, reflective surfaces, textured drywall, and a slightly misplaced beam can produce a number that looks precise without touching the points you need to compare.
Cloth tapes can sag or stretch. A rigid folding rule can be awkward across a wide opening and may not sit flush against irregular jambs. For replacement sizing, direct contact with a steel tape and a level gives you a more useful picture of the opening.
Here's a short video demonstration to watch before you begin:
Measuring the Rough Opening Step by Step
Start by deciding what surface you're measuring. If the interior stop or casing hides the actual opening, remove only what you need to expose the jambs and sill. If the existing frame gives you a clear, consistent reference for a retrofit unit, measure from the appropriate inside jamb surfaces instead of automatically tearing out trim.
The critical point is to avoid measuring decorative casing. Trim can extend beyond the structural opening, and the inside edge of a stop may describe the existing sash area rather than the space available for the replacement frame.

Record width in three places
Hold the steel tape from jamb to jamb and take three separate width readings:
- Top: Measure close to the head of the opening.
- Middle: Measure through the center, keeping the tape straight and snug.
- Bottom: Measure above the sill or at the lower reference point.
Don't bow the tape, and don't pull it diagonally to make it reach. Write each result beside its position before moving on. Professional guidance recommends checking whether the three readings stay within 1/8 inch of one another. Greater variation can point to bowed jambs, framing movement, or settlement that needs attention before ordering (Home Depot's replacement-window guide).
Use the smallest width as the controlling width. The window has to pass through the narrowest part of the opening, not the most generous part.
Repeat the process for height
Measure vertically from the sill or sub-sill to the underside of the head jamb. Take three readings:
- Left side
- Center
- Right side
Keep the tape vertical and identify the same starting and ending surfaces each time. If the sill slopes, the readings can change even when the jambs are straight. Record the smallest height because that's the maximum opening dimension the unit must clear.
Check the diagonals
Measure from the upper-left corner to the lower-right corner. Then measure from the upper-right corner to the lower-left corner. Label them Diagonal A and Diagonal B.
If the readings differ by more than 1/4 inch, the opening is out of square according to the referenced North American measurement guidance (Oknoplast's standard sizing guide). An out-of-square opening doesn't automatically make replacement impossible, but it changes the installation conversation. The installer may need corrective framing, carefully placed shims, or a product and frame approach suited to the conditions.
The smallest width and height control the order. The diagonals control how confidently the unit can be installed.
Before ordering, photograph the opening and your written sheet together. If you're moving into installation planning, the vinyl replacement window installation guide can help you compare the measurement workflow with the actual fit and fastening steps.
Translating Measurements Into the Right Window Size
A measured opening is not automatically an order size. The rough opening describes the space in the wall, while the unit size identifies the manufactured frame that will be installed. The order must leave room for positioning, shimming, and sealing, with the exact requirement set by the product and installation method.
Use the smallest recorded width and height when working out the order. Then confirm the manufacturer's sizing chart and installation instructions. A generic deduction can help with a preliminary estimate, but it cannot replace the product's stated fit requirements.
Nominal codes simplify the order
Nominal codes give suppliers and installers a short reference for the intended window size. A code such as 3046 communicates nominal width and height, but it does not guarantee the actual frame dimensions. Manufacturers and frame styles can vary, so verify the published unit size before ordering.
Frame type changes the calculation. A new-construction window with a nailing fin is installed against the framing, while a retrofit block-frame unit may fit within or beside the existing frame. Those approaches use different installation details and may require different deductions. The window installation types guide helps clarify which frame and installation category matches the opening.
For planning only, the comparison below shows how stated deductions affect an order calculation. Confirm the final dimensions with the manufacturer.
| Rough Opening (W x H) | New Construction Frame (Deduct 1/2" per side) | Retrofit Block Frame (Deduct 3/8" per side) |
|---|---|---|
| 36" x 48" | 35" x 47" | 35 1/4" x 47 1/4" |
A 36-by-48 rough opening therefore does not automatically call for a 36-by-48 actual unit. Check the smallest opening measurement, the frame style, and the supplier's specifications together. If the diagonals show the opening is out of square, address that condition before treating the calculated size as final. A unit can have the right nominal label and still be a poor fit for the actual opening.
For related spacing calculations, you can also check this thecalcs tool. Use it for planning, then rely on the window manufacturer's order specifications for the final unit.
Common Measurement Mistakes and What They Really Cost
A replacement can be ordered perfectly to the wrong dimensions. The first failure is often measuring the wrong surface, such as the interior trim, visible glass, or inside edge of the existing stop. Those readings describe the finish or old assembly, not necessarily the structural opening where the new frame must sit.
The label on the existing window can mislead you as well. It usually identifies the old unit, not the rough opening around it. A window that appears to be a standard size may still sit in framing that has shifted, settled, or been modified.
The errors that create callbacks
- One reading per direction: A center-only reading can miss a tight top or bottom. That is how a frame binds even when one measurement looks correct. Record three widths and three heights, then judge the opening by its tightest reading.
- No diagonal check: Corners can look square while the diagonals disagree. Compare both diagonals before approving the order. A replacement unit may fit the stated width and height yet sit poorly in a skewed opening.
- Ignoring the sill: Rot, water damage, or a deteriorated sub-sill can make accurate dimensions unusable. Repair the support before treating the opening as ready.
- Confusing unit and opening size: The old frame, finished opening, and rough opening are separate references. Write down which surface each dimension represents.
- Rounding too early: Record dimensions to the nearest 1/8 inch or millimetre, following the measurement documentation recommendations. Do not round a tight opening into a size it cannot accept.
A narrow variation between readings may reflect normal adjustment space. A substantial difference points to a condition that must be addressed, such as a bowed jamb or uneven sill. The smallest reading helps prevent binding, but it cannot straighten framing or rebuild damaged support.
Why the rework adds up
A field measurement error can lead to a remake, another delivery, extra labor, and damage to adjacent finishes. A single remake may cost $450–$1,200, with a $120–$200 truck roll possible on top of it. Measurement mistakes account for 18–26% of callbacks, according to the cited industry guide.
The invoice is only part of the disruption. A wrong unit can delay drywall, siding, flashing, insulation, and trim work scheduled around the window. Contractors may also need to coordinate several trades again, while homeowners face an opening that remains unfinished longer than planned.
For an older or visibly damaged opening, an expert window inspection from Awesim can provide a separate reference for identifying defects before you commit to a replacement dimension.
A Simple Measurement Template and When to Call a Pro
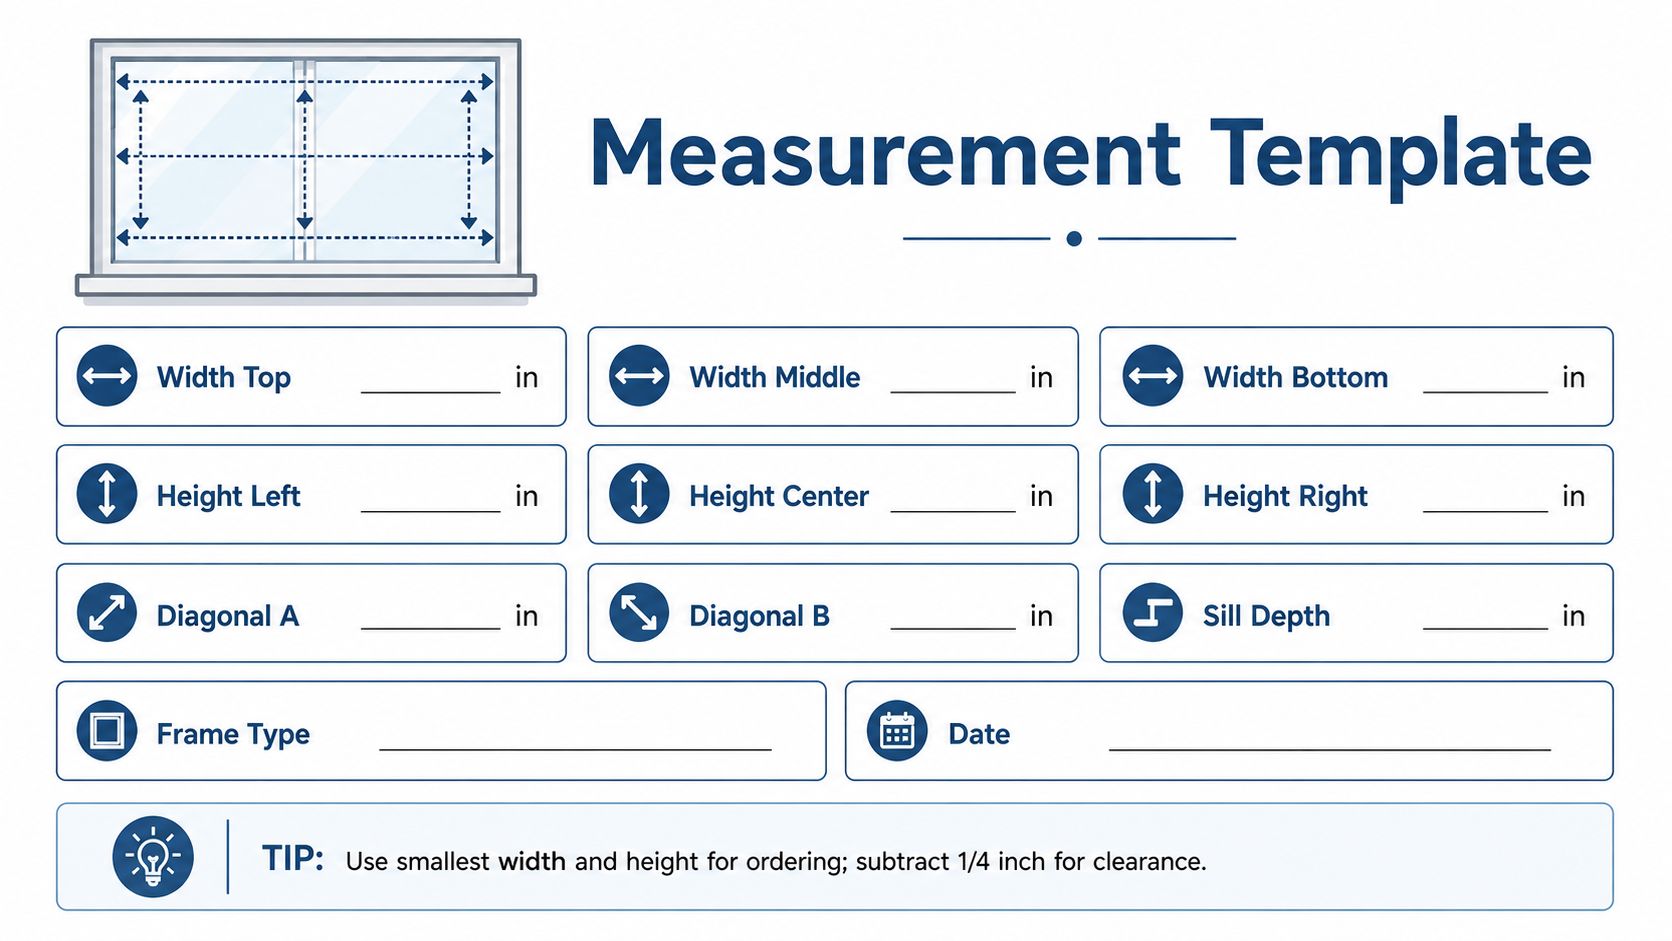
把每個窗洞記成同一套資料,訂購前才容易發現矛盾。將以下欄位抄在紙上,或列印測量圖表,每扇窗使用一張。
| Field | Reading |
|---|---|
| Width top | ______ |
| Width middle | ______ |
| Width bottom | ______ |
| Height left | ______ |
| Height center | ______ |
| Height right | ______ |
| Diagonal A | ______ |
| Diagonal B | ______ |
| Sill depth | ______ |
| Frame type | ______ |
| Date | ______ |
The final check before ordering
每次量測都按同一流程完成:
- 量寬度: 量取頂部、中間與底部。
- 量高度: 量取左側、中間與右側。
- 比對對角線: 確認窗洞是否方正。
- 採用最小值: 以最小寬度和最小高度作為規劃依據。
- 核對產品表: 依所選框體與製造商,確認實際窗體尺寸。
- 檢查支撐狀況: 查看窗台、側柱、上樑與可見的水損。
- 拍攝窗洞: 將照片與書面尺寸一起保存。

二樓窗洞、磚石窗洞、變形框架、大型訂製窗,或任何延誤交期會打亂工程安排的項目,都適合交由專業人員複核。若對角線未通過 1/4-inch squareness check,或窗台狀況涉及結構問題,也應先取得專業判斷,可參考 Lowe's replacement-window measurement guidance。
Breaking Glass Co. 提供住宅與商業窗戶供應、測量、訂購支援及安裝服務,涵蓋德州項目與全國產品配送。若要協調測量與安裝估價,可查看 Breaking Glass Co. 的窗戶安裝服務,並在訂購前提交窗洞尺寸、照片與框體資料。
如果你在德州更換窗戶,不要只依照舊窗標籤或單次讀數下單。交由 Breaking Glass Co. 核對窗洞、判斷框架狀況,再安排供應與安裝,能把對角線、最小尺寸和實際窗洞條件放在同一套品質檢查流程中。