
You notice the problem on an ordinary Texas afternoon. The front door looks fine from the street, but the latch needs a shoulder, sunlight warms the inside face, and a thin line of daylight shows around the jamb. The air conditioner runs while the entry hall still feels hot. By the time the door sticks, leaks, or fails to lock cleanly, the opening may already be contributing to comfort, moisture, and security problems.
To replace a front door successfully, treat the project as a complete entry system, not a decorative slab swap. The door, frame, threshold, weatherstripping, fasteners, flashing, and surrounding wall all determine whether the finished assembly keeps out heat, rain, air, and unwanted access. Texas sun and temperature swings make measurement and installation discipline especially important.
Table of Contents
- Recognizing When Your Entry Door Is Failing
- Choosing the Right Material for Harsh Climates
- Measuring and Preparing the Rough Opening
- Executing a Weather-Tight Installation Sequence
- Upgrading Security and Thermal Performance
- Evaluating Costs and Professional Installation
Recognizing When Your Entry Door Is Failing
A failing entry door rarely announces itself with one dramatic break. More often, the warning signs arrive separately: a seal that no longer springs back, a lock that only lines up when you lift the handle, or a darkened threshold after wind-driven rain. Homeowners often repair each symptom, but those symptoms can point to movement in the frame or deterioration behind the trim.
Start with the seal. Close the door and inspect the weatherstripping around the head and jambs. Compressed, cracked, brittle, or missing material allows conditioned air to escape and outdoor heat to enter. On a sunny day, run your hand along the interior trim. Noticeable warmth near the frame suggests thermal transfer through the assembly or an unsealed gap around the jamb.
Cosmetic damage versus system failure
A faded finish isn't automatically a reason to replace the entire door. Repainting may solve a surface problem when the slab remains flat, the frame is sound, the threshold drains correctly, and the lock engages without force. A loose strike plate, worn sweep, or replaceable weatherstrip can also be a sensible repair.
Replacement becomes more reasonable when several functions have deteriorated together:
- Warping: The slab rubs at one corner, leaves uneven gaps, or changes behavior between morning and afternoon.
- Failed alignment: The latch or deadbolt misses the strike unless you pull, lift, or push the door.
- Moisture damage: Soft wood, swelling, staining, or decay appears at the sill, lower jamb, or trim.
- Air leakage: You can feel moving air around the perimeter, particularly during windy weather.
- Security weakness: The frame flexes, fasteners no longer hold, or the lock hardware sits in damaged material.
Texas exposure accelerates these issues. Direct western or southern sun can heat the exterior finish for hours, while cooling inside the home creates a repeated stress cycle. A door that expands, contracts, and shifts against a marginal frame may continue operating for a while, but the gaps and hardware alignment usually worsen.
Practical rule: If the slab is attractive but the frame is out of square, replacing only the slab preserves the part of the system causing the trouble.
Why the frame deserves attention
The frame controls the seal and the lock position. If water has entered at the threshold, repairing the visible trim without correcting the opening can leave damaged wood behind the casing. Before ordering a unit, inspect the sill, corners, and lower jambs after removing enough trim to see the framing.
For homes in the Dallas-Fort Worth area, homeowners can also review these DFW door frame protection strategies for practical ways to reduce exposure and maintain the surrounding exterior. Protection helps, but it can't compensate for a door frame that has already lost structural integrity.
Choosing the Right Material for Harsh Climates
Material selection sets the maintenance pattern for the life of the door. Wood offers warmth and repairability, steel provides a strong and often economical option, and fiberglass generally handles the combination of Texas heat, sun, moisture, and daily use with fewer compromises.
Wood can look excellent when properly protected, but it demands consistent attention. Unsealed edges, failed paint, and moisture at the bottom rail create opportunities for swelling and rot. In a shaded, well-protected entry, that maintenance may be manageable. In full sun beneath a dark overhang or on an exposed porch, the finish and joints deserve closer inspection.
Steel brings rigidity and a familiar security profile. It can be a practical choice where impact resistance and upfront value matter, but dents are difficult to disguise, and damaged coatings can expose the surface to corrosion. Steel also conducts heat more readily than an insulated nonmetallic door, so the quality of the core, finish, frame, and perimeter seal matters greatly in a hot climate.
Fiberglass has become a common residential choice because it combines a stable surface with an insulated construction approach. The category's history supports that performance reputation. The first fiberglass doors were manufactured in 1975 for the petrochemical industry because of chemical resistance, and Therma-Tru launched its Fiber-Classic line in 1983, describing it as the first fiberglass door on the market (Therma-Tru's company history). A product that began in an industrial setting later moved into residential replacement, where durability and reduced maintenance became important selling points.
Entry Door Material Performance Comparison
| Material | Heat and UV Resistance | Maintenance Needs | Security Profile |
|---|---|---|---|
| Wood | Can perform well with excellent coatings and protection, but direct exposure increases finish and movement concerns | Regular painting, sealing, and inspection | Strong when paired with a sound frame and quality hardware |
| Steel | Strong and stable, but transfers heat and can suffer when the protective coating or surface is damaged | Refinish scratches and dents promptly, inspect for corrosion | Rigid and capable of strong hardware reinforcement |
| Fiberglass | Generally well suited to sun, temperature changes, and moisture when properly finished | Usually lower maintenance than wood, with periodic cleaning and hardware checks | Strong system performance depends on the frame, lock reinforcement, and installation |
The comparison isn't a license to ignore specifications. Look for an insulated core, weatherstripping designed for exterior exposure, and a finish appropriate for intense sunlight. A dark color can absorb more solar heat than a lighter one, so color, shade, orientation, and glazing should be considered together.
For homeowners comparing appearance and maintenance in more detail, this wood versus fiberglass front door comparison provides useful context. Fiberglass often costs more than a basic steel option, but the relevant comparison is the complete ownership burden, including refinishing, dent repair, comfort, and how reliably the assembly stays aligned.
Measuring and Preparing the Rough Opening
The old door isn't a reliable final template. It may have been trimmed, shifted, or installed in an opening that has changed over time. Measure the rough opening and inspect the framing before selecting the replacement unit.
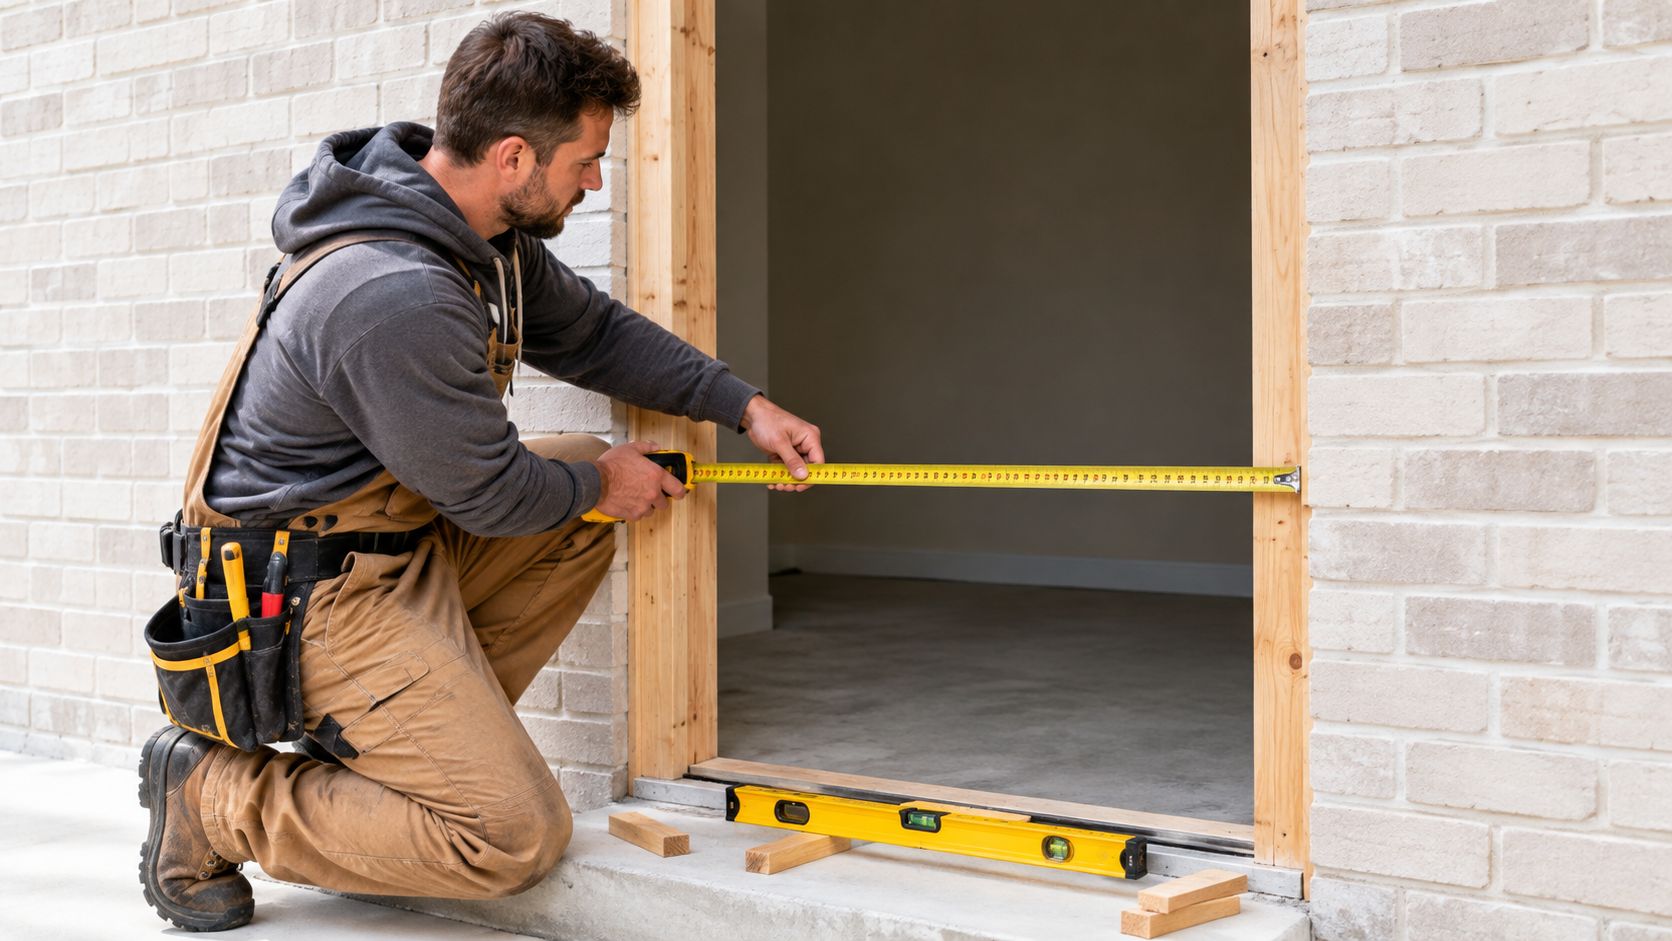
Measure the opening, not just the slab
Record the width at the top, middle, and bottom, then measure the height at both sides and near the center. Note the wall thickness, swing direction, jamb depth, threshold conditions, trim, sidelights, and any transom above the unit. These measurements help identify whether a standard prehung system will fit or whether the opening needs modification.
A useful measurement process includes:
- Remove interior or exterior trim where necessary. You need to understand the actual frame and rough opening, not only the finished casing.
- Inspect the sill and corners. Probe suspicious areas for softness and look for staining, discoloration, or failed sealant.
- Check level and plumb. Use a long level on the sill and jambs. Check diagonals to identify an opening that isn't square.
- Confirm the floor relationship. The threshold must meet the finished floor without creating a trip hazard or an air gap.
- Document obstructions. Identify wiring, masonry, stucco, unusual framing, or previous shims that could affect installation.
Correct the opening before setting the door
A level threshold is critical because the door depends on it for consistent clearance and compression of the bottom seal. If the sill slopes or the supporting wood has deteriorated, the new unit may bind even if the slab and frame are manufactured correctly.
Remove rotten or damaged material before the replacement arrives. Don't bury wet or weak framing behind a new jamb. The rough opening should provide sound fastening points at the hinge and strike areas, with enough room for controlled shimming rather than forced installation.
For homeowners taking their own measurements before requesting a quote, this replacement entry door measuring guide can help organize the information. Measurements still need professional verification when the opening is old, masonry-bound, or visibly out of square.
A small measurement error can become a large installation problem once the threshold, casing, and lock hardware are fixed in place.
Executing a Weather-Tight Installation Sequence
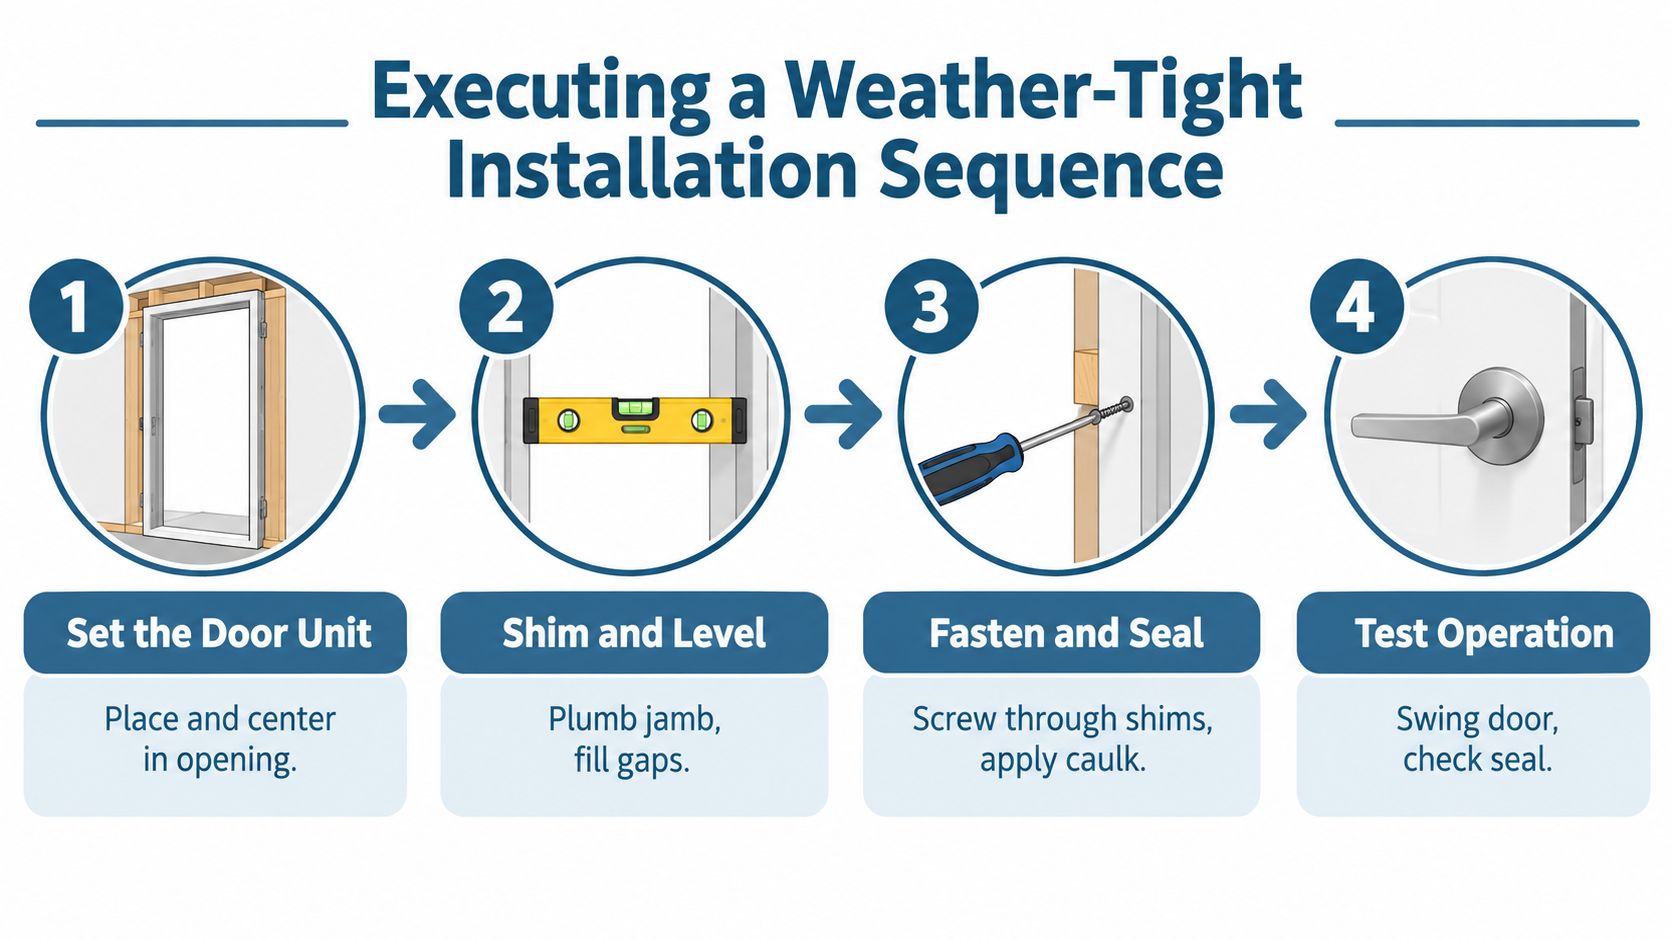
A prehung door performs only when the installer protects the rough opening and keeps the frame aligned. The correct sequence starts before the unit enters the opening and ends with an operation test, not with the last screw.
Build the sill before setting the unit
Remove the old slab and trim carefully, then clean the opening and expose the conditions that will support the new door. Install the specified flashing or sill pan at the threshold, directing water toward the exterior rather than into the wall assembly. The sill is one of the most failure-prone interfaces, so a bead of interior caulk alone isn't an adequate water-management plan.
Set the prehung unit into the opening and center it without forcing the jamb. Check the hinge side first, then verify the head and strike side. The jamb must remain plumb, level, and square while the installer adjusts the unit.
Shim where the hardware transfers force
Place shims at the hinge locations and behind the strike area. These points support the fasteners and prevent the jamb from bowing when the door is operated or locked. Drive fasteners through the shims into sound framing, but don't overtighten them. Excessive pressure can pull the jamb out of alignment and create uneven weatherstrip compression.
Before fully driving every fastener, open and close the door. Check the reveal around the slab, confirm that the latch enters the strike cleanly, and test the deadbolt. Correcting alignment at this stage is straightforward. Correcting it after trim and sealant are complete is slower and more expensive.
The full installation workflow includes the following controls:
- Opening preparation: Remove damaged wood and establish a clean, stable substrate.
- Threshold protection: Use the flashing, sill pan, and sealants specified for the door system.
- Frame alignment: Verify level, plumb, and square at each stage, not only at the beginning.
- Controlled fastening: Keep screws tight enough to secure the jamb without distorting it.
- Perimeter sealing: Insulate the frame gap and seal the exterior with compatible materials.
- Final testing: Operate the slab, latch, deadbolt, sweep, and weatherstripping before cleanup.
For a visual reference to the components and relationships involved, review this exterior door installation diagram. The final air seal usually combines low-expansion insulation in the frame gap with backer rod and exterior-grade caulk where the joint requires a flexible seal. Add exterior flashing or a drip cap where the wall and door design call for it.
Upgrading Security and Thermal Performance
A new slab won't deliver strong security if the strike is attached to weak material, and an insulated core won't lower cooling demand if air bypasses the frame. Security and thermal performance meet at the installation details, especially around the jamb, threshold, and lock side.
Start with the hardware package. A properly aligned deadbolt should extend smoothly without forcing the door, and the strike area should be anchored into sound framing. At the hinges, replace one short hinge screw with a longer security screw when the framing depth and manufacturer's instructions allow it. The same principle applies to the strike side, where fasteners need meaningful purchase rather than relying only on thin jamb material.
Multi-point locks add engagement at more than one location along the door edge. They can improve resistance to prying and help pull a tall slab into a more consistent seal, but they require precise alignment. If the frame shifts or the keepers aren't positioned correctly, the handle can become difficult to operate. Hardware complexity is useful only when the installer understands the adjustment and maintains the correct clearances.
For a broader discussion of multiple locking points and hardware selection, this triple lock security door guide is a useful reference. Don't treat a higher lock count as a substitute for reinforced framing, a sound strike area, and a door that closes squarely.
Seal the thermal bypasses
Insulate the space between the jamb and rough opening with low-expansion spray foam intended for doors and windows. High-expansion foam can bow the jamb and interfere with the slab, so product selection and controlled application matter. Backer rod and exterior caulk should accommodate movement while maintaining the weather barrier.
Choose weatherstripping that remains flexible under strong sun and repeated compression. Inspect the bottom sweep and threshold adjustment after the door has been installed. An overly compressed seal can make the door hard to close, while an under-compressed seal leaves a direct path for hot air and dust.
Ask for documented product ratings when energy performance is a priority. The door's insulated core, glazing, frame, weatherstripping, and installation work as one system. A higher-performing component can't overcome an open perimeter joint or a threshold that drains water into the wall.
Evaluating Costs and Professional Installation
The financial decision depends on the scope, not just the slab price. Recent U.S. cost guidance places a professionally installed exterior or entry door at about $1,455 on average, with installed examples ranging from roughly $546 to $2,377 or more depending on type and complexity, according to Angi's exterior door installation cost guide. Another national estimate in the same source places front-door replacement at approximately $800 to $4,000 for the door and frame.
Those figures are starting points, not promises. Glass, sidelights, custom dimensions, trim, damaged framing, hardware, masonry, and stucco can change the work substantially. Ask every contractor to separate the door system, removal, opening repairs, installation, sealing, finish work, hardware, disposal, and warranty coverage.
When professional installation earns its place
A straightforward opening with accessible framing may suit an experienced DIYer. A door is heavy and unforgiving, however, and a mistake at the sill or jamb can create problems that remain hidden until the next storm or cooling season.
Professional installation makes particular sense when:
- The opening is out of square or historic. Older framing may need correction before a prehung unit can operate properly.
- The exterior is stucco, brick, or masonry. Cutting and tying the new flashing into the wall requires careful sequencing.
- Rot appears at the sill or jamb. The repair must restore sound fastening and water management, not merely cover the damage.
- The unit includes sidelights, a transom, or heavy glazing. Handling and alignment become more demanding.
- The project is part of a larger remodel. Window, door, trim, and weather-barrier work should be coordinated rather than installed in conflicting stages.
The resale case can also matter. Remodeling-value research cited by Angi estimated a $2,214 steel entry door replacement in 2023 and associated it with approximately $2,235 in added home value, an ROI near 100% in that report. Treat that as a reported benchmark, not a guaranteed resale result. Location, workmanship, design, and market conditions still determine what a buyer recognizes.
For larger door and window replacement work, HIRI reported that homeowners in the category spent a median of $10,000 and an average of $14,067, showing how quickly an entry project can become part of a broader exterior upgrade. HIRI also reported that doors and molding grew at a 5.1% CAGR from 2020 to 2025 and forecast continued growth through 2030, while broader remodeling growth was decelerating in its 2026 forecast (HIRI's doors market outlook). The practical takeaway is simple: compare complete scopes and performance outcomes, not isolated product prices.
Get the opening measured, request a written installation sequence, and confirm how the contractor handles flashing, shims, perimeter insulation, hardware alignment, and warranty support. Breaking Glass Co. supplies and installs fiberglass entry doors and replacement door systems for Texas homes, with measurement, ordering, installation, quotes, and warranty support available as part of its service offering. Visit Breaking Glass Co. to request a quote for a Texas entry-door replacement that accounts for heat, sun exposure, security hardware, and the condition of the existing opening. A properly specified and installed system can address the problems that a quick slab swap leaves behind.