
A framer finishes the rough opening, the window crew sets a flanged unit, and the siding contractor arrives expecting the trim detail to be obvious. Then someone cuts the J-channel too shallow, tucks the WRB behind the wrong leg, or closes off the path where head flashing needs to discharge. The wall looks finished, but the first wind-driven storm exposes the mistake.
That's the problem with new construction windows with J-channel. J-channel often gets treated as part of the window's waterproofing, even though it's a siding trim accessory. The reliable order is straightforward: confirm the window and siding match, control water at the rough opening, install the head flashing, then fit and fasten the J-channel without blocking drainage or thermal movement. The details below follow that job-site sequence.
Table of Contents
- Why J-Channel Decisions Trip Up New Window Installs
- What J-Channel Actually Does Around a Window
- Matching J-Channel to Siding and Window Frames
- Flashing Before the Channel Ever Shows Up
- Installing J-Channel in the Right Sequence
- When Head Flashing Matters More Than the Channel
- Hot-Climate Performance and Long-Term Durability
- A Builder's Checklist Before the Siding Crew Arrives
Why J-Channel Decisions Trip Up New Window Installs
The trouble usually starts during handoff. The framer thinks the window installer owns the exterior finish. The window installer assumes the siding crew will build the trim around the unit. By the time the siding crew arrives, the opening has already been covered with housewrap, the nailing fin is buried, and nobody has confirmed where the channel, flashing, and siding will meet.
A new-construction window with a nailing flange is designed to be installed before siding and exterior trim. That flange helps connect the window to the wall's control layers, but it doesn't eliminate the need to plan the cladding transition. A useful comparison of new-construction and replacement windows makes the distinction clear: the installation method depends on whether the unit has a full frame and nailing flange or fits into an existing frame.
Where the mistake hides
J-channel errors rarely announce themselves on installation day. The reveal may look clean, the siding may snap into place, and the caulk line may appear complete. Failure arrives later, when rain reaches the head jamb, when the channel's pocket is too tight for the siding to move, or when an over-driven fastener prevents the trim from relieving expansion.
Job-site rule: If the head flashing hasn't been installed and inspected, the window opening isn't ready for J-channel.
Manufacturer guidance treats J-channel as the trim profile that receives siding edges around openings. It also directs installers to work around openings in a bottom, sides, then top sequence, while maintaining clearances at the siding-to-channel interface. Those instructions matter because the channel has to finish the siding without becoming a dam.
The practical mistake to avoid is cutting channel first and trying to make the flashing fit afterward. Set the water-control layers, verify the window, and only then cut the trim. That order prevents a neat-looking frame from concealing a weak wall assembly.
What J-Channel Actually Does Around a Window
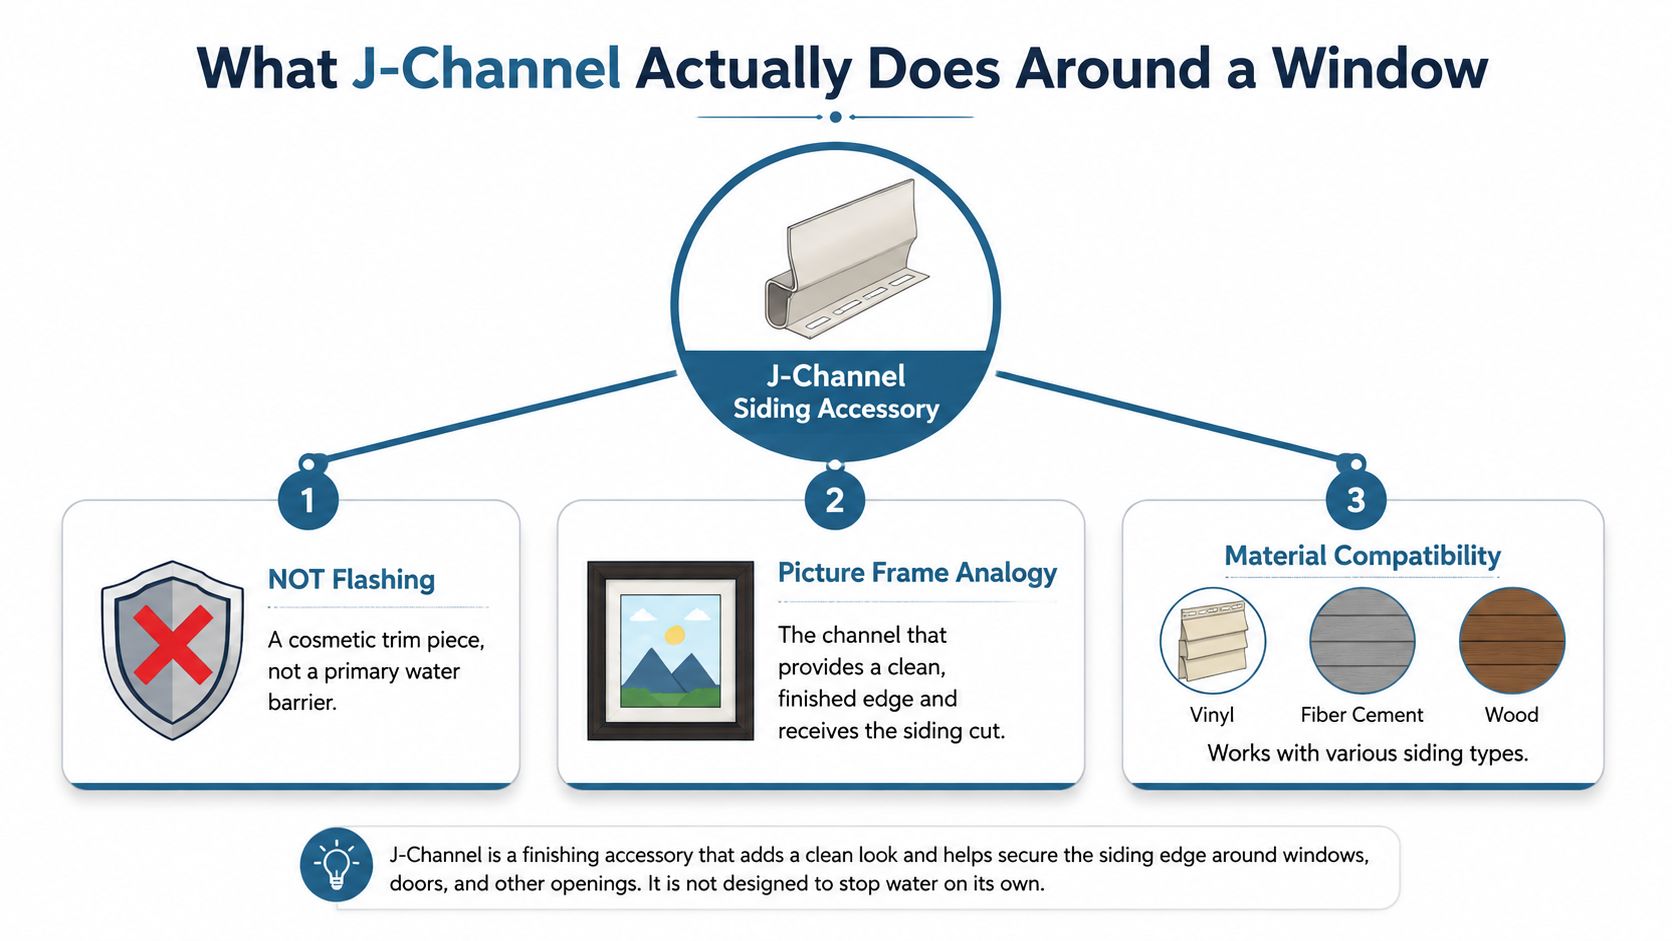
Think of J-channel as a picture frame, not a gasket. A picture frame holds the edge of a finished surface and gives it a consistent border. A gasket seals a joint against water and air. J-channel performs the first job. The flashing system performs the second.
The channel normally has three functional parts:
- Nailing leg: The flat flange fastened to the wall or framing.
- Face: The visible front edge that creates the finished reveal.
- Receiving pocket: The shaped cavity that accepts the cut edge of the siding panel.
That receiving pocket must suit the siding profile. Vinyl lap siding, fiber cement, and engineered wood don't all occupy the same depth, and a channel that fits one profile can pinch or loosely hold another. The trim also needs room for movement, rather than gripping the panel so tightly that expansion forces the channel to bow.
Trim finishes the wall, flashing protects it
The J-channel can direct incidental water away from the siding edge, but it isn't the primary weather barrier. The wall still needs a continuous WRB, sill protection, jamb flashing, and head flashing. Manufacturer instructions also warn that J-channel isn't a substitute for flashing or a water-resistive barrier, and that the top of an opening should use Z-flashing or a proper drip detail rather than relying on the channel alone. See the manufacturer installation guidance for vinyl siding accessories for the distinction.
The channel should sit outside the water-control assembly. It shouldn't trap the WRB, cover an unflashed head, or become the only layer expected to stop bulk rain. That distinction is also useful when evaluating local installation help, such as Windows and Doors Wake County Experts, because the right question isn't whether a crew can install trim. It's whether the crew understands how the trim relates to flashing and drainage.
Matching J-Channel to Siding and Window Frames
The correct channel is selected from two directions at once. First, match the pocket to the siding profile. Second, confirm how the window frame meets the cladding plane.
A typical vinyl lap profile may use a standard shallow J-channel, while thicker fiber cement or rigid foam-backed siding may require a deeper utility channel. Don't order by appearance alone. Ask for the siding manufacturer's pocket dimension, then compare that measurement with the window jamb depth and the planned exterior wall finish.
A new-construction window with an integral nailing fin usually pairs with field-applied J-channel. The nailing fin anchors and seals the window at the rough opening. The channel then creates the siding transition outside that assembly. A replacement window without a fin may instead use a factory-applied or built-in receiver, because the cladding connection is integrated into the window frame.
| Siding Type | Typical J-Channel Pocket | Frame Pairing | Notes |
|---|---|---|---|
| Standard vinyl lap | Shallow profile matched to the panel | Field-applied channel with a flanged new-construction window | Confirm the pocket allows panel movement without pinching |
| Insulated vinyl | Deeper profile than standard lap | Field-applied utility channel around the nailing-fin window | A shallow pocket can trap the thicker panel |
| Fiber cement | Deeper utility-style profile | Field-applied trim outside the flashed flange | Follow the siding system's edge and fastening details |
| Engineered wood | Profile-specific receiver | Field-applied or manufacturer-approved trim | The reveal must align with the cladding plane |
| Cladding with integrated receiver | Factory-defined pocket | Window with built-in J-channel or receiver | Don't add a second channel unless the manufacturer permits it |
The pairings that create callbacks
A channel that's too shallow can hold the siding tightly enough to restrict thermal movement. In hot, sun-exposed elevations, that may show up as buckling, noise, or a distorted reveal. A channel that's too deep for a thin panel can leave a loose pocket where wind-driven rain reaches the edge and the finish looks uneven.
Window selection also affects the labor sequence. A flanged full-frame unit is installed before siding, while a flangeless or insert unit depends more heavily on the existing opening and exterior finish. For product comparisons, review vinyl new-construction windows alongside the siding specifications, not separately. The window, channel, and wall finish have to land on the same plane.
Flashing Before the Channel Ever Shows Up
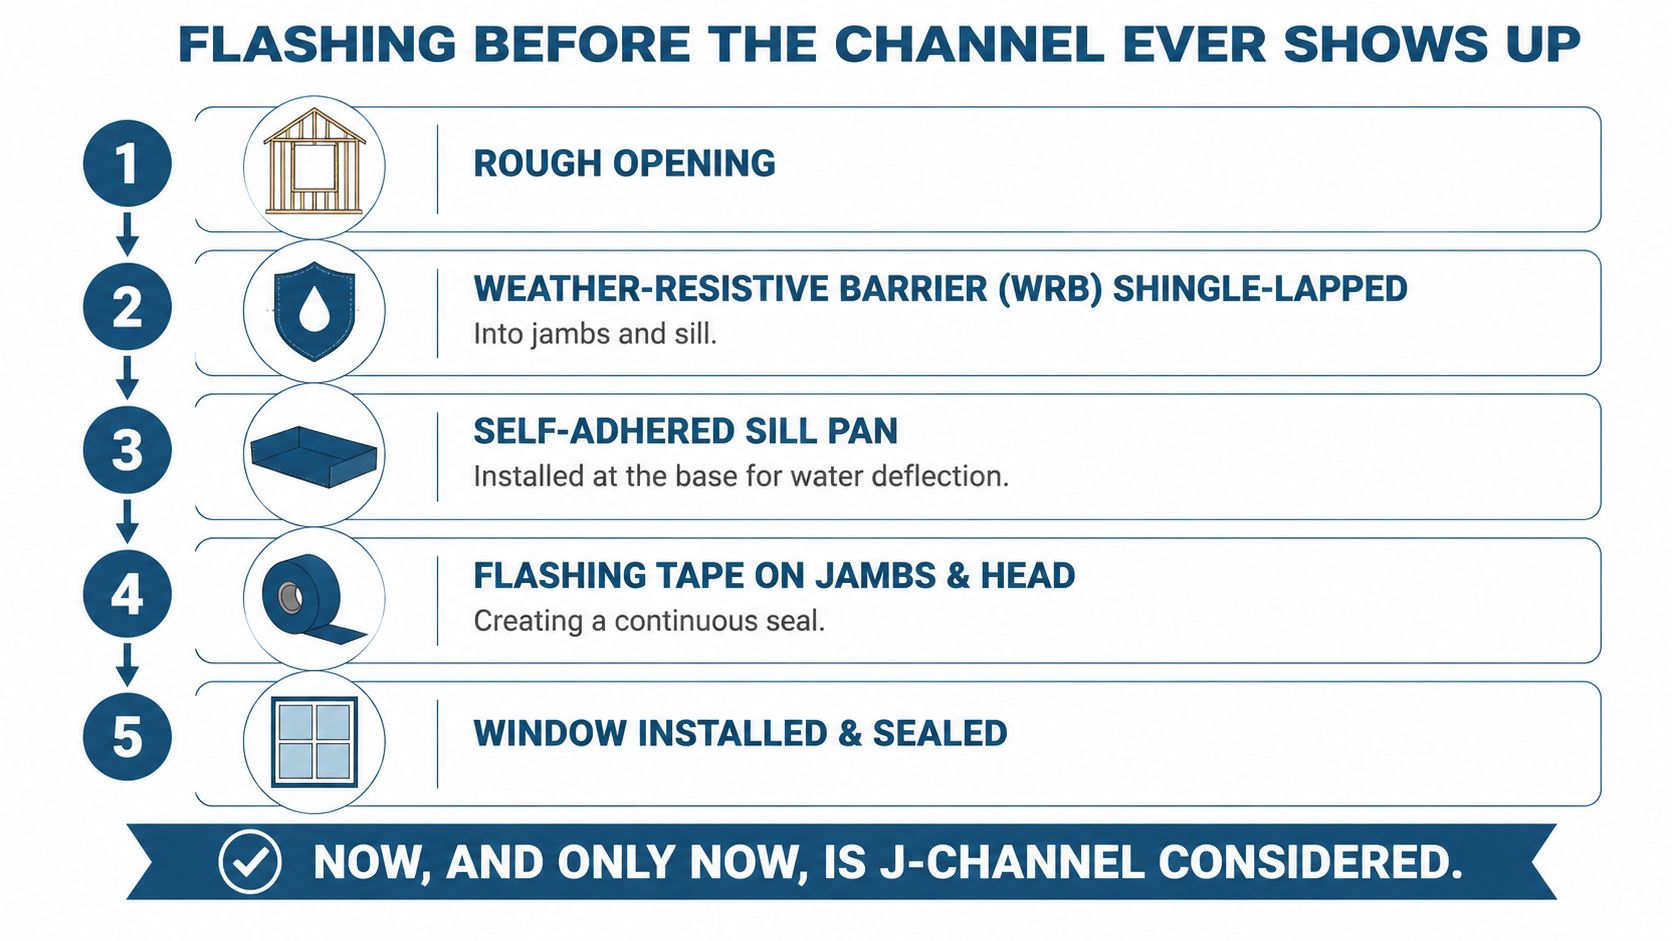
The rough opening should pass its water-control inspection before anyone unboxes J-channel. The sequence begins with the WRB and sill, not with the visible trim.
Build the drainage plane first
Start by preparing the opening so the WRB can shingle-lap into the sill and jamb areas. Install a self-adhered sill pan or pre-formed corner pans at the base, with the sill protection extending far enough to catch water from the window and direct it outward.
Then install the jamb flashing. The jamb pieces should lap over the sill pan so water moving down the sides lands on the sill protection instead of behind it. On vertical seams, follow the specified upper-lap and lower-leg coverage. The installation details in the cited guidance call for a 2-inch minimum upper lap and 4-inch minimum lower-leg coverage on vertical seams, so those dimensions should be checked against the project's selected flashing system and manufacturer instructions. See the window installation steps before the exterior trim conceals the work.
Install the window only after the sill protection is ready. Bed the nailing flange in the specified sealant, set the unit plumb and level, fasten it without distorting the frame, and integrate the flange with the jamb and head layers.
Close the head without creating a trap
Head flashing comes after the window flange is secured. The head flashing should extend past the jamb flashing on both sides, and the WRB should lap over the head flashing so water remains on the exterior face of the drainage plane. A true drip cap or Z-flashing handles water at the most exposed horizontal transition. It should not depend on J-channel to perform that work.
The top trim can be detailed after the head flashing is committed. If the channel is cut first, its nailing leg may occupy the exact space needed for the flashing, or the installer may shorten the flashing to preserve a clean reveal. That reverses the priorities and can send water behind the siding edge.
The governing principle is simple: sill first, jambs next, window after that, head flashing before trim, J-channel last. Technical guidance based on ASTM E2112 and manufacturer installation practices treats the window, flashing, WRB, and cladding as connected layers. J-channel is the visible outer layer, not the layer that makes the opening weatherproof.
Installing J-Channel in the Right Sequence
Once the flashing inspection is complete, install the channel in the same direction water naturally wants to travel. The bottom piece goes in first, the side pieces follow, and the head piece goes on last. That arrangement lets upper pieces overlap lower pieces rather than forcing water behind a lower joint.

Start at the sill
Cut the sill channel to the planned opening width and pre-notch the nailing hem so water has a path out instead of collecting along the bottom. Manufacturer and independent installation guidance commonly use drainage notches in the face at regular intervals, including 6 to 8 inches in some details, while other field instructions specify notching the hem at 8 to 12 inches. Use the siding system's instructions for the final layout rather than combining details from unrelated products.
Fasten through the center of the slots with corrosion-resistant nails or screws. The fastener should hold the channel in place without crushing the flange. Leave the channel able to move slightly within the slot.
Fit the sides over the sill
The side pieces should run from the sill area to the underside of the head flashing. Cut them long enough to overlap the sill piece, with the overlap directed so water remains on the outside. If the project detail uses a small expansion gap at the upper end, preserve it. Don't jam the side channel hard against the head flashing or window frame.
Use a square, sharp snips, a utility knife, and a siding punch where the system calls for it. Dry-fit each piece before fastening. That extra check catches a window that sits off the planned cladding plane before the siding crew has to force panels into an uneven pocket.
Finish with the head piece
The head channel goes over the side pieces. Mitered and folded corners or purpose-made corner inserts are more reliable than a diagonal seam filled with caulk. Sealant can support the detail where the manufacturer requires it, but it shouldn't block weep paths or replace the overlapping geometry.
The recurring failures are easy to recognize:
- Over-driven fasteners: The channel can't expand or contract and begins to buckle.
- Blocked drainage: Siding ends are tucked tightly into the pocket, leaving no route for incidental water.
- Incorrect overlap: The lower piece sits over the upper piece, creating a path inward.
- Closed top pocket: Siding is pushed into the top pocket instead of being allowed to move and drain as specified.
The installation video can help visualize the trim operation, but the project's window and siding instructions control the actual dimensions and fastening requirements.
When Head Flashing Matters More Than the Channel
A tidy J-channel frame can create false confidence. The head of the window is where rain strikes a horizontal transition, and wind can drive water into small discontinuities around the nailing flange, WRB, or trim.
The failure pattern is predictable. Head flashing is skipped, shortened, or installed behind the wrong layer. Water moves laterally toward the jambs, reaches the back of the J-channel, and wets the sheathing. Interior drywall may stay clean until the assembly has been exposed repeatedly, which is why a trim inspection on a dry day can't prove that the opening is weatherproof.
Put the priorities in the right order
A proper drip cap or Z-flashing above the opening sheds water away from the wall plane. End dams or folded ends help stop lateral migration past the jamb trim. The head flashing also needs to connect correctly with the WRB, so water stays on the exterior side of the drainage plane.
The channel makes the siding termination neat. The head flashing keeps the wall from relying on that neat termination for protection.
Manufacturer accessory guidance describes the head as a bulk-water risk and calls for flashing integrated with the WRB rather than a channel-only solution. It also warns against treating the channel as a substitute for flashing or placing siding into a top pocket where it can interfere with drainage.
For builders, the priority order should be:
- Head flashing and WRB continuity
- Correct shingle-lap direction
- Window flange sealing and fastening
- J-channel fit, overlap, and movement allowance
- Final siding reveal and sealant appearance
More trim won't compensate for a discontinuous WRB. If the head flashing is correct, the channel has a manageable job. If the head flashing is missing, the channel becomes a polished cover over an unresolved opening.
Hot-Climate Performance and Long-Term Durability
Hot climates expose weak trim details quickly. Strong sun heats dark surfaces, vinyl siding expands and contracts, and repeated movement stresses fasteners, joints, and sealant. A channel that looks acceptable on a mild installation day can distort when the siding is restrained at every corner.
Use corrosion-resistant fasteners suited to the exposure. Independent installation guidance emphasizes corrosion-resistant fasteners, slotted fastening, and allowance for expansion. Avoid drywall screws. They aren't a substitute for exterior-rated nails or screws and can create corrosion or holding problems in a wall assembly.
Let the trim move
Fasten through the center of the slot, not at the end, and don't drive the head tight enough to clamp the channel against the wall. Leave the manufacturer's specified movement allowance at butt joints and channel ends. A cited guide discusses 8- to 16-inch fastening intervals, while other field instructions use 8 to 12 inches, so the siding and channel manufacturer's instructions should govern the final spacing. See the J-channel installation guidance for exterior siding for the movement principle.
Color also matters. White trim generally absorbs less solar heat than darker profiles, but any color can warp if the installer over-fastens it or leaves no room for movement. The fix isn't just adding more caulk or more screws. It's selecting a compatible profile, keeping the channel mobile, and allowing the siding system to drain.
Sealant belongs only where the approved detail calls for it. Use a compatible, UV-stable exterior sealant, and don't run a continuous bead across weep paths or drainage notches. Manufacturer notes may require sealants meeting ASTM C920 Class 25, so confirm the product specification before applying sealant around the head or corners.
Inspect the detail, not just the caulk
During maintenance, look for opened butt joints, bowed faces, pulled fasteners, cracked sealant, and siding that has crept out of the receiving pocket. Those signs can mean the trim has reached the end of its useful service before the siding itself appears worn.
A practical inspection should also check whether the channel is still shedding water away from the window and whether later repairs have blocked the drainage route. In Texas and similar climates, the flashing continuity remains more important than the appearance of the channel. Heat may reveal movement problems, but water-control errors determine whether that movement becomes a leak.
A Builder's Checklist Before the Siding Crew Arrives
The handoff should be based on verified layers, not on whether the window looks centered in the opening. Use this sequence at the walk-through and have the responsible installer or superintendent sign off before siding conceals the work.
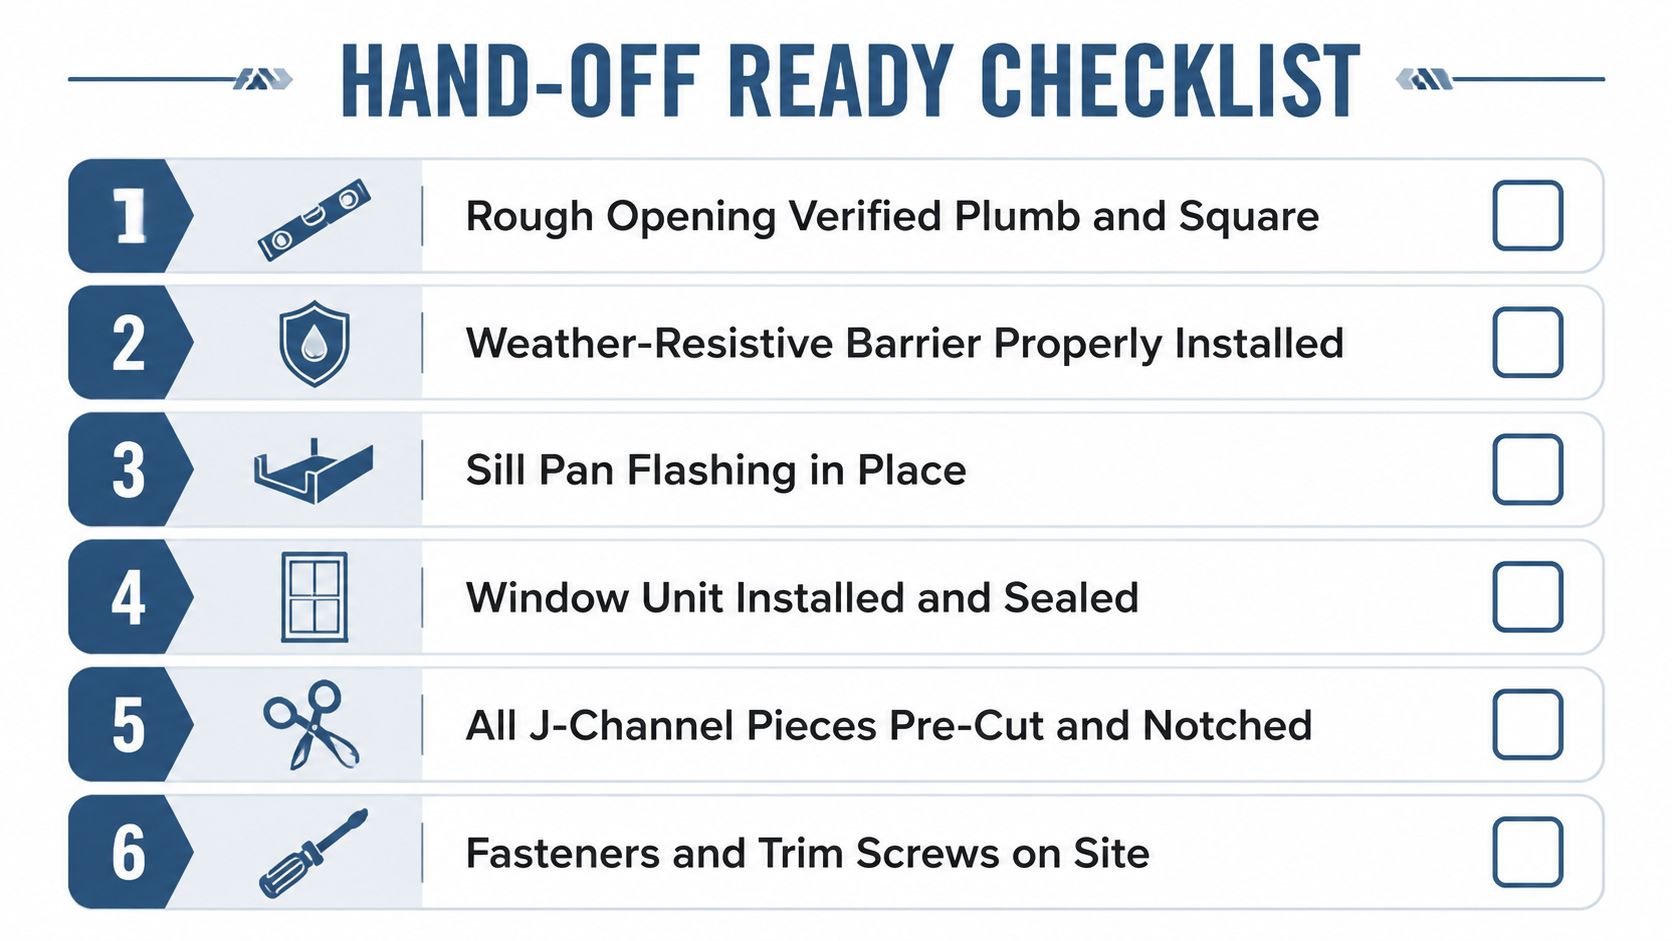
- Verify the rough opening. Confirm the opening is plumb, level, square, and sized for the selected window.
- Confirm the WRB path. Make sure the water-resistive barrier is integrated with the opening and can shingle-lap over the head flashing.
- Install sill protection. Check the self-adhered sill membrane or pan, including the corner transitions and outward drainage path.
- Install and seal the window. Identify whether the unit has an integrated nailing fin or requires a field-applied exterior trim transition. Set the unit correctly, bed the flange in the specified sealant, and fasten without distorting the frame.
- Complete jamb and head flashing. The jamb layers should lap onto the sill protection. The head flashing should extend beyond the jamb areas and connect with the WRB.
- Cut and install J-channel last. Dry-fit the bottom, sides, and top. Confirm the pocket matches the siding, the joints overlap in the drainage direction, the fasteners sit in the slot centers, and no channel leg traps the WRB.
The trim crew should also verify the specified fastening interval, preserve the required clearances, and keep siding ends from blocking drainage. Don't allow the channel to hide an uninspected head detail.
Schedule the window walk-through before the siding installation, so the GC can inspect sill, jamb, head flashing, WRB laps, and window fastening while every layer remains visible.
If your project needs new-construction windows, coordinated flashing details, and siding-ready installation, Breaking Glass Co. supplies and installs residential and commercial window packages, including products suited to Texas and Southwest conditions. Contact the team for a project quote and schedule the window walk-through before the siding crew arrives.