
You know the feeling. One room stays cold no matter how long the heat runs, the curtain twitches when there's no breeze outside, and you keep wondering whether the window is the problem or the rest of the house is leaking money through the walls.
The fastest way to fix that kind of draft is not to grab a tube of caulk first. A good repair starts with finding the leak path, then matching the fix to the part of the window that requires it. That simple distinction, moving parts versus fixed joints, is where most DIY attempts go wrong.
Table of Contents
- Pinpointing the Source of Your Drafty Windows
- Quick and Temporary Draft Solutions for Immediate Relief
- A Homeowner's Guide to Sealing Window Drafts Permanently
- Advanced Fixes and Common Sealing Mistakes to Avoid
- When DIY Is Not Enough The Case for Window Replacement
- Your Action Plan for Draft-Free Windows
Pinpointing the Source of Your Drafty Windows
A drafty window usually announces itself before you ever touch a tool. You feel a cold strip near the frame, a curtain shifts for no reason, or the room seems harder to keep comfortable than the rest of the house. That's your cue to stop guessing and start testing.

Use two simple tests before you buy anything
The dollar-bill test is the easiest way to check how well the sash is sealing. Close the window on a bill and tug it out at several points around the frame. If it slides out too easily in one area, the seal is weak there, and that's where the repair belongs. A firm-grip pull matters because the point is to check compression, not just whether the window is technically closed.
The incense test or smoke test is better for spotting moving air. Hold a smoldering incense stick near the perimeter and watch whether the smoke bends or gets pulled inward. That tells you where air is entering, even when the gap is too small to see.
Practical rule: Test more than one spot. A window rarely leaks evenly, and the worst gap is often not where you first feel the chill.
Read the pattern, not just the symptom
If the draft shows up around the sash, the issue is often worn weatherstripping or poor contact between the moving parts. If the air seems to come from the trim or the wall edge, the problem is usually a fixed joint that needs sealing. On older windows, warped frames, flattened seals, and loose hardware can all create the same uncomfortable result, but each one calls for a different fix.
That's why diagnosis comes first in any serious guide on how to stop drafts from windows. Once you know whether the leak is at a moving joint or a stationary one, you can choose the right material and avoid sealing the wrong place.
Quick and Temporary Draft Solutions for Immediate Relief
Sometimes you need the room to feel better tonight, not after a supply run and a full afternoon of repairs. Temporary fixes won't solve the root problem, but they can cut the sting while you plan a proper repair.
Fast fixes that buy time
- Draft snakes: These fabric tubes sit at the bottom of the sash or along the sill to block low, obvious air movement. They're useful when the draft is strongest near the floor, but they're only surface barriers, not seals.
- Thermal curtains: Heavy curtains help slow heat loss at the glass and reduce the sensation of a cold window. They work best on nights when the temperature drops hard, but they can't fix a frame gap or failed seal.
- Window insulation film: Clear plastic film adds a thin air barrier over the interior side of the glass. It's a solid seasonal option when you need a cleaner look than taped plastic and want a more noticeable short-term buffer.
- Rope caulk: This putty-like material can be pressed into small, non-permanent gaps and removed later. It's handy for renters or anyone who doesn't want a long cure process, but it shouldn't be treated as a permanent repair.
Use temporary fixes with the right expectation
These methods work because they slow air movement, not because they restore the window system. A draft snake stops the cold blast at the sill. Curtains shield the room from a chilly pane. Film reduces the direct exchange at the glass.
They're also safer when you're still figuring out the leak path. If you're not sure whether the problem is at the sash, the trim, or the rough opening, temporary barriers let you stay comfortable without committing to a fix you may need to undo later. If the draft is still obvious after these stopgaps, the window needs a real sealing job, or it may be past the point where repair makes sense.
A Homeowner's Guide to Sealing Window Drafts Permanently
Permanent sealing works only when you treat moving parts and fixed parts differently. That's the central mistake homeowners make. Weatherstripping belongs on parts that open and close, while caulk belongs on joints that should stay still.
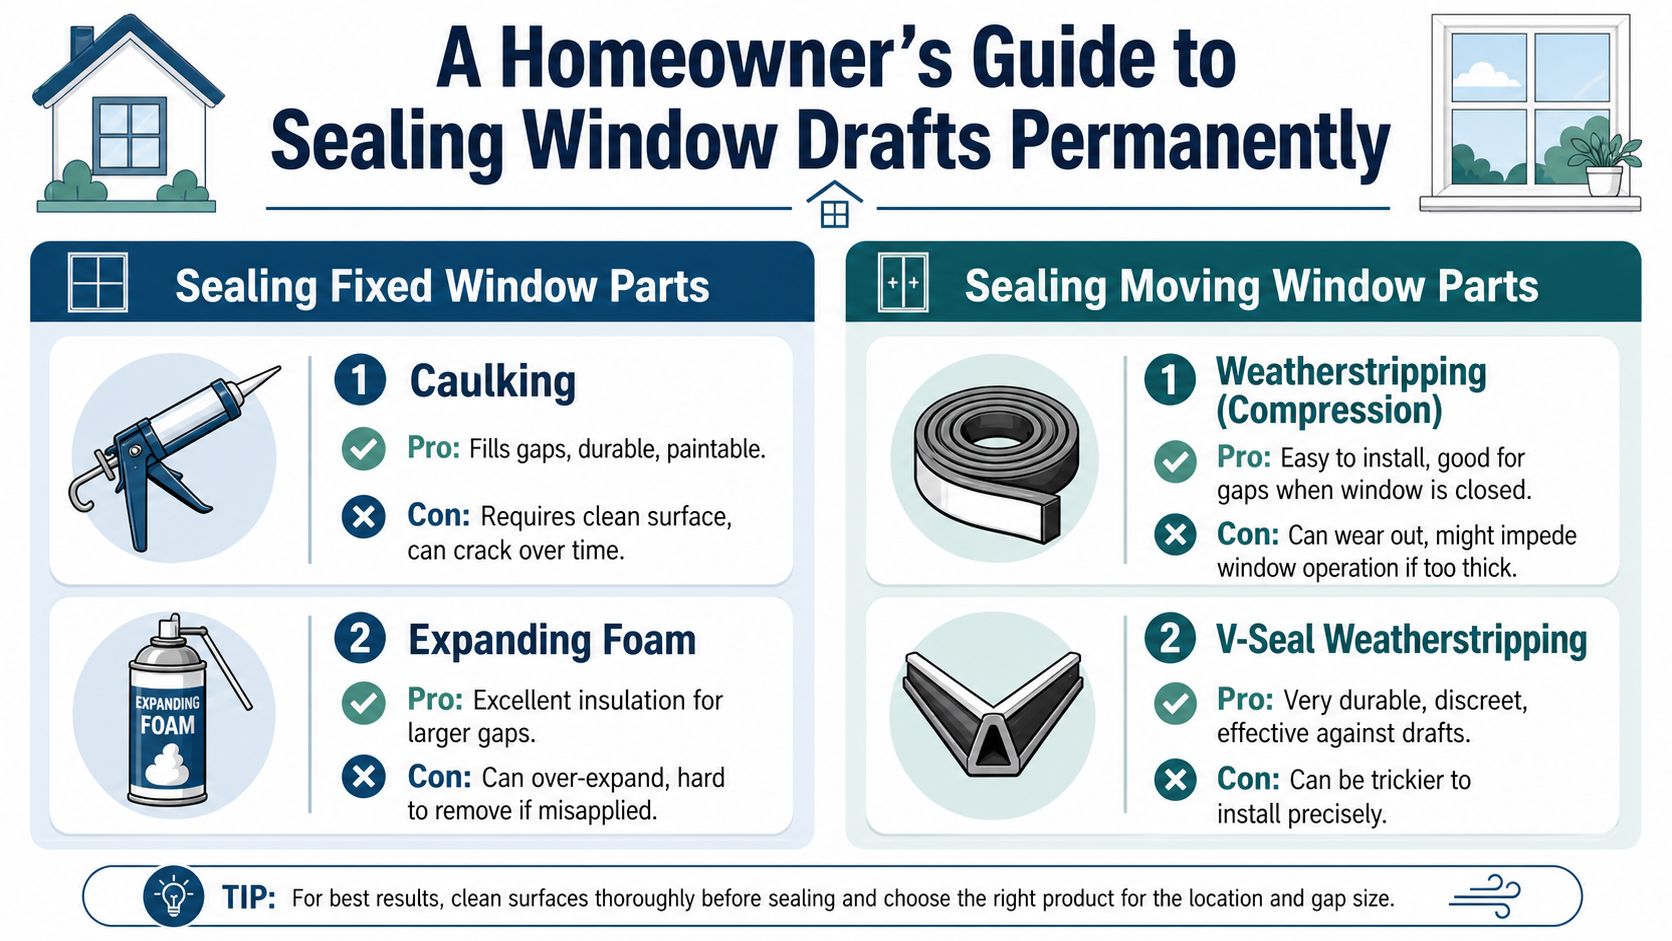
For a technical reference on how performance metrics relate to window sealing and thermal behavior, see this U-factor versus R-value guide.
Seal the moving parts with weatherstripping
The sash-to-frame interface is where weatherstripping earns its keep. Adhesive foam, compression strips, or similar products create a cushion that closes the gap when the window is shut, but still allows it to open. On double-hung units, the top of the upper sash, the bottom of the lower sash, and the meeting rail are the places that matter most.
Preparation matters as much as product choice. Remove old, flattened material, clear debris, and wipe the channel with rubbing alcohol so the new strip bonds well. Measure the space carefully before installing anything, because a strip that's too thick can stop the latch from closing and leave you with a new problem instead of a fix.
A good seal should disappear into the operation of the window. If you have to force the sash, the weatherstripping is too aggressive or installed in the wrong place.
Seal the fixed joints with caulk
Caulk belongs at the jamb, casing, and frame-to-wall joint, where no movement is expected. That's the right material for stationary cracks because it stays in place and blocks air without needing the joint to flex. As a practical rule, caulking is for small, fixed cracks, not gaps that move or open and close with the sash.
Clean the surface first, remove the old bead, and make sure the area is dry before you apply anything. A neat bead over a dirty seam won't last, and the failure usually starts exactly where the old material was left behind. When those prep steps are done right, the seal lasts longer and the window stops leaking at the points that matter.
Properly applied adhesive foam weatherstripping plus silicone caulk can reduce drafts by 50–70% in minor-leak cases according to this homeowner guide. That result depends on matching the material to the part of the window, not on using more product.
Advanced Fixes and Common Sealing Mistakes to Avoid
A lot of draft problems are bigger than a thin crack, and that's where simple caulk lines start to fail. The worst mistakes are also the easiest to make, especially when someone tries to “seal everything” and accidentally blocks the parts the window needs to function.
Don't trap moisture while chasing air leaks
Weep holes must stay open. Those drainage paths let the window shed water, and if you seal them shut, moisture gets trapped where it shouldn't be. The same warning applies to moving sash components, because overapplying caulk or foam there can lock parts in place and create a different kind of failure.
If a window is drafty and old, airtightness isn't the only concern. Moisture pathways and ventilation still matter, especially when the frame is already tired or warped. Sealing the wrong spot can quiet the draft for a while and still leave you with hidden moisture, rot, or a window that doesn't operate cleanly.
Use fill material when the gap is too deep
For cracks less than 1/4 inch on non-movable parts, caulk is the right finish. For larger openings, a fill material such as backer rod should go in first so the seal has something stable behind it. That extra step helps the caulk hold shape and resist failure instead of shrinking into a hollow gap.
Low-expansion spray foam can help around the rough opening where the window meets the framing, but it belongs outside the moving assembly. Use it carefully, because too much foam can distort the area you're trying to protect. If the opening is large enough that you're reaching for foam without a clear plan, the better move may be to evaluate whether the window needs more than a repair.
The bottom line is simple. If the gap is fixed and shallow, seal it. If the gap is deeper, fill it first. If the joint moves, don't caulk it shut.
When DIY Is Not Enough The Case for Window Replacement
Sometimes a window keeps fighting back no matter how carefully you seal it. You can weatherstrip, caulk, and recheck every corner, and the draft still comes back because the window itself is no longer doing its job.

If you're comparing repair and replacement options, this vinyl replacement window installation guide is a useful place to understand what a full-window solution involves.
Watch for signs the window has reached the end of repair
Persistent drafts after multiple fixes are the clearest clue. So are visible signs of deterioration, like rot, warped frames, or fog between panes that suggests a failed seal. If the sash is hard to open or close, the fit is no longer reliable, and that makes it difficult for any seal to work the way it should.
The deeper issue is that modern energy efficiency depends on airtightness plus moisture management. As noted by Sense, sealing an older, failing window can sometimes trap moisture, while a modern replacement is engineered as a complete system to handle air leakage and moisture correctly. That difference matters more than most homeowners realize.
Replacement solves the system, not just the symptom
A replacement window isn't just a new pane. It resets the frame, the seals, the operation, and the moisture control strategy at the same time. That's why it makes sense when the window is warped, tired, or no longer closing tightly even after careful repair.
For homeowners who want a longer-term fix, that system-level approach is the cleanest answer to recurring drafts. The window stops being a patchwork of aging parts and becomes a single unit designed to stay tight and work correctly.
Your Action Plan for Draft-Free Windows
Start with the leak test, not the shopping list. Once you know where the air is coming from, use the right material in the right place, weatherstripping for moving parts, caulk for fixed joints, and temporary barriers only when you need immediate comfort.
If the window still leaks after proper sealing, or if you're dealing with warped frames, failed seals, or stubborn moisture issues, replacement is the better long-term move. A full installation avoids the cycle of repeated patching and gives the home a more durable solution.
For homeowners who want help beyond DIY, professional window installation services are the next step when the frame itself is no longer worth saving. That's the point where smart repair ends and lasting comfort begins.
If you're ready to stop chasing the same draft every season, Breaking Glass Co. can help you evaluate whether your windows need a careful repair or a full replacement. Visit Breaking Glass Co. to explore window installation and replacement options built for a better seal, better comfort, and less guesswork.