
A glass door can look perfect on installation day and still become a source of leaks, sticking panels, and damaged trim after a Texas summer. The usual culprit isn't the glass itself. It's a rough opening that was never square, a sill that doesn't drain outward, a fastener pulling the frame out of alignment, or a sealant joint that was treated as cosmetic work.
Good glass door installation starts before the unit arrives. Heat, intense sun, wind-driven rain, humidity, and movement in the surrounding structure all expose weak preparation. The practical standard is simple: verify the opening, support the frame, control water, confirm safety glazing, then adjust the hardware after the assembly has settled into its final position.
Table of Contents
- Site Preparation and Precision Measurement
- Framing and Rough Opening Verification
- Setting the Frame and Securing the Assembly
- Weatherproofing and Moisture Management
- Safety Glazing and Building Code Compliance
- Hardware Adjustment and Energy Performance
Site Preparation and Precision Measurement
Texas heat changes the working conditions before the first fastener goes in. Dark materials absorb heat, exposed framing can move during the day, and a remodel may reveal substrates that aren't as solid as the finished wall suggested. Clear the work area completely, protect flooring and nearby finishes, and make sure the crew has a safe path for carrying the frame and glass without twisting the assembly.
Large glass units aren't a one-person lift. Use rated glass suction cups, padded supports, a stable work platform, a laser level, a long spirit level, a framing square, feeler gauges, and quality tapes. Keep the glass upright on approved edge protection. Never lean a heavy panel directly against an unprotected corner or leave it where another trade can strike it.
Practical rule: If the crew can't stage the glass safely, the opening isn't ready for installation.
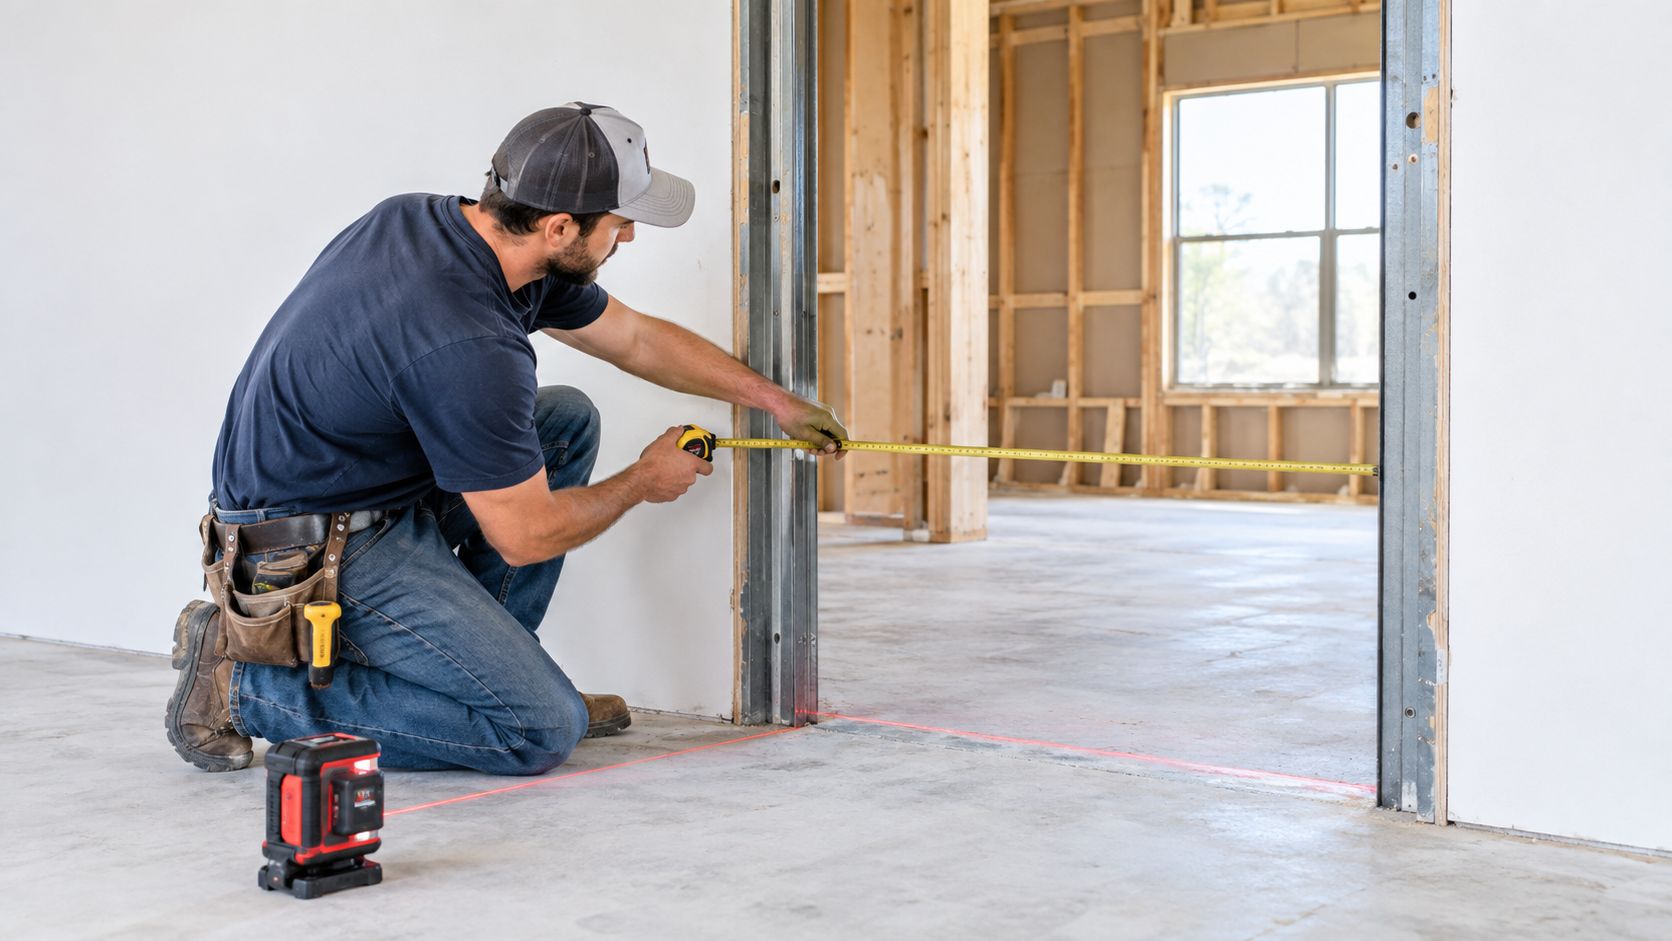
Measure the opening, not the old door
Take field measurements at multiple points rather than trusting the existing unit or one tape reading. Measure width near the sill, at the center, and at the head. Measure height at both jambs and through the center. Record the diagonals, check the sill for level, and use a laser or long level to identify bowing in the jambs and header.
Those readings tell you whether the opening is consistent enough for the selected door. A sliding panel needs a reliable track plane. A swinging or pivot door needs stable hinge or pivot backing. If the opening narrows at one height, the installer may need framing correction before the door is ordered, not improvised shims after the glass arrives.
Check the floor transition carefully. Tile, stone, concrete, and finished wood can have different elevations, and a small ridge at the threshold can affect drainage and operation. In a remodel, inspect for hidden rot, soft framing, old fastener holes, and previous water damage before final measurements are approved.
Prepare for the surrounding work
Remove trim only as far as necessary to expose the actual substrate. Confirm where structural studs, blocking, masonry, or reinforced backing will accept anchors. Protect vapor retarders and air or water barriers during demolition, because a damaged barrier can create a moisture path behind an otherwise well-sealed door.
For homeowners comparing the broader cost of outdoor glass projects, a resource such as this guide to the cost of glass pool fencing can help separate glass product pricing from the labor, site preparation, and structural requirements that support it. The same principle applies here. The visible glass is only one part of the installed system.
Don't finalize the order until the opening, handing, sill condition, panel clearance, and hardware locations have been documented. Accurate field work prevents return trips, and it keeps the installer from forcing a precision product into an imprecise structure.
Framing and Rough Opening Verification
The rough opening is the load path for the entire door. If the framing twists, the frame follows it. If the sill slopes the wrong way, water stays at the threshold. If anchors land in weak material, the assembly may operate at first and then loosen as wind, use, and thermal movement work on the connection.
Professional verification begins with the substrate. Inspect studs, headers, sill members, masonry, blocking, and existing fastener locations. Look for rot, cracks, crushed wood, loose masonry, and gaps between the finish materials and structural backing. A large glass unit shouldn't be anchored to trim, thin sheathing, or a floating finish layer.
The opening must be plumb, level, square, and true before the frame is set. The supplied project guidance identifies approximately 1/8 inch as an important tolerance for opening accuracy, while the required infographic uses equal diagonals within 1/4 inch as its field check. Treat those figures as verification limits, not as permission to force the frame into a bad opening. Product instructions and the governing project specification still control.
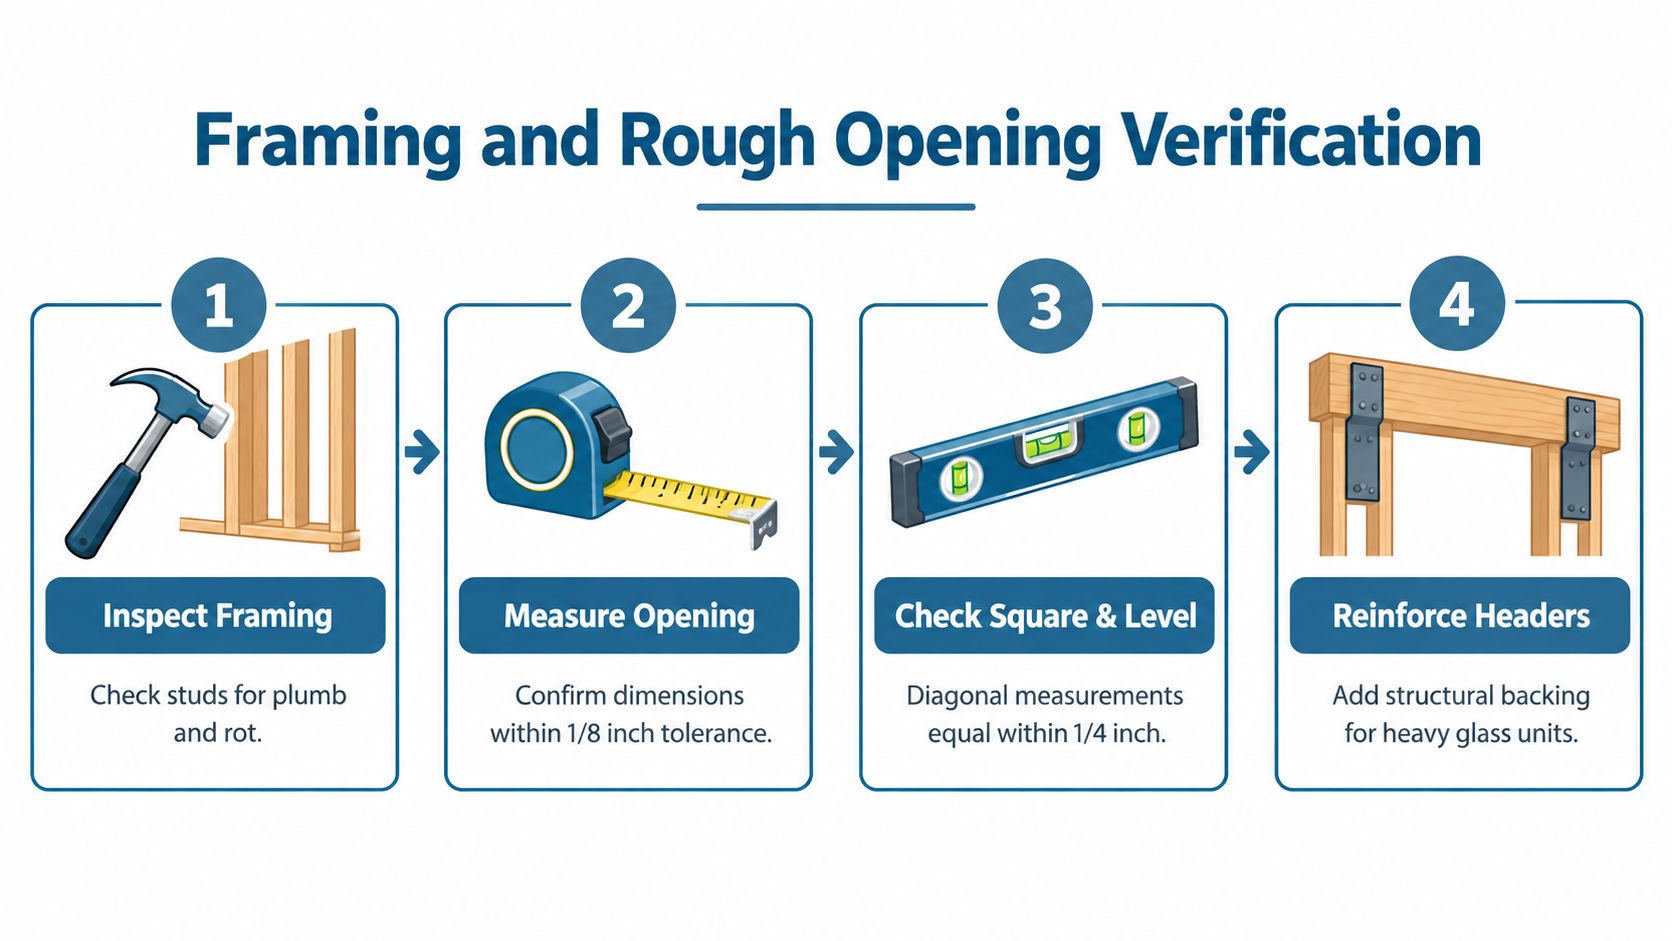
Find the failure before the door does
Measure both diagonals. If they differ, the opening isn't square. Check each jamb with a level or laser, then check the head across its full span. A level sill that isn't supported continuously can flex under traffic, while a sill that slopes toward the interior can direct water into the wall instead of away from it.
Shims correct alignment only when they transfer load to solid backing. They shouldn't float in an unsupported cavity or compress insulation into a soft point. Place durable, noncompressible shims at prescribed anchor and hardware locations, then verify that the frame remains straight as fasteners are tightened.
Confirm barriers and structural support
Before setting the unit, identify the air barrier, water-resistive barrier, vapor retarder, sill pan location, and flashing sequence. The opening must allow water that gets past the exterior seal to drain outward. An installation guide specifically connects air and water resistance to proper flashing and a sill pan before the unit enters the opening, as described in the manufacturer-style installation guidance for sliding aluminum-framed glass doors.
For a replacement project, don't assume the old frame proved the opening was adequate. Old doors often hide compressed shims, discontinuous sealant, and wet framing. Correct those conditions before measuring the replacement.
This short installation video can help junior builders visualize the relationship between the opening and the frame. It shouldn't replace the door manufacturer's instructions or the project engineer's requirements.
The frame should have firm backing at hinges, pivots, locks, rollers, and major anchor points. For a useful reference when coordinating the surrounding entrance assembly, review this guide to door entrance frames. The important question isn't whether the opening looks clean. It's whether every load and every water path has a deliberate destination.
Setting the Frame and Securing the Assembly
Once the opening passes inspection, dry-fit the frame before lifting the glass. Confirm orientation, threshold height, drainage paths, hardware clearance, and the position of every anchor. A dry fit catches conflicts while the assembly is still manageable. It also lets the installer confirm that the sill pan and perimeter flashing won't be blocked by the frame.
Bed the sill member on the specified sealant or gasket, maintaining a continuous contact line without plugging designed drainage paths. A gap under the sill is not a harmless cosmetic defect. It can allow movement, interrupt the seal, and create a direct route for water into the wall.
Keep the frame straight while anchoring
Set the frame level, plumb, square, and true. Use shims where the manufacturer permits them, and tighten anchors gradually rather than driving one fastener fully home and pulling the frame out of shape. Recheck the jambs and head after each group of fasteners.
Fastener selection depends on the substrate. Wood framing may require corrosion-resistant screws of the specified length. Masonry requires anchors compatible with the concrete or block, with edge distances and embedment determined by the system. Metal framing may need designed backing rather than a screw into thin gauge material. Never substitute a convenient fastener for the specified connection.
Anchor spacing and locations should follow the product documentation and structural requirements. The purpose is to keep wind and operating loads distributed through the frame, not concentrated at a few points. Over-tightening can distort aluminum members and make a sliding panel bind.
Field observation: A frame can be firmly attached and still be wrong. If the jamb bows between anchors, the glass and seals will reveal that error every time the door operates.
Manage movement and material contact
Texas heat creates repeated expansion and contraction in exposed assemblies. Leave the required movement space and avoid locking dissimilar metals tightly together where moisture can remain trapped. Isolate materials when the specification calls for separation, especially where aluminum, steel, treated wood, masonry, and wet sealants meet.
Use suction cups and padded supports for glass handling, and keep the panel protected while the frame is being secured. Don't hang or adjust a heavy panel against an unfinished frame. The glass perimeter needs consistent contact with the setting blocks, gaskets, and stops intended by the door system.
A clear exterior door installation diagram can help a junior builder understand how sill, jamb, head, fasteners, and sealant interact. The diagram is useful because the frame isn't an isolated component. Every adjustment affects the next layer.
After anchoring, check uniform clearances around the glazing perimeter. Operate the panels before final trim is installed. A door that drags, rubs, or refuses to latch is giving you a correction opportunity. Don't hide the symptom with extra force at the handle.
Weatherproofing and Moisture Management
A high-quality glass door can fail in a wet Texas exposure if the opening can't drain. Water management determines whether a minor breach dries harmlessly or saturates the wall. The sill pan, flashing, sealant, backer rod, weeps, and exterior joint must work as one system.
Start at the bottom and build outward. Install the sill pan or sill flashing so it slopes toward the exterior and connects to the surrounding water-resistive barrier. End dams or compatible transitions should keep water from escaping into the jambs. The exact sequence varies by wall assembly, but the principle doesn't: water must have a continuous path out.

Build a drainage plane
Don't rely on a bead of caulk across the bottom to perform the job of a sill pan. Sealant can supplement flashing, but it shouldn't create a basin that traps water inside the wall. Keep designed weep paths open, and don't cover drainage slots with trim, foam, or an over-applied exterior bead.
At the jambs and head, integrate flexible flashing with the existing barrier. Press it firmly into corners and transitions without puncturing it unnecessarily. If the door is in masonry, use compatible materials and allow the joint to accommodate movement rather than bonding rigid surfaces that expand differently.
The glass door installation guidance highlights the practical importance of a plumb, square opening, sill pan, backer rod, and sealant integration. Those details matter more than a neat-looking exterior bead because they control the water path behind the finish.
Seal the joint without trapping failure
Use backer rod where the joint depth requires it, then apply a compatible sealant with the correct geometry and adhesion conditions. The backer rod controls sealant depth and helps prevent three-sided adhesion. Clean, dry surfaces matter. Dust, release agents, damp substrates, and incompatible primers can undermine an otherwise expensive sealant.
At the perimeter, inspect for gaps, skips, bubbles, and areas where the sealant pulled away from the frame. The heavy-glass guidance from the National Glass Association heavy glass door design manual emphasizes perimeter contact and the need to address gaps or openings during field glazing and weatherproofing.
Water test rule: Don't test only the center of the door. Test corners, sill transitions, jamb joints, and the interface between flashing and frame.
Texas storms expose discontinuities at corners first. If water enters, document the path before adding more caulk. More sealant over a blocked weep or failed transition usually conceals the problem and makes the next repair harder.
Safety Glazing and Building Code Compliance
Not all glass belongs in a door. Clear appearance doesn't tell you whether a pane meets human-impact requirements, and thickness alone doesn't prove compliance. The installed glazing must match the door's location, use, safety class, and approved system.
The regulatory history is long. The first national impact-resistant safety-glazing standard, ANSI Z97.1, was accepted in 1966, after studies found an average of 320,000 injuries per year from people impacting glass in doors and windows, according to the American Society of Home Inspectors overview of safety glazing. The Consumer Product Safety Commission's federal impact standard, 16 CFR Part 1201, has been in force since 1977, and industry guidance says new glazing in doors with glass openings greater than 3 inches must comply with the applicable safety requirements.
Tempered and laminated glass serve different purposes
Fully tempered glass is heat-treated for impact resistance and, when it breaks, is designed to fracture into smaller pieces. Laminated glass uses an interlayer that holds the broken glass together. The correct choice depends on the door system, location, impact exposure, retention needs, and local code requirements.
For heavy glass doors, the supplied commercial specification calls for fully tempered or fully tempered laminated glass meeting ANSI Z97.1 unlimited class and CPSC 16 CFR 1201 Category II requirements. Monolithic fully tempered glass must also comply with ASTM C1036 and ASTM C1048. One commercial specification sets a minimum glass thickness of 6 mm, or 1/4 inch, for sliding glass door glazing, tying thickness to structural and wind-load performance rather than appearance alone.
| Standard / Code | Requirement Details | Application |
|---|---|---|
| ANSI Z97.1 | Impact-resistant safety glazing classification, including unlimited class where specified | Heavy glass doors and other hazardous locations |
| CPSC 16 CFR Part 1201 | Federal impact standard for architectural glazing, including Category II where specified | Door glazing subject to human-impact requirements |
| ASTM C1036 | Requirements for flat glass | Monolithic glass product compliance |
| ASTM C1048 | Requirements for heat-treated flat glass | Fully tempered or heat-strengthened glass |
| Local building code | Location-specific safety-glazing rules and inspection requirements | Residential, commercial, and mixed-use projects |
Before installation, request the glass stamp, product data, test reports, and manufacturer approval for the exact door configuration. The FGIA frequently asked questions on safety glazing is a useful starting point for understanding why doors and new installations receive special attention.
Homeowners comparing styles can also review examples of top patio doors in Fresno, but a product comparison should never replace verification of the selected glass and the local code path. For projects exposed to severe weather or high traffic, the distinction between ordinary decorative glass and impact-resistant glass should be settled before fabrication.
Hardware Adjustment and Energy Performance
The door isn't finished when the glass is hanging. Rollers, pivots, hinges, locks, gaskets, and meeting stiles need adjustment after the frame is anchored and the panels are operating under their actual loads. Check that sliding panels move without dragging, swinging leaves close without rebound, and locks engage without lifting or forcing the handle.
Inspect weather seals while the door is closed. The gasket should contact continuously without being crushed in one spot and open in another. A latch that needs excessive force may indicate frame distortion, hinge misalignment, or a seal that isn't seated correctly.
Pivot systems deserve special care because small alignment errors transfer directly into the floor and head hardware. Use this resource on how to avoid pivot hinge mistakes when reviewing pivot locations, backing, clearances, and adjustment procedures.
Check performance, not just movement
Energy performance depends on the installed assembly, not only the product label. ENERGY STAR residential door criteria use glazing-level ratings from the National Fenestration Rating Council. The EPA analysis found that doors had a 71% qualifying market share, with 83% of full-lite doors and 97% of half-lite doors able to meet an SHGC threshold of 0.25 or less, as reported in the ENERGY STAR criteria analysis.
The same federal specifications set air-leakage limits of 0.3 cfm/ft² for sliding doors and 0.5 cfm/ft² for swinging doors, using the cited ENERGY STAR analysis as the source. Natural Resources Canada says certified doors are about 15% more efficient, and that windows, doors, and skylights can account for up to 25% of a home's energy loss, as included in that analysis.
These targets are easy to undermine with a distorted frame or incomplete seal. Review the NFRC ratings, glass configuration, SHGC, U-factor, air-leakage data, and installation requirements together. If the unit is supplied for a hot, sunny Texas exposure, confirm that the specified glazing supports comfort without creating an unnecessary solar-heat burden.
Before sign-off, photograph the flashing and sill before trim covers them, record the glass identification, test operation, inspect perimeter seals, and provide the homeowner with care and warranty documents. For Texas builders who need coordinated product supply and installation, Breaking Glass Co. supplies residential and commercial doors, including sliding glass doors, with Texas installation support and nationwide product shipping.
Breaking Glass Co. can help with measurement, product selection, residential or commercial glass door installation, and warranty coordination for Texas projects. Visit Breaking Glass Co. to request a quote and discuss an opening that needs careful structural and moisture planning.