
You can stand in a hallway, tug on a sticky door, and feel the whole problem at the frame. The slab gets blamed first, but the true trouble is often the door entrance frame, the part that holds alignment, seal, hardware, and weather protection together so the opening works day after day.
If you're a homeowner, builder, or remodeler, that's the shift worth making. A frame isn't just trim around a door, it's the system that carries load, controls gaps, and gives hinges and locks something solid to bite into. Once you start looking at it that way, size, material, and installation details stop feeling like guesswork and start looking like coordination.
Table of Contents
- What a Door Entrance Frame Does
- Parts of a Door Entrance Frame Named Clearly
- Frame Materials Compared for Real-World Projects
- Standard Door Entrance Frame Sizes at a Glance
- Terminology Builders and Installers Use on Site
- Commercial Frame Specifications That Matter
- Installing a Door Entrance Frame the Right Way
- Troubleshooting Non-Orthogonal Openings and Uneven Gaps
- Matching the Frame to Performance and Warranty Goals
- Quick Reference Checklist for Door Entrance Frame Projects
What a Door Entrance Frame Does
The first sign the frame is doing poor work shows up at the door edge. The slab may look straight, but the gap reads uneven, the latch rubs, or the seal never meets the stop evenly. At that point, the frame is no longer background carpentry. It is the part deciding whether the entrance performs or frustrates everyone using it.
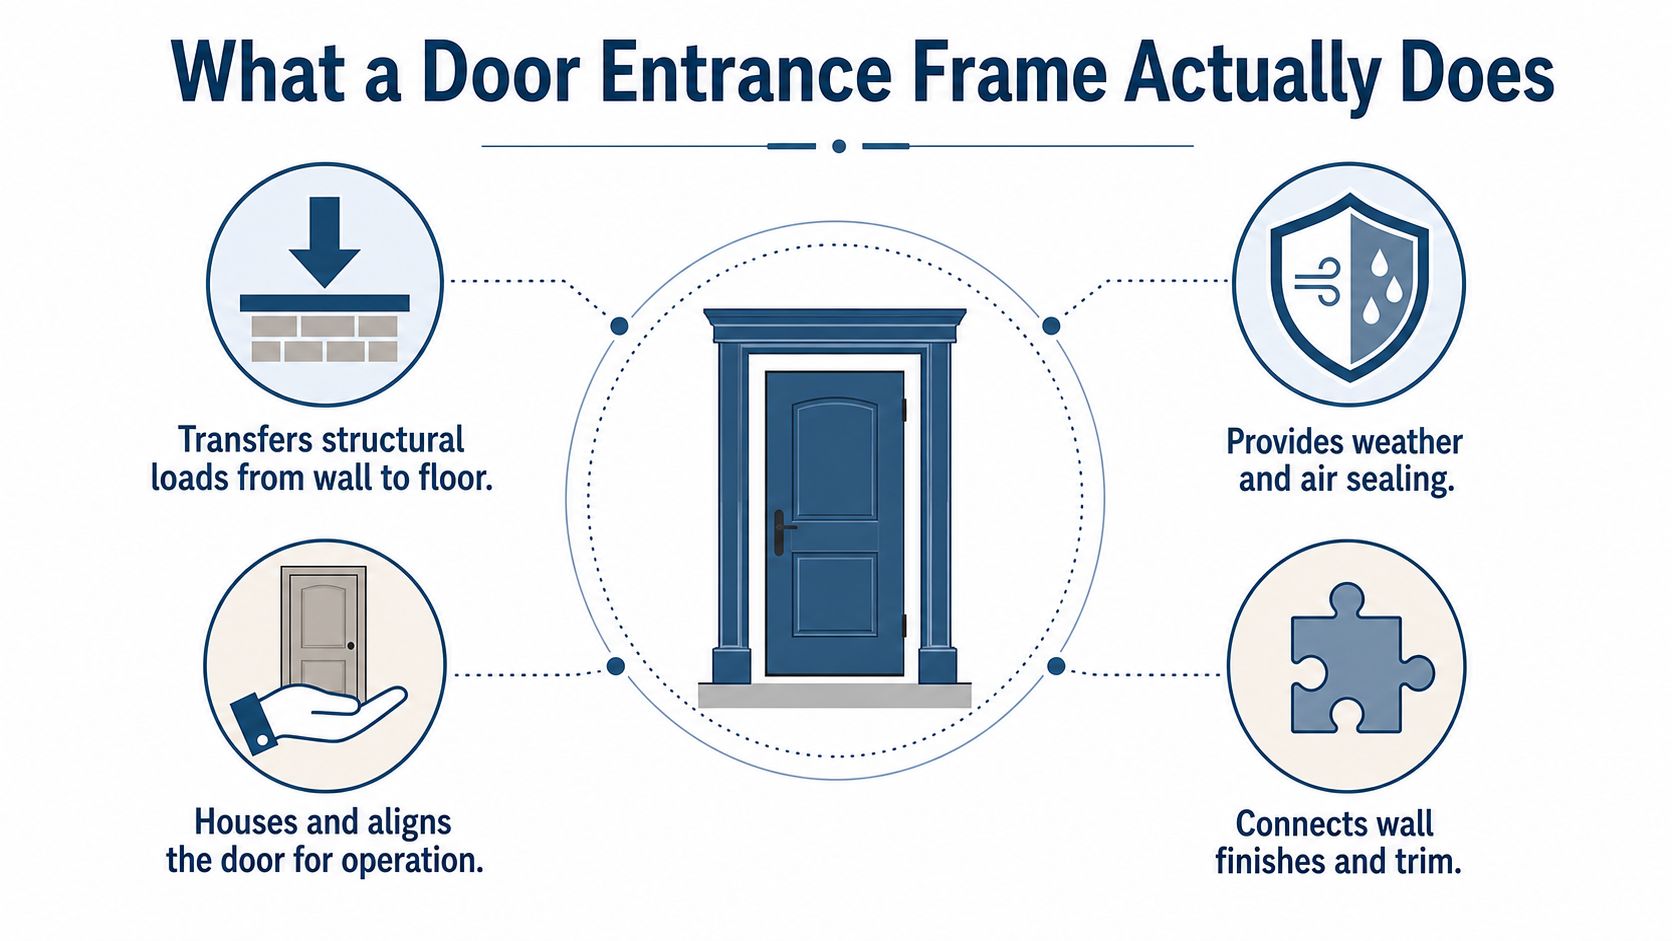
A door entrance frame handles four jobs at the same time. It carries the door's weight into the surrounding wall, keeps the slab aligned so it can swing and latch, provides the surfaces for seals and thresholds, and ties the opening back into the finish trim so the assembly reads as one built unit. If one of those jobs slips, the others start to suffer too.
A frame works as a system
A good frame is not a few boards around an opening. It includes the hinge side, latch side, head, threshold, anchors, seals, and trim, all set to work together. Installation quality matters just as much as the material, because a premium frame still fails if it is out of plumb, racked, or anchored badly.
Practical rule: if the door binds, leaks, or will not latch smoothly, inspect the frame first before you blame the slab.
The frame also affects energy performance. Independent sources note that doors account for about 11% of heat loss in a typical home, so the frame-and-seal interface affects comfort and utility costs as well as appearance (Octopus Doors door facts). A loose fit, weak seal line, or poor threshold detail can undo a lot of effort elsewhere in the build.
The rest of the article breaks that system into usable parts. The glossary names the components in builder language, the size table gives you a quick check on an opening, and the troubleshooting section deals with uneven openings and clearance problems that homeowner guides usually skip. Once you read the frame as a coordinated assembly, the whole job becomes easier to judge.
Parts of a Door Entrance Frame Named Clearly
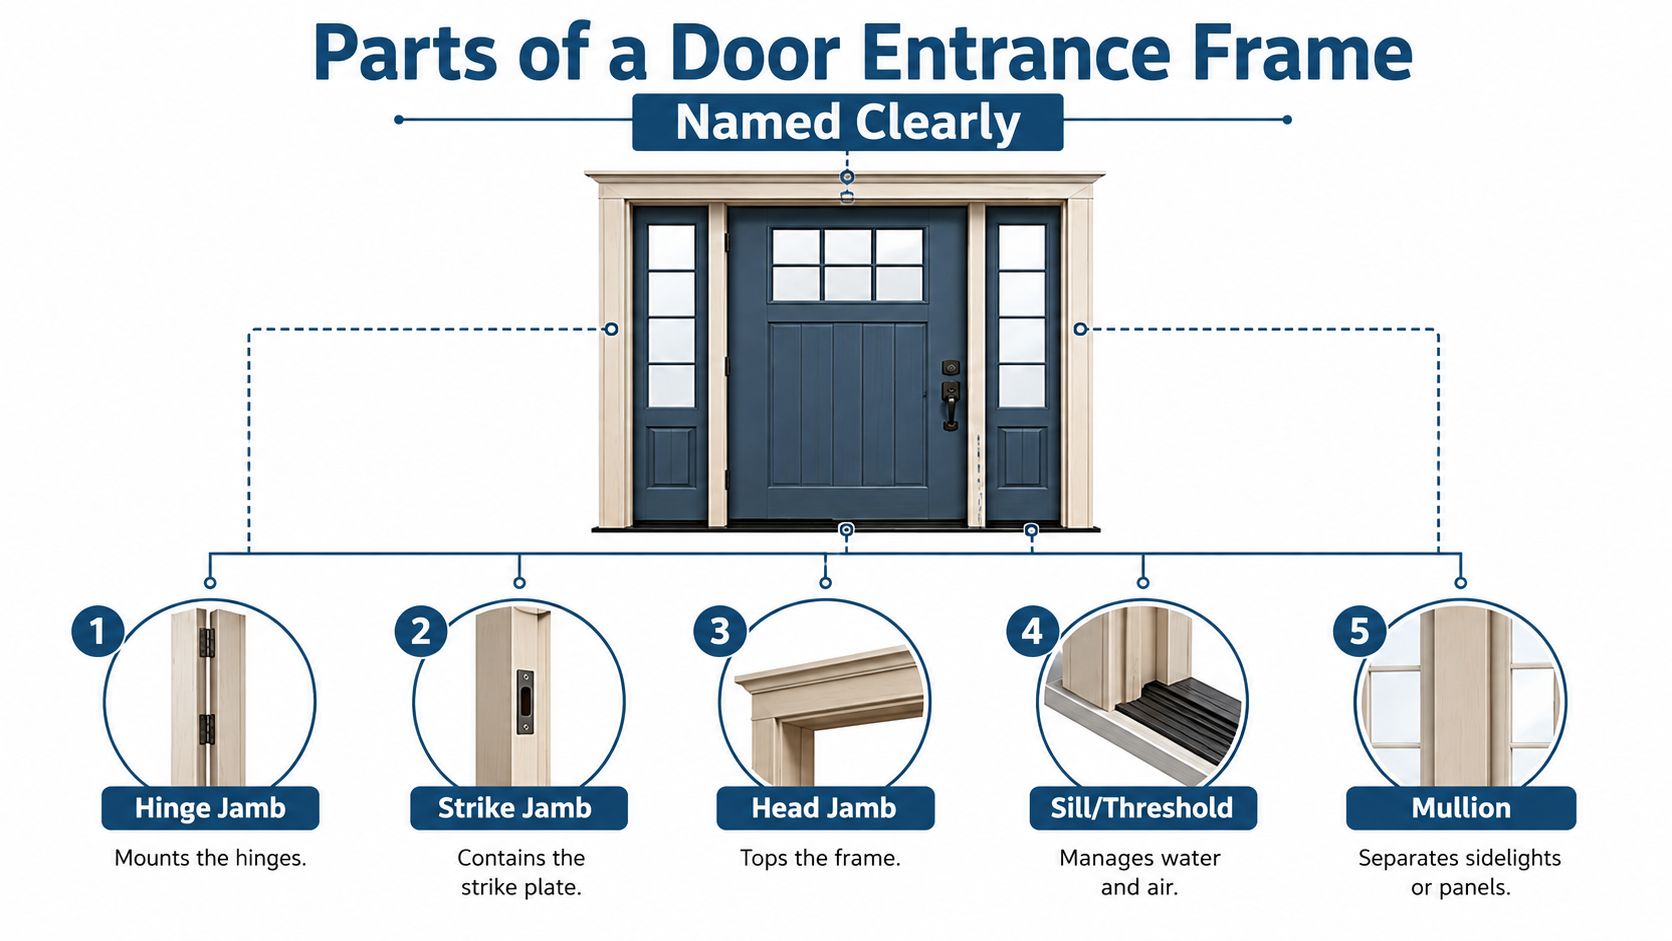
Start on the hinge side. The hinge jamb is the vertical member that carries the hinges, so it takes the repeated force of opening and closing. If that side is soft, out of square, or poorly anchored, the whole door feels loose.
On the lock side, the strike jamb is where the latch meets the frame. That's the piece that has to line up with the strike plate, or the door will slap, scrape, or refuse to latch without a shove. The head jamb spans across the top and keeps the opening tied together, while the threshold or sill forms the bottom interface that helps manage air and water at the floor line.
The pieces you'll hear called out on site
- Hinge jamb: The side that carries hinge hardware and load.
- Strike jamb: The side that receives the latch and strike plate.
- Head jamb: The top horizontal member that closes the opening.
- Threshold or sill: The bottom member that handles the floor transition.
- Mullion: The divider used when sidelights or paired openings are built into one assembly.
- Trim or casing: The finish piece that hides the rough wall-to-frame joint.
The wall interface matters just as much as the visible pieces. That's where the frame gets anchored, sealed, and sometimes shimmed, so it's also where air leakage and alignment problems tend to start. The floor interface matters for the same reason, especially where slab slope or a recessed sill changes how the frame seats.
Field note: when a door has mystery gaps, don't just stare at the slab. Check the hinge jamb, the strike jamb, and the floor line together.
Once you can name the parts, shop drawings stop feeling cryptic. You can read a quote, point to the right member, and explain what needs to be adjusted instead of using vague language that leaves everyone guessing.
Frame Materials Compared for Real-World Projects

Wood still has a place, especially in custom work and historic homes. It's easy to shape, easy to match, and familiar to finish carpenters. The trade-off is maintenance, because wood needs attention at the paint or stain layer and can be less forgiving where moisture or sun exposure is tough.
Steel is the workhorse for many commercial entrances. It's strong, familiar to specifiers, and well suited to abuse-prone openings, but it can dent and it needs the right finish and detailing to perform well over time. Fiberglass has become a strong option for residential entry systems because it handles moisture well and supports lower-maintenance finishes, which is why it fits many Texas and Southwest projects.
Material choice depends on the opening, not just the look
Aluminum shows up often in modern and commercial-style entrances. It's lightweight, corrosion-resistant, and pairs well with slim profiles, but thermal behavior depends heavily on whether the system uses a thermal break. Composite and hybrid frames try to combine the advantages of multiple materials, though they can bring a higher upfront cost and more system-specific detailing.
| Material | Best use case | Strengths | Trade-offs |
|---|---|---|---|
| Wood | Custom and historic projects | Easy to modify, traditional look | More finish maintenance |
| Steel | Commercial and high-traffic openings | Strong, durable, familiar spec system | Can dent, needs proper detailing |
| Fiberglass | Residential entry doors | Moisture resistance, low maintenance | System quality varies by product |
| Aluminum | Modern and commercial-style openings | Lightweight, corrosion-resistant | Thermal performance depends on design |
| Composite or hybrid | Mixed-performance projects | Balances multiple material traits | Often higher cost |
A useful way to think about it is this, choose the frame material that fits climate, use, and maintenance expectations, not just what looks good in the brochure. The best frame for a shaded interior doorway is rarely the same frame you'd pick for a sun-baked exterior entry with heavy traffic.
Standard Door Entrance Frame Sizes at a Glance
The fastest way to avoid a bad order is to separate three numbers in your head, the rough opening, the frame size, and the door slab size. People mix these up all the time. The rough opening is the framed hole in the wall, the frame size is the unit that gets installed, and the slab is the moving door itself.
A practical check point is standardization. Timely notes that modern framing systems evolved alongside industrialized steel-frame production, while standard interior sizes became increasingly common in the 20th century, and Wikipedia lists the most common interior door size as 860 mm × 1,985 mm, about 33.9 in × 78.1 in (Timely history). That kind of standard sizing is why installers can work from repeatable details instead of re-engineering every opening.
| Use | Unit Size (in) | Rough Opening (in) | Common Heights | Notes |
|---|---|---|---|---|
| Interior single | 30, 32, 34, 36 width range, project-specific | Typically larger than unit size to allow shimming | 6'8" is common | Most common residential interior opening style |
| Exterior single | Common residential single-door widths vary by project | Typically larger than unit size to allow installation tolerance | 6'8" and 8'0" are common | Exterior frames usually need more attention at the sill |
| Commercial single | Project-specific | Set by schedule and hardware package | 7'0", 8'0", and taller custom heights appear often | Driven by hardware, accessibility, and code |
| Double door pair | Two matching leaves | Wider rough opening than a single | 6'8", 8'0", and custom heights | Often includes a center mullion or meeting stile |
| Single with sidelight | Varies by door plus sidelight width | Wider overall rough opening | Height matches door head and sidelight layout | Frame footprint expands with the sidelight unit |
| Door with transom | Varies by door and transom layout | Taller overall rough opening | Higher than a plain single opening | The head condition becomes part of the visual design |
How the numbers stack up
A quote sheet can look simple until you realize the installer needs room for shims, plumb correction, and fastening. That's why an opening that looks “close enough” from the hallway can still be wrong once the frame is in hand. Standard sizes help, but they don't replace measurement.
If a frame package includes sidelights or a transom, the size conversation changes again. The whole assembly footprint grows, and the rough opening has to match the combined unit, not just the door leaf. That's where people get surprised, because a beautiful layout on paper can become a custom opening in the field.
Terminology Builders and Installers Use on Site
A jobsite conversation about a door entrance frame can sound like shorthand at first, but each term points to a different part of the assembly. RO means rough opening, the framed hole before the unit goes in. OW is opening width, OH is opening height, and those measurements tell you whether the frame will fit without forcing the wall apart or asking the crew to trim back the opening. HM usually means hollow metal, the common steel-frame shorthand in commercial work.
You'll also hear FHR, or frame hinge reinforcement, when the spec calls for extra support on the hinge side. SDL means standard door lite, a term often used when glass or divided-light patterns are part of the design. Jamb depth is the thickness of the frame section that matches the wall. If that dimension is off, the trim and drywall details start fighting the frame instead of wrapping it cleanly.
Acronyms that affect approval, not just conversation
Some abbreviations point to performance and compliance, not just shop talk. ADA comes into play when clear opening and accessibility matter. NFPA 80 and NFPA 252 show up in fire-rated and tested assembly work, while ASTM E283 and U-value relate to air leakage and thermal performance, not just sales language. The Steelcraft technical manual is a useful place to check how those terms tie back to frame details.
When a spec uses an acronym, ask whether it changes the way the frame is built or only the way it's described.
That distinction saves time at the counter and during submittal review. A supplier can talk about finishes and sizes all day, but if you do not know whether the project calls for a fire reference, a thermal target, or a hardware reinforcement detail, you are not asking the right question yet. Learn the abbreviations once, and the paperwork gets a lot less slippery. For projects that include rated openings, a field guide from Breaking Glass Co. on fire doors can help connect the spec language to the assembly on site.
Commercial Frame Specifications That Matter
Commercial hollow-metal frames live or die by the details around them. One institutional specification calls for 16 ga minimum for interior hollow-metal frames and 14 ga minimum for exterior hollow-metal frames, with exterior hollow-metal doors at 16 ga minimum and mitered, welded corners for new construction (Ivy Tech spec). Those numbers matter because exterior exposure and abuse are not the same thing as an interior corridor.
The ANSI/SDI A250.8-2017 standard is the practical baseline for standard steel doors and frames, and related SDI documents cover frame details, gasketing, thresholds, existing wall anchors, and high-frequency hinge preparations. In plain language, the frame profile, anchor type, hinge reinforcement, and seal details need to be coordinated as one package.
What to look for in a submittal
- Gauge selection: Interior and exterior exposure need different thickness assumptions.
- Anchors: The wall type controls how the frame ties in.
- Hinge reinforcement: Heavy or frequent-use doors need the hardware side strengthened.
- Gasketing and threshold detail: Air and water control depend on these pieces as much as on the door leaf.
- Hazard category: Fire-rated, severe windstorm, and blast conditions call for different references and tests.
Independent performance specs often describe frame systems with air infiltration limited to 0.06 cfm/ft² of fixed area under ASTM E283, no leakage under ASTM E331, and thermal targets such as CRF ≥45 and U-value ≤0.65 Btu/(hr·ft²·°F) for thermal-break framing systems. Those benchmarks are useful because they tie the frame to comfort, condensation control, and HVAC load rather than vague claims about being “energy efficient.”
A rated opening asks for the same discipline. The frame, hardware, and door need to be reviewed together, and Breaking Glass Co.’s fire door information is a practical reference for connecting the spec language to the assembly on site. If a value-engineered submittal strips out reinforcement or changes the frame geometry, the rating path and the field performance can both fall apart.
Installing a Door Entrance Frame the Right Way
Start with the opening, not the frame. Verify rough opening size, floor-to-floor height, level, plumb, and sill recess before the unit comes out of the carton, because once the frame is unpacked you've committed to the geometry you've got. The installation guide for entrance frames makes it clear that opening size and floor coordination are part of the job, not a separate cleanup step (Entrance frame installation guide).
Set the frame in sequence
First, place the hinge jamb where it belongs and shim at the hinge points. That keeps the weight path stable and gives the door a fair shot at swinging without binding. Next, bring the strike jamb into alignment so the latch meets the strike plate cleanly, then check the head for square before you fasten everything permanently.
Insulation and trim come later. If you force them in too soon, you can hide a bad reveal and create a service call for yourself down the road. The frame should stay adjustable until the door swings, latches, and closes with a consistent gap.
Installer habit worth keeping: test the reveal before the finish work goes on. If you wait until trim day, you're usually fixing yesterday's mistake with today's labor.
Internal coordination matters here too. If you're selecting a finished entry package, Breaking Glass Co.’s entry door options are one example of how the frame, slab, and hardware have to match as a system rather than as loose parts. For painted fiberglass units, finish work belongs after the frame is set, not before, which is why this fiberglass entry door painting guide fits the sequence only after the installation is stable.
Troubleshooting Non-Orthogonal Openings and Uneven Gaps
A door opening that looks square at first glance can still be off in several small ways. One wall may kick out, the floor may fall away, or the head may carry a slight bend that changes the reveal from side to side. In the field, those small errors act together, and the frame has to follow the actual opening, not the drawing.
Start with the shape of the rough opening itself. If the top width and bottom width do not match, the jambs are not sitting in a true rectangle. A door can also read as faulty when the hinge side is sound but the strike side is drifting, or when the floor line tilts enough to change the bottom gap.
Read the opening before you chase the slab
- Measure the top and bottom widths separately. A difference there tells you the opening is out of square.
- Check the plumb on both jamb lines. If one side leans, the reveal will change even if the slab is true.
- Inspect each hinge mortise. A hinge that sits proud can push the door face out and throw off the gap pattern.
- Look closely at shim placement. Shims placed at the wrong points can twist the jamb instead of correcting it.
- Follow the floor and sill line. A slope, dip, or uneven threshold can look like a hinge problem when it is really a base-line problem.
- Test latch engagement with light pressure. If the latch only catches when the door is forced, the strike side needs attention.
Uneven gaps often come from a combination of these conditions rather than from one obvious mistake. That is why a quick swap of the slab rarely solves the problem. The frame, the opening, and the hardware have to be read together, like parts of one assembly that all pull on the same reveal.
Clearance questions can appear at the same time, especially where access rules apply. If the geometry of the opening changes the usable width or affects how the hardware works, a repair that fixes binding can also affect compliance. That matters in public spaces and in commercial entries, where the frame is part of the full entrance package, including the door entrance system options from Breaking Glass Co..
Irregular openings call for measurements before ordering, not after the frame is already on site. Check the wall angle, the rough opening shape, and any change in plane across the jambs. A standard frame will not straighten a crooked opening on its own, and forcing it into place usually creates new gaps at the head, the strike side, or the threshold. Treat the wall as it is, then choose the frame layout that matches it.
Matching the Frame to Performance and Warranty Goals
A frame choice sets the tone for the whole entry. It affects comfort, security, weather resistance, and how much forgiveness the installation has once the building starts moving with seasons and use. The frame and seal line are part of the building envelope, so the material, threshold, and fit have to work together instead of being chosen one at a time.
A simple residential frame suits a clean opening and light exposure. A thermally broken frame makes more sense where exterior performance matters, because it helps interrupt heat transfer through the frame section itself. Commercial-grade framing belongs in entries that see heavier traffic, stronger hardware loads, or code-driven performance requirements.
Match the frame type to the job
- Basic residential framing fits straightforward openings, light use, and lower maintenance expectations.
- Thermally broken framing fits exterior doors where condensation control and comfort are part of the brief.
- Commercial-grade framing fits projects where abuse, traffic, or performance specs push the assembly harder.
Warranty coverage can shift the decision too. A frame package with better manufacturer support may cost more at the start, but it can be easier to justify when the opening is hard to access later and a callback would be expensive. In practice, the right frame is the one that matches the exposure, the hardware, and the level of finish the project needs, not just the one that is available on the shelf.
For complete entry assemblies, Breaking Glass Co.’s entry door systems are one example of a coordinated supply-and-install path for residential and commercial work in Texas, with nationwide shipping and installation support for projects that need the frame, slab, and hardware to arrive and function as one assembly.
Quick Reference Checklist for Door Entrance Frame Projects
Use this as the jobsite cheat sheet.
- Verify the rough opening first: Measure width, height, level, and plumb before unboxing the frame.
- Confirm the sill condition: Check for slope, recess depth, and water management details.
- Match the frame depth to the wall: Jamb depth has to suit the finished wall thickness.
- Identify the frame type: Hollow metal, wood, fiberglass, aluminum, or hybrid.
- Check the hardware side: Hinge reinforcement and strike reinforcement need to match the door load.
- Confirm the seal strategy: Weatherstrip, threshold, and perimeter fit should all work together.
- Look for geometry problems: Angled walls and out-of-square openings need custom attention.
- Test the swing before trim: The door should latch and close cleanly before finish work covers the frame.
Fast size and acronym refresher
| Term | Meaning |
|---|---|
| RO | Rough opening |
| OW | Opening width |
| OH | Opening height |
| HM | Hollow metal |
| FHR | Frame hinge reinforcement |
| ADA | Accessibility requirements |
| NFPA 80 | Fire door reference |
| ASTM E283 | Air leakage test reference |
| U-value | Thermal performance measure |
If you're on a deadline, start with the opening, not the hardware box. A few minutes spent checking geometry, anchor type, and sill condition can save hours of rework later. For Texas builders, contractors, and homeowners who need a framed entry package, same-day quotes, statewide installation, and shipped product are all useful next steps once the field measurements are right.
If you're planning a replacement or new-build entry, Breaking Glass Co. can help with the frame, the door, and the install as one coordinated scope. Visit Breaking Glass Co. to request a quote, compare entry options, and get a system that fits the opening instead of fighting it.