
After a hard Texas rain, you notice a brown mark at the corner of a window. Outside, the paint is peeling and a trim joint has opened on the wall that gets the afternoon sun. Replacing that board looks like an easy fix, but before anyone covers the opening again, you need to know whether you're looking at a finish problem or evidence of water getting behind the wall.
Table of Contents
- Why Texas Homeowners Should Care About Exterior Window Trim
- The Parts of Exterior Window Trim Around a Window
- How Trim Works With Flashing and Water Management
- Trim Materials Compared for Texas Conditions
- Matching Trim Style to Your Home's Architecture
- Maintenance That Actually Extends Trim Life in Texas
- When to DIY Versus Hire a Pro for Trim Work
- Putting It All Together for a Texas Window Trim Project
Why Texas Homeowners Should Care About Exterior Window Trim
Exterior window trim is both an architectural feature and part of the window-to-wall assembly. It finishes the opening, establishes proportions, and covers connections that deserve careful inspection before they disappear behind new casing.
The mistake is treating every damaged board as an isolated carpentry problem. A split joint might need maintenance, but staining beneath it calls for investigation. Windows are common pathways for water entry, and older installations sometimes omitted head, jamb, or sill-pan flashing, as described in Building Science Corporation's rainwater-management research.

Look beyond the damaged finish
On a Texas house, the useful starting point is the exposure. Compare the affected window with others beneath a porch, on a shaded elevation, or beside a different wall finish. Note whether the problem follows a storm, returns after repainting, or appears only around a particular corner.
Bring those observations to the installer rather than asking only for replacement trim.
- Describe the timing. Explain whether interior staining appears during rain or remains visible all the time.
- Identify the location. Photograph the entire wall, then the damaged joint and the corresponding interior corner.
- Ask about the opening. Find out whether the proposed work includes inspecting behind the casing or only replacing visible pieces.
Practical rule: Price the investigation before choosing the finish. Fresh paint shouldn't be the reason a questionable connection gets covered again.
That doesn't mean every peeling board requires a new window. It means the repair should answer a specific question: what caused the damage, and does the proposed scope address it? A contractor who can explain that distinction gives you something more useful than a material recommendation.
The Parts of Exterior Window Trim Around a Window
Think of casing as the picture frame around the window, then separate the decorative pieces from the details intended to direct water. Names vary between manufacturers and trades, so photographs and product drawings are better ordering references than a verbal description alone.

Know what you're pointing at
- Head casing is the horizontal trim across the top. Don't confuse the visible board with the flashing associated with that location.
- Jamb casing runs vertically along the sides. Its width and thickness help establish the window surround's appearance.
- Sill describes the lower horizontal element. Ask whether the installer means the window's sill, an added exterior sill nose, or the concealed sill pan.
- Apron is decorative trim beneath a projecting sill where that design is used.
- Brick mold is a particular casing profile used around window or door openings. The name alone doesn't establish whether it's attached to the window or installed separately.
- Drip cap or head flashing refers to the detail above the opening intended to direct water outward.
- Rosettes and plinth blocks are decorative blocks used at corners or at the lower ends of casing.
- Caulk joint is the visible sealant connection, not a substitute name for flashing.
Separate window trim from roof trim
A soffit belongs at the underside of a roof overhang, not around the window opening. If your repair estimate also includes eaves or roof-edge carpentry, Blue Lake Roofing & Remodeling's soffit guide for Fort Worth roofs is a useful companion for sorting out that vocabulary.
Before ordering replacement pieces, ask the contractor to label a photograph with the components being replaced. Include the profile, thickness, finish, and connection to the adjacent wall. That small documentation step helps prevent an attractive piece of molding from being mistaken for a complete repair specification.
How Trim Works With Flashing and Water Management
A drained rough opening gives incidental water a route back outside. The installation has to function beneath the trim, not depend on the trim hiding every possible entry point.
Use this sequence to discuss the proposed assembly with your installer.
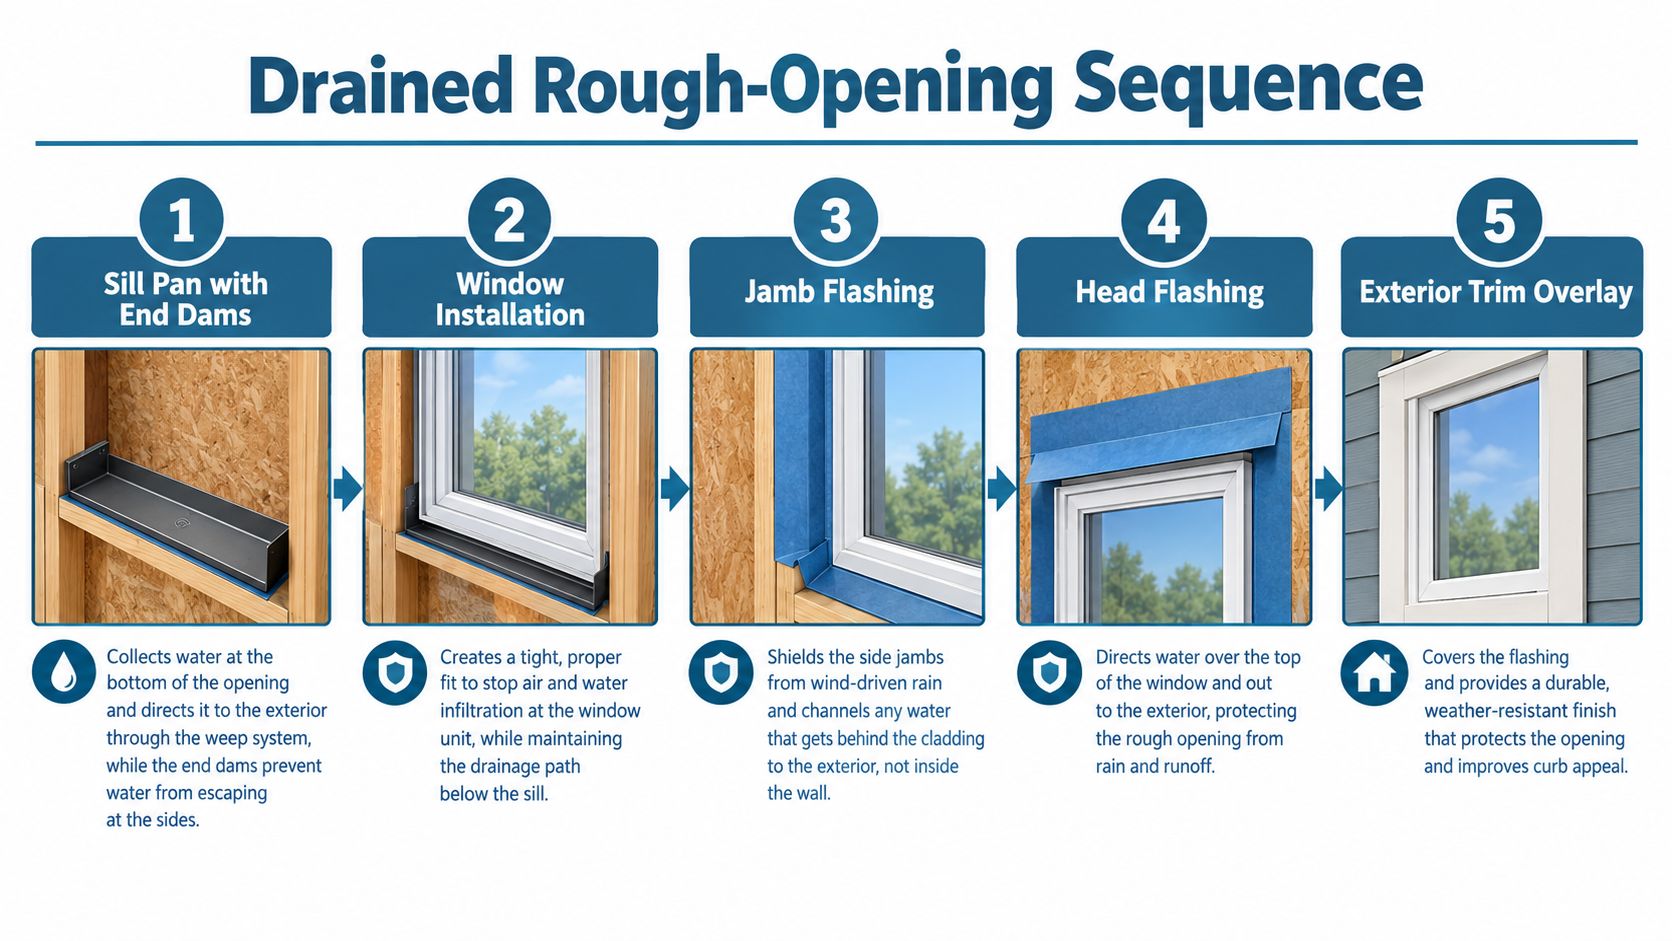
Follow the drainage path
- Start beneath the window. A continuous waterproof sill pan needs end dams and an appropriate back-dam detail, with an outlet connected to the wall's drainage plane.
- Integrate the sides. Jamb flashing overlaps the sill-pan end dams rather than directing water behind them.
- Finish the head connection. Head flashing and the weather-resistive barrier, or WRB, need shingle-style laps so upper layers discharge over lower layers.
- Preserve the outlet. Trim and sealant must not bridge the intended drainage route at the sill.
Building Science Corporation's rain-control guidance recommends that head and sill flashings extend at least 2 inches beyond the jambs to keep laterally moving water from concentrating at the corners. The same guidance explains why completely sealing the sill can trap water instead of improving protection.
More exterior caulk isn't automatically a better installation. The assembly still needs somewhere to discharge water.
Inspect before the casing goes back
During full-frame replacement, exposing the rough opening creates an opportunity to check sheathing, flashing transitions, and the perimeter connection. The Building America guide to complete window-and-frame replacement places rough-opening preparation, sealing, and flashing work ahead of reinstalling trim.
Ask for photographs showing the pan corners, jamb overlaps, and head-to-WRB connection before those details are concealed. A close-up of finished caulk can't establish what's behind the casing.
For project coordination, the new-construction window flashing guide provides a relevant reference when discussing the opening with your builder or installer.
Use the video below as a companion to that discussion, not as a replacement for the selected window's installation instructions.
Trim Materials Compared for Texas Conditions
There isn't a responsible universal answer to which trim material is best for Texas. A shaded opening under a deep porch deserves a different evaluation from a dark surround on an exposed west-facing wall.
Compare complete product systems, including the coating, fasteners, joints, installation instructions, and warranty. Don't accept a material category as proof of suitability.
Exterior window trim materials at a glance for Texas homes
| Material | Sun/Movement | Moisture/Insects | Maintenance | Typical Cost |
|---|---|---|---|---|
| Natural wood | Check finish requirements and joint detailing | Specify the species, treatment, and protected cut ends | Plan for finish inspection and localized repairs | Request a species- and profile-specific installed quote |
| Cellular PVC | Verify movement allowances and approved colors | Review product claims and fastening details | Follow approved cleaning and coating instructions | Quote the complete fastening and joint system |
| Fiber cement | Check the selected product's installation schedule | Verify cut-edge and clearance requirements | Inspect coatings, edges, and attachments | Include cutting, finishing, and installation labor |
| Engineered wood | Confirm exposure and coating limitations | Check treatment and field-cut instructions | Follow the manufacturer's finish requirements | Compare equivalent factory-finished or site-finished scopes |
| Aluminum-wrapped wood | Examine folds, joints, and substrate movement | Establish the condition of the wood underneath | Inspect seams and terminations | Include substrate repair and custom wrapping |
The cost column deliberately avoids unsupported price bands. Ask bidders to separate material, removal, wall repairs, flashing, finishing, and access. Otherwise, a lower trim price may describe less work.
Heat makes detailing a product-specific decision
A Corian exterior-cladding technical bulletin allows approximately 1/32 inch per foot of movement for a potential 120°F temperature variation for that specific material. That's a useful illustration of thermal movement, not a sizing rule for wood, PVC, fiber cement, or aluminum.
For the product you're considering, request its own joint-gap requirements, fastener spacing, unsupported-length limits, and approved sealants. Dark finishes and dissimilar substrates deserve explicit review rather than a generic promise that the material won't move.
Also ask for documentation covering UV exposure, paint compatibility, moisture and insect resistance, and warranty exclusions. Where wildfire exposure affects the specification, verify the exact product's fire-performance documentation and local requirements. Don't infer a rating from the material's name.
The practical trade-off is straightforward: choose the profile and maintenance commitment you're comfortable with, then confirm that the installer can execute the required details.
Matching Trim Style to Your Home's Architecture
Start with the house, not the trim display. A surround should relate to the window size, nearby corner boards, porch details, and the amount of wall visible between openings.
Historical precedent can help when the original design is unclear. Winco's overview of historic exterior window trim describes the progression from broad, detailed Greek Revival surrounds to ornate Victorian profiles, simpler Craftsman geometry, and reduced ornament in modern designs. The useful lesson is proportion and consistency, not copying a decorative detail without considering the rest of the elevation.

Use the elevation as your reference
As design starting points, consider restrained casing for a ranch, straightforward geometry for a Craftsman-influenced house, and a quieter surround for contemporary architecture. A transitional or modern farmhouse elevation can accommodate substantial flat trim, but that doesn't mean every window needs a heavy header.
- Compare surrounding details. Hold the proposed width against corner boards, fascia, and porch posts.
- Check crowded locations. Look at windows near inside corners or grouped openings before approving a wider profile.
- Review actual samples. Evaluate the material and finish outdoors rather than relying entirely on a screen.
- Confirm fabrication options. Ask whether the selected product is supplied in the desired profile and whether field shaping is permitted.
Keep the finish decision tied to the specification
A dark surround can change the visual balance of the whole wall. The modern black windows exterior guide can help you evaluate that appearance before committing to the combination.
Don't assume the window frame and adjacent trim accept the same paint or have the same finish restrictions. Request approval for each component separately, including touch-up procedures.
Choose the look with a sample. Approve the installation with a detail.
A full-size corner mockup is especially useful when the proposed surround includes stacked molding, projecting caps, or several materials. It gives everyone a shared reference for both appearance and assembly.
Maintenance That Actually Extends Trim Life in Texas
Maintain exterior window trim by inspecting its condition, not by adding sealant whenever a joint looks unfamiliar. Keep the installation drawings or photographs available so you know which openings are intentional.
The DOE homeowner retrofit guide distinguishes rough-opening air sealing and insulation from the exterior finish work. That distinction matters when a homeowner expects repainting or new casing to solve a draft.
Build a repeatable inspection routine
Walk the house after severe weather and during your regular exterior-maintenance check. Use a phone camera to document changes, particularly on elevations you can't inspect safely at close range.
- Examine finish condition. Record peeling, bubbling, exposed cut ends, and recurring discoloration.
- Inspect designated sealant joints. Look for separation from the adjoining surface, cracks, and deteriorated material.
- Check attachments. Note raised fastener heads, displaced trim, and openings at corners.
- Observe nearby water sources. Include roof runoff, downspouts, shutters, and wall-mounted fixtures in the inspection.
- Compare inside and outside. Photograph interior staining or musty corners alongside the corresponding exterior location.
Repair the condition, not just the appearance
Don't assign every product the same repainting schedule. Follow the coating manufacturer's maintenance instructions and respond to actual deterioration. Before cleaning factory-finished trim, confirm the approved cleaner, application method, and rinsing procedure; avoid experimenting on the most visible part of the house.
Repeated peeling after a finish repair deserves investigation before another coat goes on. Record where it returns and whether it follows rain, then give that history to the person assessing the opening.
If air leakage is the complaint, use the guide to stopping drafts from windows to organize the diagnosis rather than assuming the exterior casing is responsible. Appropriate testing may help distinguish the source.
Keep a maintenance folder with the product name, color, coating system, sealant, installation photographs, and warranty paperwork. Future repairs are easier to specify when nobody has to guess what was installed.
When to DIY Versus Hire a Pro for Trim Work
The useful dividing question is whether the work requires exposing or changing the rough opening. Painting an accessible surround and rebuilding a concealed window-to-wall connection are different jobs, even if both estimates say “trim repair.”
For an experienced homeowner, a limited cosmetic task may be reasonable when access is safe, the substrate is sound, and the product instructions are available. Don't classify replacement of a deteriorated board as cosmetic until you understand why it deteriorated.
Keep DIY work inside a defined boundary
Consider handling the work yourself only when you can identify the components and finish the job without improvising concealed details.
- Suitable scope. Cleaning, finish touch-ups, or renewing a clearly identified maintenance joint may fit your skills.
- Safe access. You need a stable working arrangement, not a plan to stretch from a ladder while carrying tools.
- Compatible materials. Confirm the coating or sealant with the relevant product manufacturer.
- A stopping point. Stop if removal reveals questionable sheathing, unexpected gaps, or flashing you can't identify.
Stop-work signal: If opening the trim changes the job from finish repair to wall investigation, revise the scope before continuing.
Hire for the connection you can't see
Professional assessment is the stronger choice for recurring leaks, extensive deterioration, upper-level work, and transitions involving brick veneer or stucco. It's also appropriate when window replacement and trim work need to be coordinated under the selected manufacturer's instructions.
Ask prospective installers to explain how much of the opening they expect to expose. Request a written process for handling concealed damage, including authorization before additional repairs proceed.
Your proposal should identify:
- Included work. Removal, investigation, flashing integration, replacement casing, and finishing should be distinguishable.
- Documentation. Specify photographs before concealed layers are covered.
- Product requirements. Identify whose installation instructions govern each component.
- Warranty responsibilities. Clarify which company supports the window, trim product, coatings, and installation labor.
A confident installer won't promise to know the entire hidden condition from a driveway inspection. What matters is having a clear procedure for discovering it, documenting it, and agreeing on the repair.
Putting It All Together for a Texas Window Trim Project
A good trim project starts with a diagnosis and ends with a documented assembly. The appearance matters, but it shouldn't determine what the installer is allowed to inspect.
Make the decisions in the right order
- Establish the repair scope. Decide whether you're maintaining a sound surround, investigating damage, or coordinating trim with window replacement.
- Approve a specific product. Match its installation requirements and finish limitations to the wall and exposure.
- Choose the appropriate labor. Keep manageable finish work separate from repairs that require opening the enclosure.
Compare estimates against those decisions rather than comparing only the bottom line. Ask what happens if the installer finds damaged sheathing, whether finishing is included, and what records you'll receive when the work is complete.
For a window-and-trim package, request the actual window specifications alongside the casing proposal. Review installation responsibilities, climate-related product requirements, and written warranty provisions before ordering. Factory-direct supply and coordinated installation can be useful purchasing arrangements, but neither replaces a clear scope.
Finally, save the approved profile sample or drawing with the installation records. You should be able to identify what was installed, how the concealed connections were handled, and whom to contact if a concern develops. That's a more dependable outcome than new boards that look good from the street.
Breaking Glass Co. supplies factory-direct windows and doors, coordinates installation across Texas, and ships products nationwide, with warranty support under its stated provisions. Request a free same-day quote and share photos of your existing trim, wall finish, and any staining so the team can discuss whether your project calls for a limited repair or a coordinated window-and-trim package.