
A cold ribbon of air slips across the tile every time you walk past the patio door. You hold a candle near the meeting stile, watch the flame lean toward the glass, and wonder whether the answer is a new strip of weatherstripping or a completely new door. A rising heating or cooling bill makes the problem harder to ignore, but buying the first sliding door weather seal that looks similar can make the door harder to operate without stopping the draft.
The better approach starts with diagnosis. A failed seal may be the visible symptom, while a dropped roller, dirty track, shifted latch, damaged frame, or blocked drainage path causes the seal to lose contact. The U.S. Department of Energy treats weatherstripping as part of broader air-sealing work and reports that a package of air-sealing measures can typically reduce whole-house energy use by approximately 10% to 20%, although that figure does not apply to replacing one patio-door seal by itself. The DOE guidance on insulation and air sealing also describes weatherstripping as a relatively low-cost measure that can produce quick returns.
Table of Contents
- Why Your Sliding Door Feels Drafty in the First Place
- Inspecting the Door Before You Buy Anything
- Matching Seal Type to Location and Climate
- Measuring Every Run the Right Way
- Removing the Old Seal and Installing the New One
- When Adjustment Beats Replacement
- When to Call a Pro and Key Takeaways
Why Your Sliding Door Feels Drafty in the First Place
A draft usually enters where two parts should meet but no longer do. On a sliding patio door, the first suspect is often the interlock stile, the vertical meeting edge where the operating and stationary panels close together. Compressed pile, torn fins, or a missing section there can leave a narrow but noticeable air path.
The perimeter can fail in less obvious ways. Flattened fin weatherstripping at the head or jamb may no longer spring back against the panel, while a bowed track can hold the panel away from the frame. A dropped roller can leave the operating panel hanging low, sometimes roughly a quarter inch below its proper position, so the top seal loses contact and the latch no longer pulls the meeting stile tightly together.
Read the door as a system
Look at the lower edge before ordering anything. A worn threshold cap, damaged bottom sweep, packed sill channel, or blocked weep path can admit air and water even when the vertical pile looks new. Interior water staining, peeling paint, or a musty smell near the sill often points to the same alignment or drainage problem rather than an isolated strip failure.
A failed seal can increase infiltration near occupied rooms and make heating or cooling equipment run longer. That doesn't mean a replacement seal alone will deliver the DOE's whole-house energy-saving range. It means the door deserves attention because a small opening at a frequently used exterior panel can affect comfort and expose the surrounding finishes to moisture.
Installer's rule: If the panel doesn't sit squarely in the frame, a thicker weatherstrip is usually a workaround, not a repair.
Check the frame, rollers, latch, and sill before touching the seal. Guidance on professional window installation tips is also useful when the door problem appears connected to broader frame, glass, or installation issues. The right workflow saves you from fitting a perfect replacement onto a door that still hangs out of alignment.
Inspecting the Door Before You Buy Anything
Set aside the parts catalog and inspect the closed door first. Stand inside on a bright day, close and latch the panel, then examine the full meeting stile for visible daylight. Run a finger lightly along the joint. You should feel consistent contact, not a section where the pile disappears or the panels separate.
Press the latch or hook fully into its keeper. If the handle feels unusually loose, the latch barely catches, or the panel sits proud of the frame, record that before blaming the seal. A locking mechanism that doesn't pull the panel into its final position can create a leak even with fresh weatherstripping.

Inspect the perimeter and pile
Open the operating panel and examine the head jamb, lock-side jamb, and panel edges. Look for:
- Flattened strips: Pile that has stayed crushed no longer bridges the gap effectively.
- Torn or detached material: A loose end can curl into the rollers or leave an open channel.
- Missing tufts: Bare sections identify the actual failure location.
- Dirty fibers: Dust and grit reduce loft and can hide uneven contact.
- Gaps at corners: Short cuts and shifted strips often leak at their ends.
Move to the sill and sight down the track from one end. A dent, packed grit, or raised fastener can stop the panel from sitting properly. Lift the inside edge of the operating panel gently. Excess movement, a dragging bottom rail, or a panel that appears low at the handle points toward roller adjustment or hardware wear.
Slide a business card under the closed lower edge at several locations and compare the resistance. This isn't a laboratory test, but changing resistance can reveal an uneven gap. Don't force the card into a tight drainage opening or use the result as a reason to block a weep path.
Record the evidence by location
Inspect the stationary panel perimeter too. A draft may bypass the operating panel entirely through a loose fixed-panel retainer, failed perimeter seal, or deteriorated caulk joint. Inside the room, check for water stains, peeling paint, soft trim, or a musty odor around the sill and side jambs.
Write findings in a simple location list:
- Meeting stile, daylight or damaged pile.
- Operating-panel perimeter, flattened or missing seal.
- Head and jambs, uneven contact or detached material.
- Sill and track, debris, dents, standing water, or blocked drainage.
- Hardware, roller drag, latch misalignment, or incomplete engagement.
That record tells you whether you need pile, a fin, a compression gasket, a threshold component, adjustment, or a professional inspection. It also prevents the common mistake of matching a replacement by appearance alone.
Matching Seal Type to Location and Climate
A sliding door doesn't use one universal strip. The correct material depends on whether the seal must slide past another surface, compress against a stop, bridge a moving joint, or control the gap at the sill.
Pile weatherstrip, often paired with a fin, is common along vertical jambs and interlock edges. The backing has to fit the frame's kerf or channel, while the pile height must reach the opposing surface without creating excessive drag. A flexible or reinforced fin can improve contact where wind and dust challenge the interlock, but an overly stiff fin may make the panel difficult to close.
Foam tape and EPDM rubber gaskets work better where compression matters more than sliding friction, such as a stationary head or jamb stop. Foam can conform to small irregularities, but an exposed adhesive-backed strip needs a clean, sound surface. EPDM generally suits locations that need a resilient gasket, provided the profile matches the original compression space.
Bulb seals are used where a hollow or rounded section compresses against the frame or another panel. They can work well at meeting stiles and exposed perimeter locations, but the bulb must have room to compress. Filling a narrow gap with an oversized bulb raises operating force and may prevent the latch from engaging.
Threshold seals and sweeps belong at the lower edge. Select them by measuring the actual sill gap and considering whether the door crosses tile, wood, carpet, or another finish. The bottom assembly also has to preserve drainage, so never cover designed openings with adhesive or caulk.
| Seal Type | Best Location | Material Notes | Climate Suitability |
|---|---|---|---|
| Pile with fin | Jambs and meeting stile | Match backing width and pile height to the channel | Good for moving panels, dust, and wind when correctly fitted |
| Foam tape | Stationary stops and minor compression gaps | Closed-cell foam resists air passage better than open-cell alternatives | Useful for sheltered compression locations, not high-friction sliding edges |
| EPDM rubber gasket | Head, jamb, or compression joints | Durable profile must compress without binding | Suitable for varied exposure when the original system calls for rubber |
| Bulb seal | Meeting stile or perimeter stop | Needs clear compression space and compatible retainer | Useful in exposed or temperature-variable openings |
| Threshold seal or sweep | Lower rail and sill | Must fit the gap without blocking drainage | Chosen for sill geometry, traffic, dust, and floor finish |
Material choice matters. The Maryland Energy Administration reports that reinforced felt and open-cell foam are substantially poorer air barriers than closed-cell foam, with reinforced felt permitting more than 250 times as much air leakage as closed-cell foam, inch for inch. Its weatherstripping guidance is a useful reminder that adding any strip isn't the same as creating a durable air barrier.
For sun-facing doors, silicone pile can be a sensible choice where ultraviolet exposure is severe. Polypropylene pile may suit a more shaded location, while a vinyl bulb can be appropriate where repeated temperature changes demand a flexible compression profile. Before using a temporary measure such as home insulation film methods, identify the location and movement the permanent seal must accommodate.
Measuring Every Run the Right Way
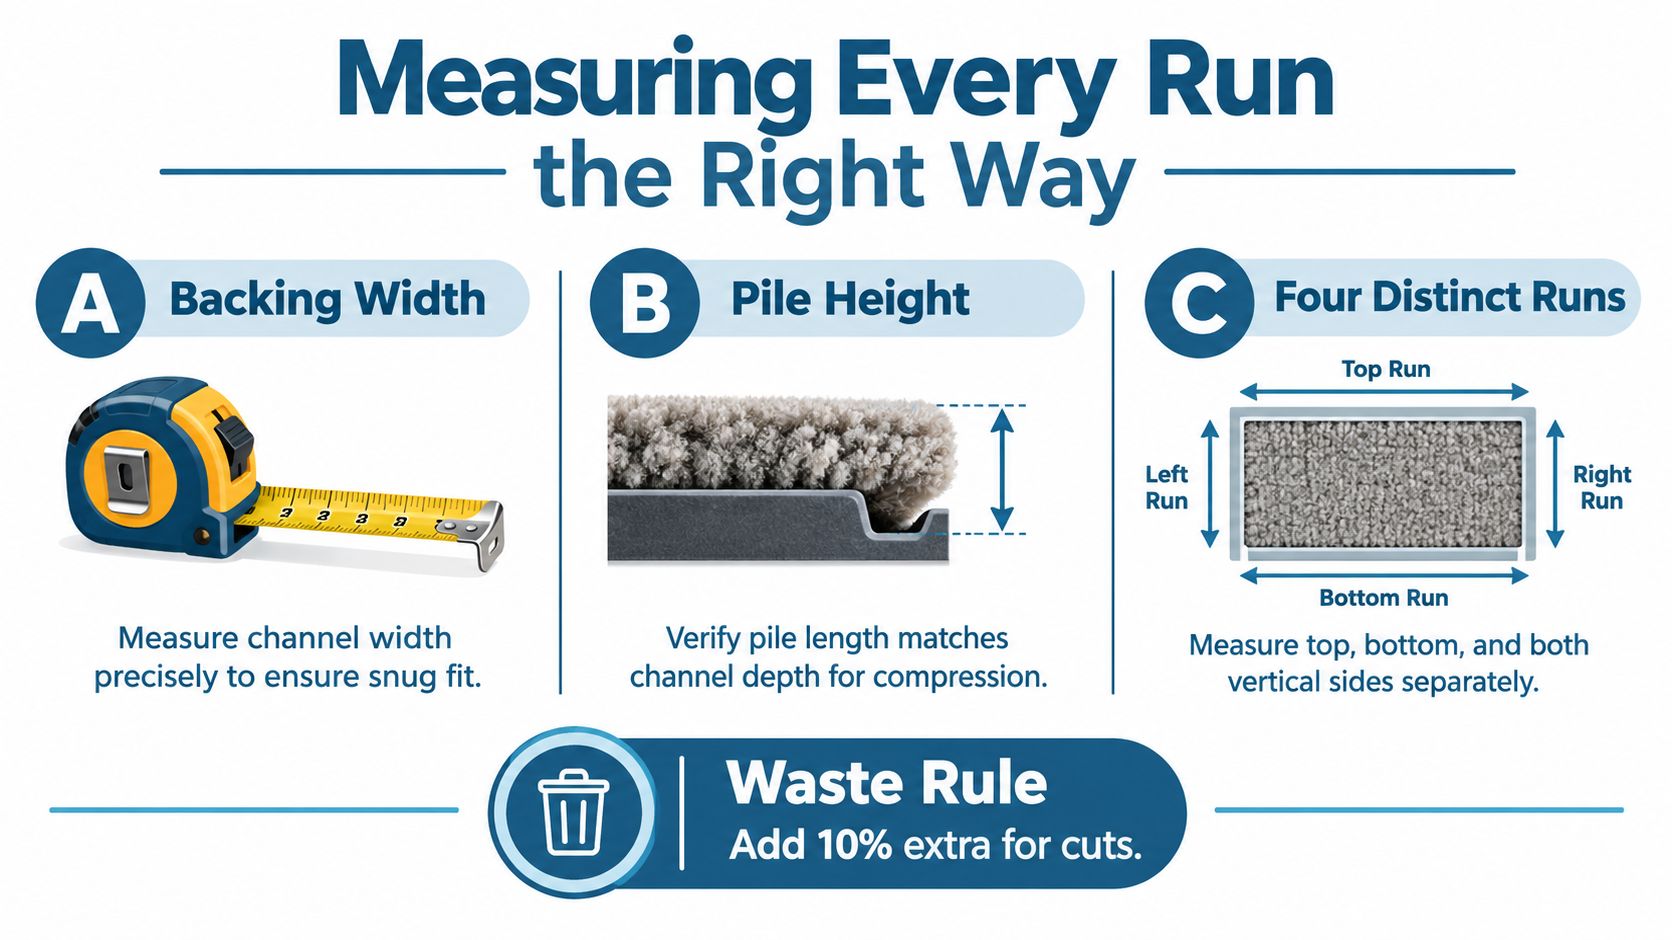
Treat the door as four separate runs, not one rectangle. The head, two jambs, and meeting stile each need their own measurement because openings are rarely perfectly square and the operating panel may not match the fixed panel.
Remove or open the panel enough to reach the existing seal. Measure the left and right jamb heights independently with a steel tape, from the actual starting point at the sill to the head. Measure the head across the full opening where the seal runs, including the fixed and operating sections if that is how the original system was built. Measure a pile or fin on the panel edge against the panel itself, not against the rough opening.
The most frequently missed dimension is backing width. Use a ruler or calipers to measure the old strip's rigid base, or measure the empty kerf after removal. That dimension must fit the channel. Pile height is a separate measurement. Lightly compress the pile against a flat edge to approximate the closed-door condition, then record the height without crushing it.
Label each dimension before ordering
Photograph every location beside a tape measure. Write the seal type, backing width, pile or bulb height, channel shape, and run length directly on the photo or a paper sketch. A close-up of the channel is often more useful than a product listing that only shows the finished profile.
Use this quantity rule for each separate run:
- Measure independently: Record the actual head, jamb, meeting stile, and lower run rather than assuming opposing sides match.
- Add installation allowance: Add approximately 10% to each run for cutting and handling waste.
- Round up: Round the resulting length to the next whole foot if the product is sold by the foot.
- Separate profiles: Total lengths only when the backing and profile are identical.
Don't stretch a strip while measuring or installing it. Stretching changes the finished length and can pull the ends out of the channel after temperature changes. If you're comparing a replacement frame or planning broader work, a labeled takeoff pairs well with a door entrance frame measurement reference, but the existing sliding-door channel remains the controlling dimension.
Removing the Old Seal and Installing the New One
Have a padded surface ready before removing the operating panel. Release the catches, lift the panel into the head track, then swing the bottom edge out of the sill and lower it carefully. Sliding glass panels are awkward and heavy, so use a second person when the panel is large or difficult to control.
Remove without damaging the channel
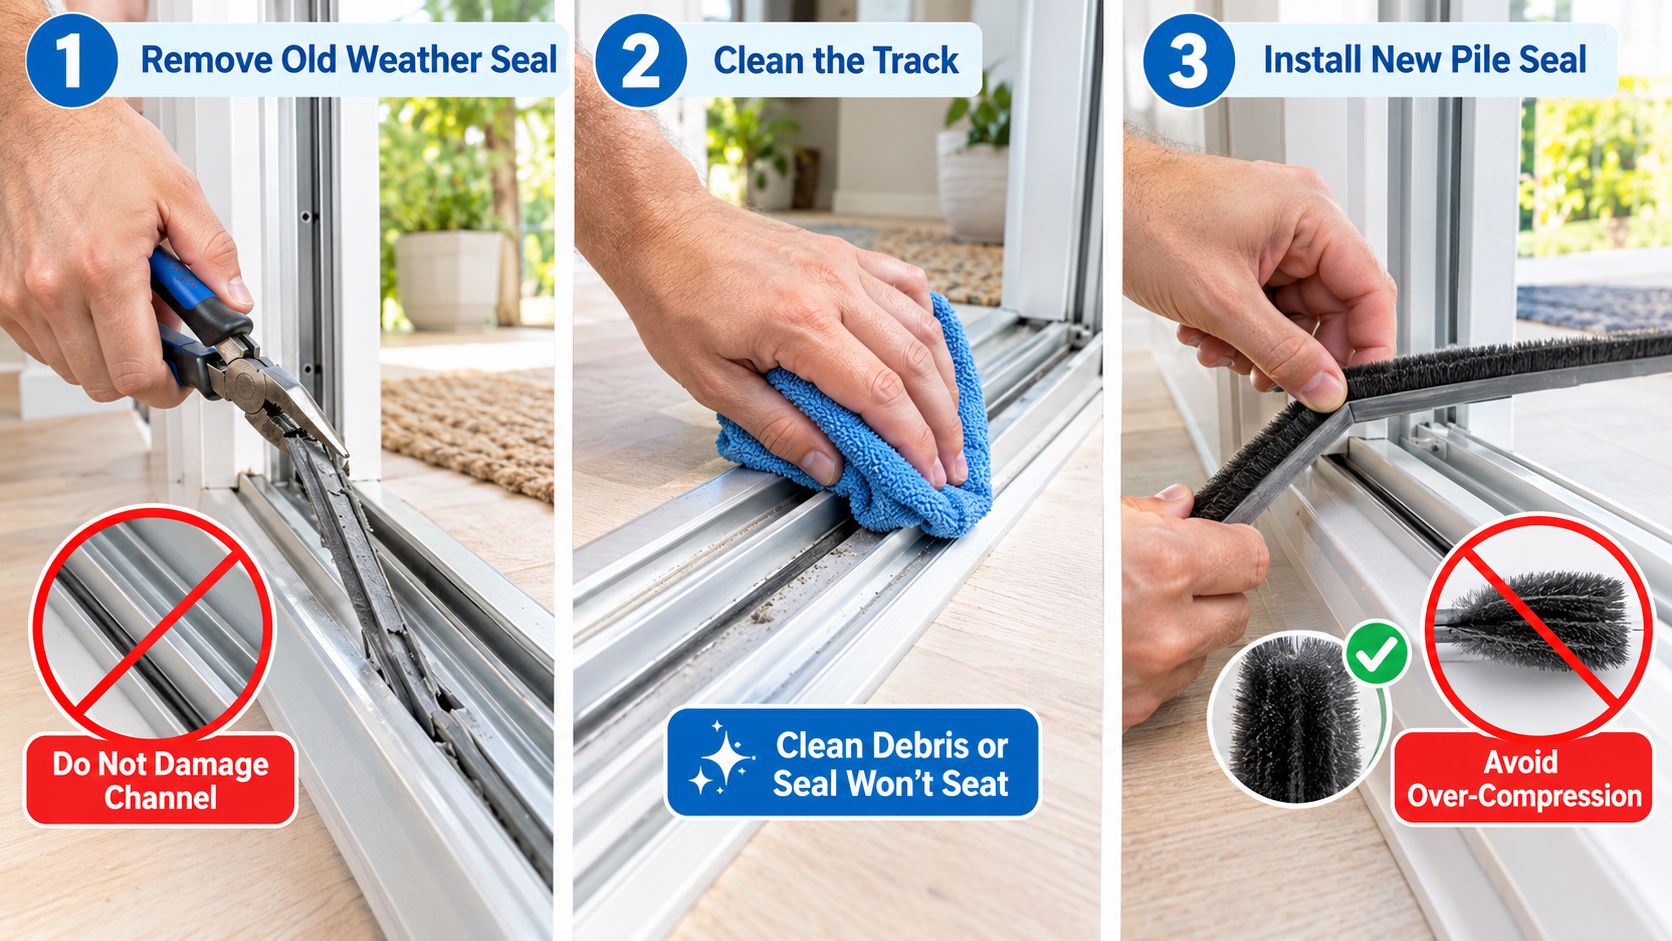
Start at an accessible end. For kerf-mounted pile, use a flat pick or small screwdriver to lift the flange gently, then pull the strip along the channel rather than yanking upward. A torn kerf flange can damage the retainer and turn a seal replacement into frame repair.
For adhesive-backed material, peel slowly and keep the adhesive layer from tearing into small pieces. Remove residue with a cleaner compatible with the frame finish. Don't install new material over old adhesive, grease, or grit. Pile won't sit squarely in a dirty channel, and adhesive-backed weatherstrip won't bond reliably to dusty aluminum.
Vacuum the channel, then wipe it with a suitable degreasing cleaner and let it dry. Inspect for sharp burrs, bent retainer lips, or a channel that has opened up. Correct those issues before measuring again.
Install without stretching or over-compressing
Identify the starting point for each run and keep the replacement relaxed as you feed it into place. Stretched pile can shrink back at the ends, leaving a gap. A twisted fin creates a permanent leak path, even if the strip looks tight from the room side.
Press kerf-mounted material into the channel with a small roller or the rounded back of a screwdriver handle. Work gradually instead of forcing a long section at once. Trim the ends flush with a fresh razor. Scissors can crush pile fibers and leave an uneven end that pulls out of the retainer.
Once the vertical and head seals are installed, return the panel to the opening. Adjust the rollers until the panel moves freely and the meeting stile compresses evenly when locked. The replacement shouldn't make the handle noticeably harder to operate.
A sheet of paper provides a useful final check. Close and lock the panel, then pull the paper through the joint. Light resistance suggests contact. If the paper tears, the strip may be over-compressed or the panel may be misaligned. If it slides out freely, find the loose section instead of adding another layer over the whole run.
Watch this installation sequence before removing a panel if you haven't handled one before.
A new strip can't correct a warped frame or a damaged sill. If the panel, frame, or surrounding opening needs broader work, review sliding installation options and compare the repair scope before ordering a narrow replacement part. The exterior door installation diagram can also help you identify the difference between a panel seal, frame joint, threshold, and surrounding opening components.
When Adjustment Beats Replacement
Many draft complaints are hardware complaints wearing a weatherstrip disguise. If the panel drags, rattles, sits low at the handle, or fails to latch cleanly, adjust the door before buying a replacement seal.
Start with the rollers. Look for the adjustment screw at the bottom of the operating panel, usually near each side. Turn it clockwise in small increments to lift the panel, then slide and latch the door after each adjustment. The objective is even contact at the meeting stile and smooth travel, not maximum height. If the top rail begins to bind against the head, the panel has been raised too far.
Correct the latch and track
A hook latch or keeper that has shifted outward can leave the panel sitting proud of the frame. Fresh weatherstripping won't solve that gap because the lock no longer pulls the panel into compression. Loosen the keeper screws, reposition the keeper so the latch engages fully, and retest the handle without forcing it.
Clean the track next. Remove grit, paint flakes, and packed debris with a vacuum and a stiff brush. Inspect bent stops, missing anti-lift screws, and damaged rail surfaces. A panel that racks out of plane on a rough track can lose contact at one corner while appearing to have a bad seal at the other.
Alignment is mechanical. Weatherstripping is consumable. Fixing the mechanism first often restores the seal you already have.
Don't caulk over a moving joint or seal a drainage opening. Use guidance on stopping drafts from windows as a broader reference for separating air leakage at movable components from leakage at stationary frame joints. If adjustment restores the latch, smooths the travel, and produces even paper-test resistance, replacement would have been wasted effort.
When to Call a Pro and Key Takeaways
A seal replacement is a reasonable homeowner project when the frame is sound, the panel moves normally, the channel is accessible, and the replacement profile is identifiable. Stop and call a qualified professional when the problem involves the structure around the seal rather than the seal itself.
That handoff is especially important with cracked or warped glass, water pooling under the threshold, rotted jambs, track damage that cleaning can't correct, or failed insulated glass. A seal failure inside the door frame cavity also belongs in the professional category because reaching it may require frame disassembly or a product-specific component.
Know when the repair has outgrown the strip
Professionals can identify compatible extrusions, sill pans, flashing, and tested seal configurations that aren't always available through retail channels. For code-relevant work, sliding doors are treated as coordinated assemblies involving panel seals, interlocks, sill drainage, flashing, frame joints, and roller alignment. IIBEC's guidance on door performance notes that sliding doors are subject to testing requirements under AAMA/WDMA/CSA 101/I.S.2/A440 and/or ASTM E330, while sill-pan flashing helps drain incidental leakage.
Product specifications can call for different pile, interlock, header, stile, and bottom-sweep configurations. That is why a generic profile shouldn't override the manufacturer's tested configuration when the door is under warranty, part of a commercial opening, or exposed to persistent water and wind.

Keep this checklist with the replacement parts:
- Diagnose first: Check daylight, damaged pile, panel contact, rollers, latch alignment, track condition, and drainage.
- Match the location: Use pile for sliding contact, compression materials for stops, and a correctly sized threshold component at the sill.
- Measure the channel: Record backing width, pile or bulb height, channel geometry, and every run separately.
- Allow for waste: Add approximately 10% to each measured run and round up to the next whole foot.
- Install cleanly: Remove residue, avoid stretching, prevent twists, and trim with a sharp razor.
- Adjust before replacing: Restore roller height and latch engagement before assuming the seal has failed.
- Escalate damage: Call a professional for glass, frame, sill, flashing, drainage, or structural problems.
If your sliding door still leaks after cleaning, adjustment, and a correctly matched seal, Breaking Glass Co. can help with residential and commercial window and door supply, measurement, replacement, and installation across Texas. Request a quote when the issue points to damaged glass, frame components, or a full door system rather than a simple weatherstrip.