
A storefront crew arrives at 7 a.m. with the door slab, a closer, and a schedule that leaves little room for surprises. The opening looks square from across the room, but the finished floor is higher than the drawings, the header has no confirmed blocking, and nobody has selected the final lock. If the team starts drilling anyway, the job can turn into binding hardware, damaged glass, failed inspection, and a return visit before the entry ever sees normal traffic.
Commercial glass door installation is a commissioning task, not just a mounting task. The installer has to verify the opening, confirm code-driven glazing, select a system that fits the building, match hardware to the glass, tune the door for actual users, and return after settlement to check seals and operation. The work below follows that sequence from the field perspective.
Table of Contents
- What a Commercial Glass Door Project Really Involves
- Verifying the Opening Before You Order Glass
- Safety Glazing and ADA Rules That Gate the Job
- Choosing the Right Door System for the Building
- Hardware Selection and the Actual Mounting Sequence
- Weatherproofing, Security, and Post-Install Performance
- Realistic Timelines and Common Field Questions
What a Commercial Glass Door Project Really Involves
The first visit starts with a site walk, not a glass order. Measure the opening, inspect the substrate, identify the finished floor, photograph adjacent construction, and find out how the entry will be used. A retail storefront retrofit may involve an existing aluminum frame, occupied space, limited access, and a replacement that has to fit around flooring and signage. A new-construction tenant fit-out usually offers more control over blocking, anchor locations, and inspection timing, but the opening may still change while other trades work around it.

Four decisions control the installation
Opening verification comes first. Confirm width, height, plumb, level, floor elevation, and available support. A frame that isn't properly supported at the sill can move under door weight, while a header without suitable reinforcement may not carry a sliding track or closer.
Code review gates the specification. The project team needs to identify safety glazing, accessibility, fire, egress, and hazardous-location requirements before fabrication. The historical shift toward impact-tested safety glazing began with the CPSC architectural glazing rule issued in 1977 and effective July 6 of that year, which addressed injuries from impact with glazing in doors and related assemblies. The Federal Register rule.pdf) explains the original safety purpose.
System selection follows the conditions. A narrow-stile storefront entrance, a framed hinged leaf, an all-glass door, and an automatic slider don't share the same support or maintenance demands. The decision should account for traffic, exposure, access requirements, security, and serviceability, not only appearance.
Field installation completes the work, but commissioning proves it. The crew sets the frame, anchors it, hangs the leaf, installs the hardware, checks reveals, and operates the door repeatedly. The final deliverable is a door that closes, latches, seals, and remains usable after the building and hardware settle.
A clean entry also depends on coordinated maintenance. If the facility manager is arranging exterior upkeep, a resource such as commercial window cleaning Colorado Springs can help keep surrounding glazing and entrance surfaces serviceable without turning cleaning into an installation problem.
Practical rule: Never release glass for fabrication while the opening, substrate, and hardware schedule are still assumptions.
Verifying the Opening Before You Order Glass
The opening controls every downstream dimension. For framed systems, field guidance commonly uses a rough-opening allowance of plus 3/8 inch and minus 0, while all-glass systems may use plus 1/2 inch and minus 0, subject to the manufacturer's tolerance sheet. Those figures are not permission to accept a poor opening. They define the space available for setting and adjustment, and the manufacturer's approved details control the final decision.
Measure width at the head, middle, and sill. Measure height at both jambs and the center. Check each jamb with a four-foot level, then check the header and sill for level. A small lean at the header can change the relationship between the pivot, closer, and latch. Even a 1/8-inch variance should be corrected before the frame is set because it can create binding and uneven hardware loading. The field tolerance and its consequences are also summarized in this commercial entrance frame guide.
Commercial Glass Door Opening Tolerances
| Check | Acceptable Tolerance | Why It Matters |
|---|---|---|
| Framed rough-opening width | Plus 3/8 inch, minus 0, subject to the manufacturer's sheet | Provides controlled setting space without leaving an undersized opening |
| All-glass rough-opening width | Plus 1/2 inch, minus 0, subject to the system detail | Allows adjustment around patch fittings and hardware |
| Opening variance before frame setting | Correct variances above 1/8 inch | Prevents misalignment, binding, and stress on hardware |
| Sliding clear travel | About 1.5 times the panel width | Gives the panel room to move fully without obstruction |
| Sliding header capacity | At least 25% above the glass panel weight | Limits track deflection and premature hardware stress |
For a sliding system, inspect the load path instead of looking only at the visible header. The track transfers point loads into the structure behind it, whether that structure is steel, concrete, or wood blocking. Hollow steel studs without reinforcement aren't a dependable anchor for a heavily loaded track. Add the specified backing or revise the support before installation.
The floor plane deserves the same attention. Confirm the finished floor elevation, threshold condition, and any floor transition before ordering a threshold or setting bottom pivots. A door installed against an unfinished elevation can scrape after flooring is added, or leave an unwanted gap if the finished surface ends up lower than expected.
Document the measurements, substrate, photographs, and approved tolerances in the project file. If the opening fails the check, correct it before the glass order is released.
Safety Glazing and ADA Rules That Gate the Job
Glazing selection starts with the door, sidelites, and nearby hazardous locations, not with a last-minute substitution. Require a verified safety-glazing specification in the submittal. A generic description such as “tempered glass” is incomplete until the team checks the permanent label, impact category, thickness, and compatibility with the door system. The CPSC rule established impact categories, while the removal of the longstanding wired-glass exemption in the 2006 International Building Code made code-aware selection more important in hazardous locations. The glass safety history reviewed by USGlass describes how fragmented state requirements pushed the industry toward greater standardization.
Select the glazing by risk and assembly
Tempered glass provides impact resistance and breaks into smaller pieces when it fails. It cannot be cut or drilled after tempering, so hardware holes, notches, and edge work must be confirmed before fabrication. A measured opening is only useful if the glass and fittings were ordered from the same approved dimensions.
Laminated safety glass retains fragments with its interlayer after breakage. It can suit security, acoustic, or containment requirements, but it may call for different fittings, edge clearances, and fabrication details than tempered glass. Confirm the glass thickness against the patch fittings, hinges, pivots, and seals. A mismatch can create stress at the edge or leave hardware unable to clamp correctly.
The final specification also depends on fire-rated construction, door type, adjacent glazing, and the authority having jurisdiction. Safety-glass requirements apply to glass doors and enclosures in other markets as well. Contractors can review these UK safety law compliance tips for a broader risk-management perspective, and project teams assessing impact performance can consult this impact-resistant glass resource.
Key ADA and Safety Glazing Requirements for Commercial Doors
| Requirement | Threshold | Applies To |
|---|---|---|
| Impact-tested safety glazing | Verified CPSC performance category | Glazing in doors and hazardous locations |
| Clear accessible opening | Confirm the adopted accessibility standard and approved door schedule | Doors on accessible routes |
| Threshold transition | Confirm the permitted height and bevel detail | Accessible entrances |
| Door force and closing behavior | Tune to the adopted accessibility and fire requirements | Hinged, automatic, and fire-rated systems |
| Visual identification | Use required markers where the adopted code calls for them | All-glass doors and large uninterrupted panels |
Accessibility review covers more than clear width. Check approach clearances, hardware reach ranges, threshold details, closing speed, and actual operating force. Tune the closer after the glass and hardware are installed, because field resistance can differ from the submittal assumption. Record the final checks with glazing labels and the hardware schedule, then recheck seals and door operation after the opening settles. This commissioning record gives the inspector and facility team evidence that the installed assembly performs as specified.
Choosing the Right Door System for the Building
The right door system reflects the building's routine. A quiet professional office, a busy retail entrance, a healthcare corridor, and a tight vestibule place different demands on the same opening. Catalog appearance can't tell you whether a door will tolerate carts, repeated impacts, wind exposure, or constant access-control use.
Compare the systems by use
| System Type | Best Use Case | Typical Daily Traffic | Glass Thickness Range | Structural Requirement | ADA Suitability |
|---|---|---|---|---|---|
| Narrow-stile storefront | Retail strips and standard commercial entrances | Lower to moderate | Manufacturer-selected safety glazing | Aluminum frame and specified anchors | Good when clearances and hardware are coordinated |
| Framed hinged | Vestibules, offices, healthcare corridors, and wider leaves | Moderate and varied | Matched to the frame and hardware package | Jamb, head, sill, and pivot support | Good with correct opening force and threshold |
| All-glass | Lobbies, galleries, showrooms, and design-focused entries | Moderate, with controlled abuse exposure | Thicker tempered or laminated options selected by system | Patch fittings, pivots, header rail, or floor support | Possible, but details need close coordination |
| Sliding or automatic sliding | High-use entries and tight vestibules | Moderate to high | System-specific safety glazing | Rated header, track support, and full travel zone | Strong option when travel and controls are correctly designed |
A storefront door is usually easier to service because the framing organizes the glass, weather seals, and hardware. It works well where the owner values a familiar replacement path and a clean aluminum sightline. The trade-off is that the frame adds visual structure and can limit the opening or glass area.
Framed hinged doors suit locations where the leaf needs a strong perimeter, a wider opening, or specialized hardware. They also give installers more predictable interfaces for seals and strikes. All-glass doors deliver a more open appearance, but the fittings concentrate stress at prepared holes and edges, so fabrication accuracy and handling discipline matter more.
Sliding systems help with accessibility and vestibule space, yet they need unobstructed travel and reliable overhead support. A beautiful slider installed against a weak header is still a failed system. For broader coordination around door compliance in commercial fit-outs, keep the door schedule, access-control plan, and structural details aligned before fabrication.
Hardware Selection and the Actual Mounting Sequence
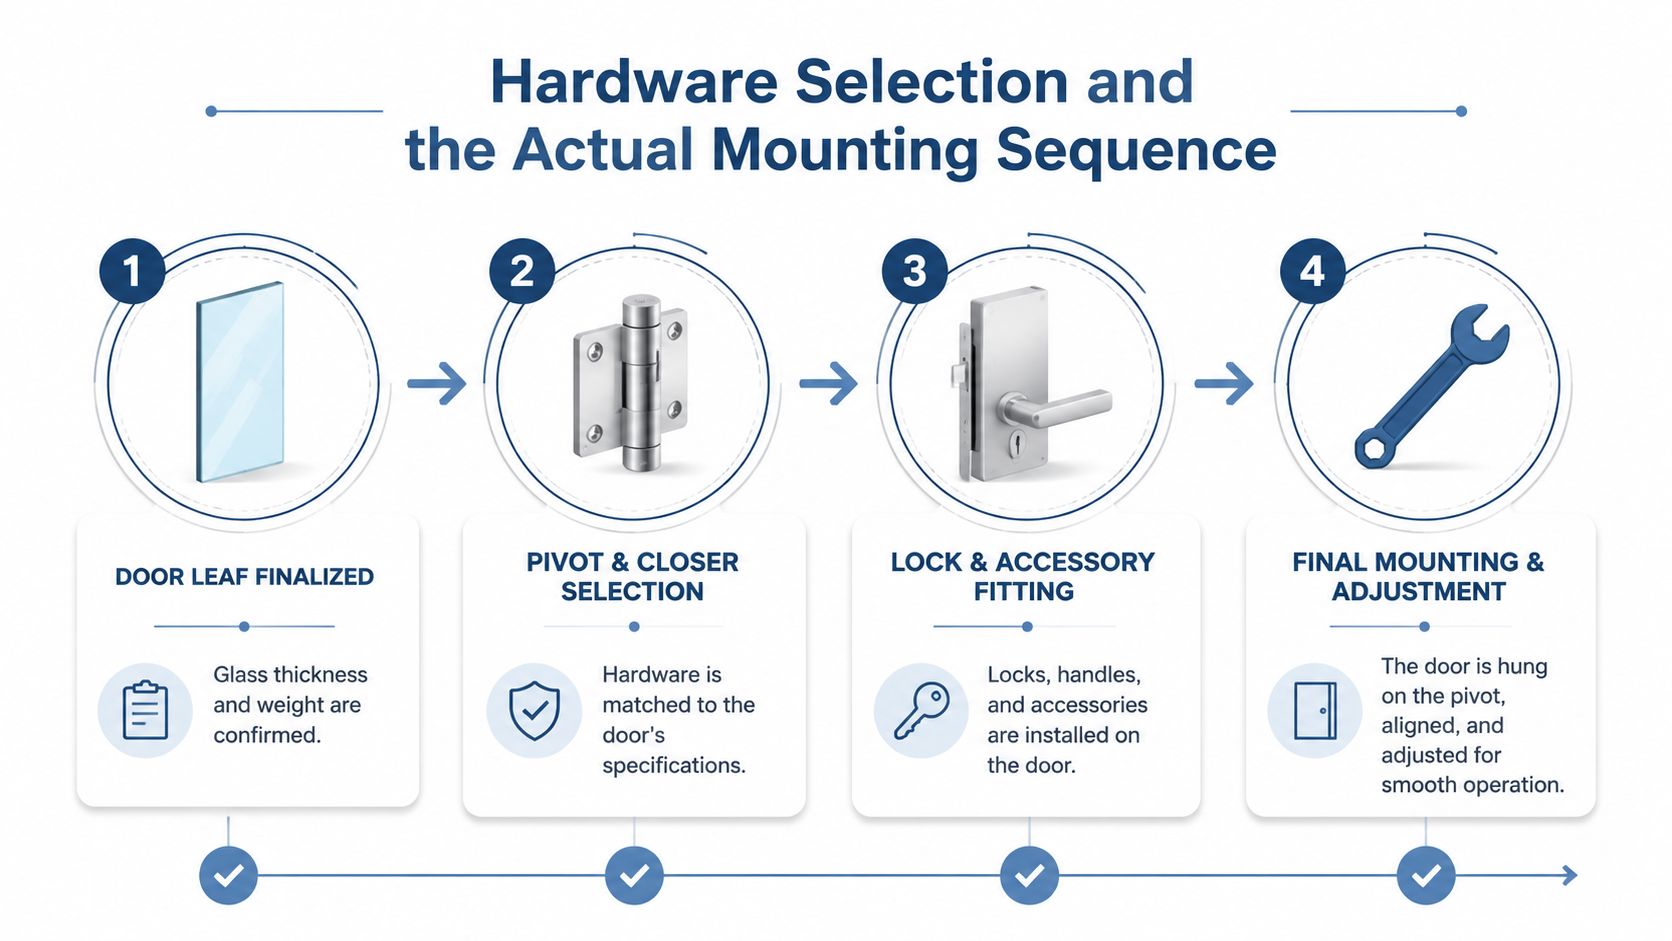
Hardware follows the finalized leaf. Confirm the glass type, thickness, dimensions, weight, edge preparation, and door operation before selecting pivots, patch fittings, locks, and closers. A standard aluminum storefront door may use a conventional commercial hardware package, while an all-glass leaf needs fittings specifically approved for its glass and load condition.
Follow the load path
Start by assembling and shimming the frame. Support the sill and bottom pivot area, anchor the hinge jamb, then recheck plumb and square before adding the remaining anchors. Anchors can pull a frame out of position, so a level check after each meaningful anchor group is more reliable than one check at the beginning.
Set the door panel only after the frame and pivot support are stable. Protect edges during handling, seat the bottom pivot correctly, engage the top pivot, and check the reveal before installing stops or final trim. For an exterior installation, the commercial door installation diagram can help the crew coordinate the frame, opening, and hardware sequence.
Patch fittings and clamps deserve controlled tightening. Use resilient pads, avoid metal-to-glass contact, and tighten clamping screws in a star pattern over multiple passes. That spreads pressure instead of loading one point at the fitting. Tightening by feel alone is risky because over-tightening can damage glass, while under-tightening allows hardware to loosen after use.
Glass handling rule: The edge is the vulnerable part. Keep it protected from concrete, metal tools, and abrupt contact throughout the lift and set.
Install the closer and lock after the leaf is aligned. Verify that the handle and other operable hardware sit within the approved accessible reach range, and make sure the latch enters the strike without forcing the door sideways. Tune sweep, latch speed, back-check, and hold-open behavior with the door installed in its real environment. A bench adjustment can't reproduce the floor, seals, pressure, and traffic conditions the closer will face.
Weatherproofing, Security, and Post-Install Performance
Glass rarely causes the long-term leak. The perimeter joint, threshold, sill support, weatherstrip, and closer determine whether the assembly keeps water and air outside. A door can have flawless glazing and still fail because the threshold isn't supported, the seal doesn't compress continuously, or the closer doesn't pull the leaf fully into the seal.
Set the sill pan or end dam before placing the threshold. Bed the jamb against the substrate using the specified backer rod and structural or weather sealant, then inspect the seal for continuity rather than assuming the visible bead is complete. Check weatherstrip contact from top to bottom with the door both open and closed. The leaf should move freely, then seat evenly without dragging across the seal.
Security starts behind the finish
Security depends heavily on anchorage and lock preparation. Through-bolts into structural framing, reinforced strike pockets, properly aligned locks, and a correctly adjusted closer usually contribute more to dependable resistance than changing glass type without addressing the frame and hardware. An installer should confirm that the strike is supported, the fasteners reach suitable structure, and access-control wiring doesn't interfere with the door or closer.
Commissioning should include more than a single opening cycle. Run the door through repeated swings or slides, check the latch, observe the reveal, inspect seal compression, and verify that the threshold remains stable. Look for signs of pivot movement, hinge stress, loose patch fittings, or a closer that is fighting the seal.
Handoff standard: Don't sign off because the door works once. Sign off when the opening, closing, latching, sealing, and anchorage all remain correct after operation.
Schedule a post-install review after the building has had time to settle, including checks at 30 and 90 days as identified in installer guidance. Commercial glass door installation guidance emphasizes frame alignment, threshold anchorage, closer adjustment, weatherstripping, lock function, and smooth operation. Those checks turn a handoff into a serviceable record and give the owner a chance to correct small movement before it becomes a replacement issue.
Realistic Timelines and Common Field Questions
A commercial door schedule starts with decisions, not with the installation crew. The opening survey, approved drawings, glazing selection, hardware preparation, permits, fabrication, delivery, installation, and commissioning all have to line up. A short field installation can still sit idle if the closer, laminated glass, access-control component, or adjacent flooring isn't ready.
Schedule the decisions that cause rework
Lock the accessible clear opening, threshold approach, closer model, panic or exit hardware, access-control interface, glass label, and finish before fabrication. Coordinate with flooring, storefront glazing, electrical, security, and painting trades. A replacement in an existing storefront may move quickly once the opening and hardware are confirmed, while a new fit-out can take longer because reinforcement, inspections, and adjacent finishes must arrive in sequence.
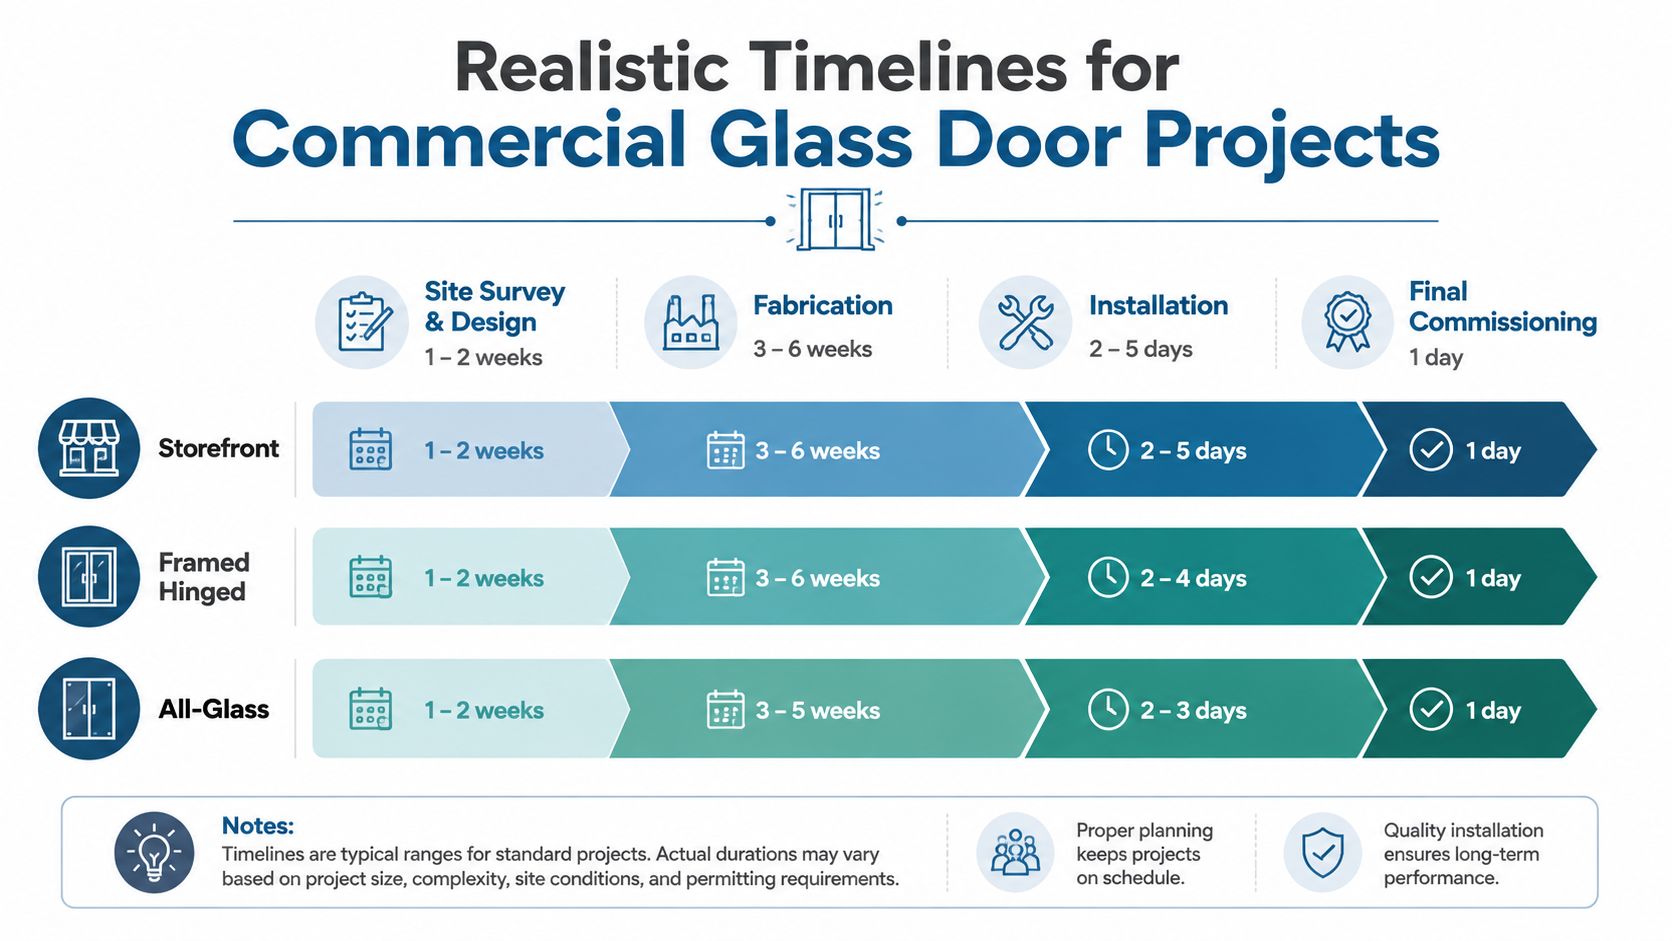
The supplied project timeline presents a planning framework of 1 to 2 weeks for site survey and design, 3 to 6 weeks for fabrication, 2 to 5 days for installation, and 1 day for final commissioning across storefront, framed hinged, and all-glass project types. Treat those ranges as planning guidance, not a promise. Manufacturer availability, permit revisions, field conditions, and the selected assembly can change the sequence. The commercial installation process source also emphasizes opening checks, sliding travel, header capacity, and final alignment before operation.
Questions crews and owners ask
Who owns ADA compliance when the drawings and field conditions disagree? The design and construction team must resolve the conflict before installation. The installer should document the condition and avoid improvising a compliant-looking detail without an approved revision.
How long does a single storefront door swap take? The physical swap may be brief when the replacement matches the existing frame and the hardware is available. Survey, fabrication, access coordination, and final testing determine the actual project duration.
Can an existing opening be reused? Often, but only after checking plumb, sill support, anchor condition, finished-floor elevation, and compatibility with the new leaf and hardware.
What do insurance carriers want to see? Keep the approved submittal, glazing labels, hardware schedule, installer documentation, photographs of anchorage, and commissioning record. Requirements vary, so confirm the carrier's file requirements.
When is a fire-rated assembly mandatory? The building code, occupancy, wall rating, opening location, and adopted listing determine that answer. Use a listed door, frame, glass, closer, and hardware package when the opening is part of a rated assembly. Don't mix components based only on appearance.
Breaking Glass Co. supplies and installs commercial windows and doors, including storefront entrances and automatic sliding glass door solutions, with product support for Texas projects and nationwide shipping. If your opening needs a documented takeoff, compatible hardware, and a commissioning-focused installation plan, visit Breaking Glass Co. to request a project quote and discuss the door package before fabrication.