
You've measured the window, written down the width and height, and found a replacement that looks right. Then the supplier asks whether those measurements describe the frame, rough opening, or clear opening. If you're replacing a bedroom window, there's another question: will the new sash open far enough for emergency escape?
Casement window dimensions are a linked measurement system, not just a pair of numbers. A reliable order connects the wall opening, installation space, actual frame, moving sash, and usable passage, with each dimension clearly labeled.
Table of Contents
- Why Casement Window Dimensions Are More Than Width and Height
- Understand Every Dimension in a Casement Schedule
- Explore Common Casement Size Categories
- Measure an Existing Replacement Opening Correctly
- Specify Rough Openings for Replacement and New Construction
- Compare Nominal, Test, Clear, and Custom Dimensions
- Check Bedroom Egress Before Ordering
- Determine Safe Maximum Sizes for Large Casements
- Order Casement Windows Without Measurement Conflicts
- Quick Reference for Measuring and Sizing Casements
Why Casement Window Dimensions Are More Than Width and Height
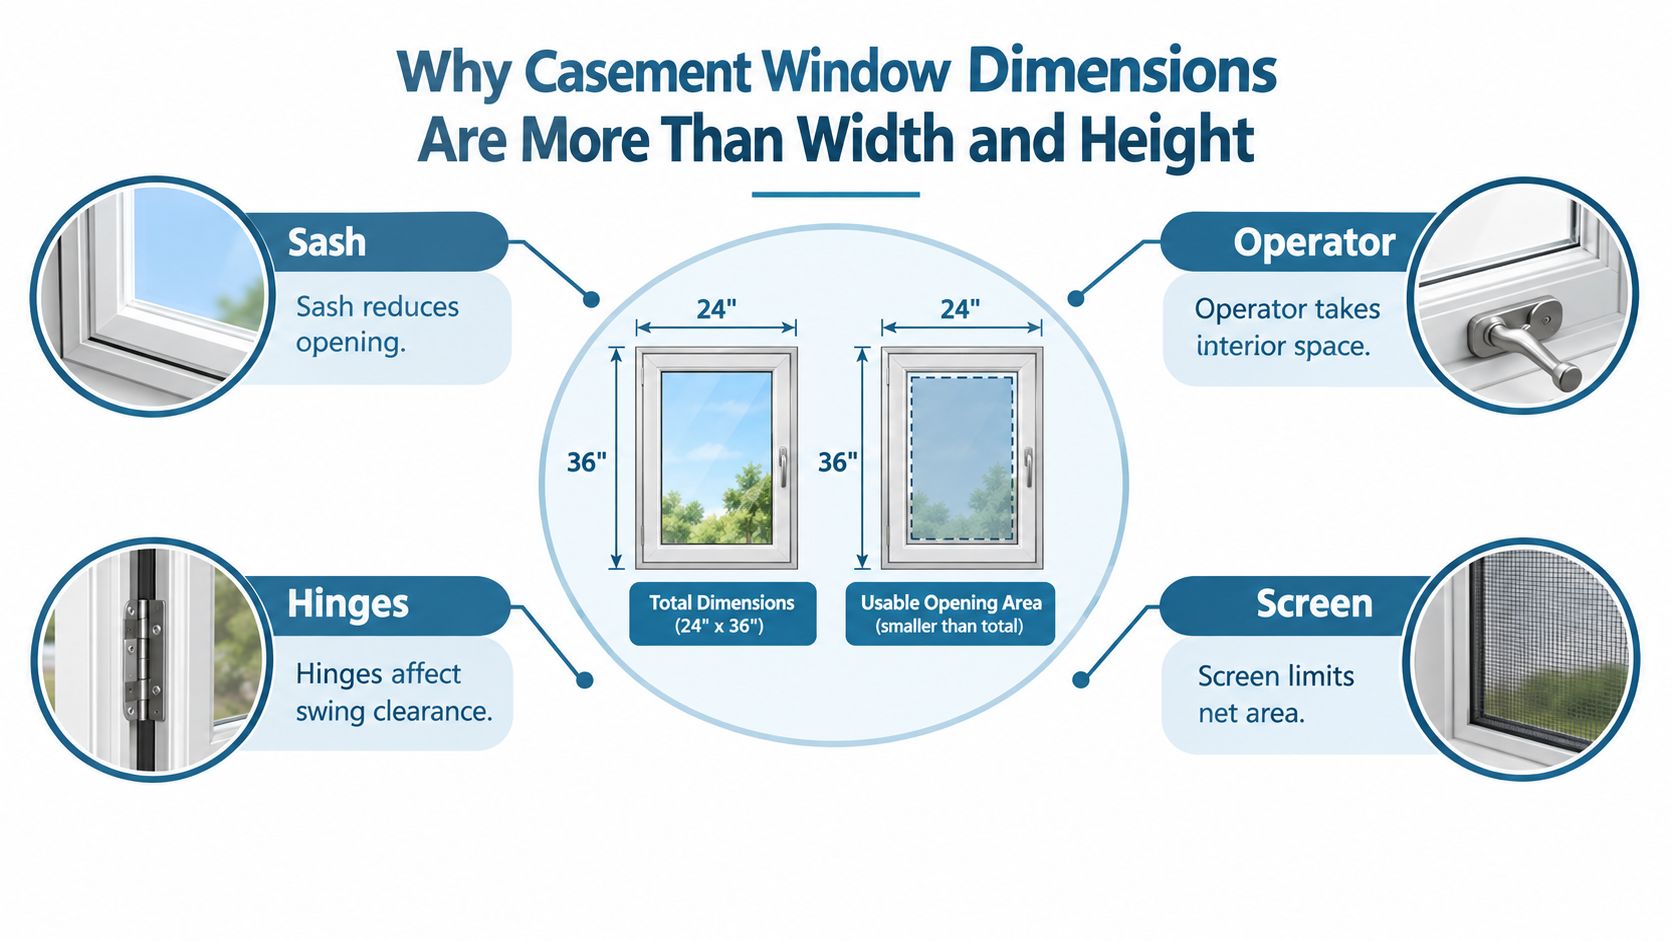
Matching the advertised width and height doesn't necessarily reproduce an existing window's usable opening. Different frame profiles and hinge arrangements can leave different passages when the sash opens. The operator also needs room to function, and the screen must be considered when evaluating access.
The diagram separates the components you'll need to account for.
Start with the project conditions
For a replacement, begin with what's already in the wall and decide what will remain. For new construction, coordinate the proposed unit with framing and the installation detail before treating the architectural opening as an order size.
Keep these questions separate:
- Will it fit? Compare the actual frame and installation requirements with the available opening.
- Will it operate? Check sash swing, crank access, hinge placement, and nearby obstructions.
- Will it satisfy the project requirements? Verify escape access and product performance independently of appearance.
A useful parallel exists in commercial glazing: diagnosing the existing assembly comes before choosing replacement material. Aloha Window Bros.’ resource on fixing storefront glass issues provides related context for readers also dealing with storefront work.
The practical starting point is a complete dimensional record. A measurement labeled “window width” leaves too much for the supplier or installer to interpret.
Understand Every Dimension in a Casement Schedule
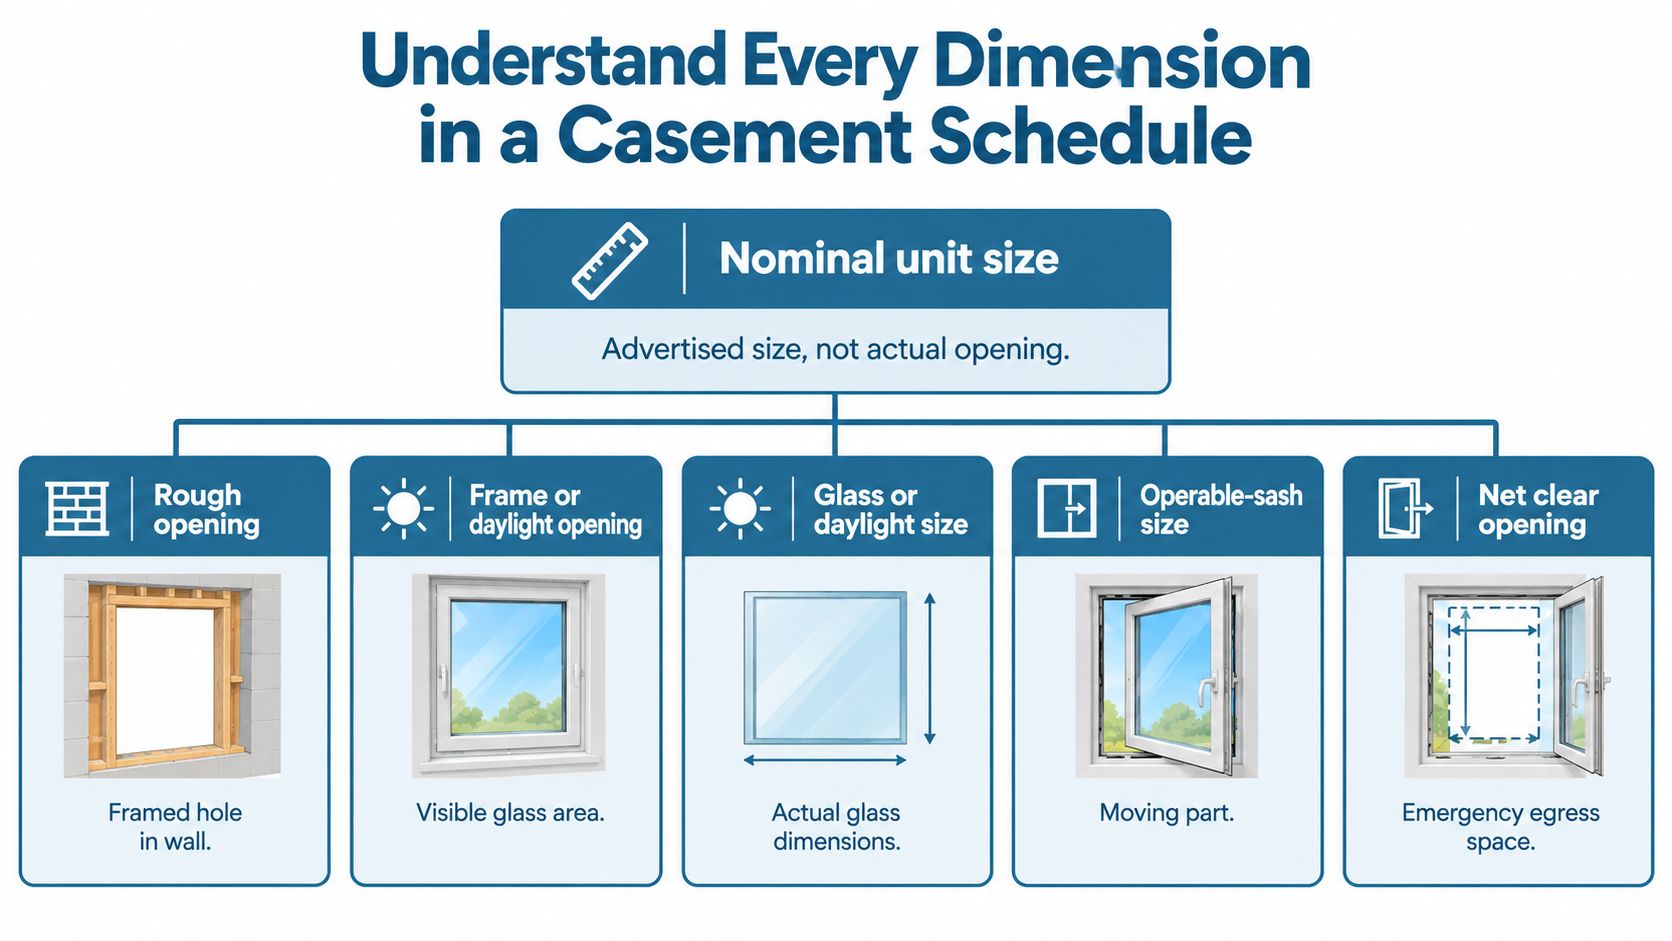
A window schedule can contain several legitimate widths and heights. They aren't competing answers. Each describes a different part of the assembly or answers a different installation question.
Use the diagram as an orientation, then keep the distinctions in the table explicit on your paperwork.
Casement Dimension Terms
| Dimension | What It Measures | Where It Is Used | Common Error |
|---|---|---|---|
| Nominal unit size | Catalog designation or stated ordering size | Estimate and product matrix | Assuming it equals the actual frame |
| Actual frame size | Outside dimensions of the manufactured frame | Order confirmation and product drawing | Including trim in the measurement |
| Rough opening | Opening prepared to receive the installation | Framing plan and installation detail | Ordering a frame to fill it completely |
| Structural opening | Opening bounded by structural framing or masonry | Architectural and structural drawings | Treating finishes as structural boundaries |
| Daylight opening | Visible exposed glazing area | Elevation and appearance review | Calling it the full glass size |
| Glass size | Physical glazing dimensions, including concealed edges where applicable | Glazing fabrication documentation | Ordering glass from visible dimensions |
| Operable-sash size | Dimensions of the moving leaf | Sash and hardware details | Treating it as usable passage |
| Net clear opening | Unobstructed passage in the required open configuration | Egress verification | Using the rough opening instead |
| Finished sill height | Height from finished floor to the applicable opening reference | Code review and installation plan | Measuring from the subfloor |
Follow an opening through the paperwork
Consider a hypothetical bedroom replacement with existing exterior masonry that must remain. The field worksheet records the available opening and masonry restrictions; the supplier then identifies a candidate product and its actual frame dimensions.
The product drawing establishes the sash configuration and clear passage. The architectural record separately locates the opening above the finished floor.
Don't accept “frame or daylight opening” as an interchangeable label. Ask the supplier to mark the measurement boundaries on a drawing. A clear sketch is more useful than an unexplained number, particularly when an estimate moves between a homeowner, builder, supplier, and installer.
Explore Common Casement Size Categories
The most useful size categories describe the job, not an unsupported list of small, medium, and large windows. Identify the application first, then compare products within the appropriate manufacturer's size matrix.
Replacement and remodeled openings
An existing-opening replacement starts with a decision about retained materials. Ask whether the proposed installation keeps an existing frame or removes the assembly back to the wall opening. Don't compare quotes until they describe the same scope.
For an older opening with a distinctive exterior reveal, request a section drawing showing how the replacement meets that reveal. A unit that fits inside the wall can still produce an unwanted trim relationship.
A remodeled opening allows more freedom, but requires coordination. If you're changing proportions or planning a bedroom escape opening, establish the required function before choosing the exterior appearance. Custom dimensions should respond to the approved design, not compensate for an unresolved field condition.
New construction and larger assemblies
With new construction, request a coordinated opening schedule that the framer and window supplier can both approve. The controlling question is whether the proposed assembly can be built, installed, and operated as detailed.
For commercial or large residential openings, request assembly drawings rather than relying on a single-sash catalog entry. Identify which sections operate, which remain fixed, and how the manufacturer approves their connection.
| Project category | Document to request first | Main decision |
|---|---|---|
| Existing-opening replacement | Field survey and installation scope | What stays and what comes out |
| Remodeled or custom opening | Proposed opening detail | Whether the wall or product changes |
| New construction | Coordinated framing schedule | Which opening the builder prepares |
| Large or commercial assembly | Approved assembly drawing | How the complete system is configured |
Historical proportions explain some older openings, but they aren't ordering standards. Winchester City Council's casement conservation guidance describes early windows constrained by available glass and traditional casement leaves usually no wider than about 450 millimeters, or 18 inches.
Use that history to understand the building's proportions. Use current product documentation to specify its replacement.
Measure an Existing Replacement Opening Correctly
Bring a tape measure, level, framing square, camera, and a field sheet. Before measuring, identify the proposed replacement method so you know which surfaces define the opening.
The following diagram outlines the field sequence.

Establish reliable measurement boundaries
Remove interior casing only where appropriate and with permission. If finishes conceal the opening, mark the survey as preliminary rather than guessing where the framing begins.
Record width at the head, middle, and sill, then height at the left jamb, center, and right jamb. Measure between consistent surfaces, not from a frame on one side to trim on the other.
- Check geometry: Compare diagonals and use the level to identify leaning jambs or an uneven sill.
- Record depth: Note the wall build-up, frame position, and available space for interior returns.
- Inspect restrictions: Photograph masonry, siding, projecting trim, counters, and exterior objects near the sash swing.
- Separate damage: Mark deterioration or displaced material for investigation rather than measuring around it as though it were permanent.
The smallest available dimension generally controls where the restriction cannot be corrected. It isn't automatically the final order dimension, because installation space still needs to be resolved.
Build a usable field record
A completed qualitative record might read: “Width restricted at sill; right jamb out of plumb; exterior masonry retained; interior casing removable; frame depth concealed; repair review needed before release.” Attach the actual measurements to those observations and label the matching photographs.
For a companion field guide, use this resource on how to measure window size. Keep the raw readings, even after the supplier calculates an order size.
Use the video below alongside the written measurement record.
Field rule: Record what you measured, where you measured it, and what will remain after removal.
The old glass, old sash, and old frame are different measurement references. None should become the new unit's ordering dimensions.
Specify Rough Openings for Replacement and New Construction
A framer sizes an opening from the catalog designation, the unit arrives at its actual frame size, and the leftover gap no longer suits the flashing detail it ships with. Hole first, product second: that sequence is where most rough-opening failures begin.
The opening is the output of a chain. Structural boundary, prepared opening, installation materials, attachment substrate, and actual frame belong on one drawing. They aren't separate allowances to stack together; the approved detail defines how they relate.
Work back from the actual frame
Get the supplier's required rough opening for the selected unit before anyone cuts the hole. A generic deduction assumes a shim gap, sill detail, and fastener method your product may not use. For example, if the approved detail calls for half an inch of working space at each jamb plus a built-up sill pan, the opening equals frame width plus one inch and frame height plus the pan buildup. The window rough-opening size guide shows how to record that relationship; the selected product's numbers belong on the project drawing.
Existing walls set their own limits
Whatever must stay undisturbed controls a replacement opening. Retained masonry, finishes the owner won't repair, and existing framing each reduce the room left for flashing, insulation, and fasteners. Have the installer state what gets removed or leveled, how the sill pan fits the remaining depth, where fasteners land in sound material, and how interior returns and exterior trim meet the frame.
New construction locks both sides at once
The order and the framing must agree before the wall closes:
- Send the proposed actual frame size to the supplier; get the required rough opening back in writing.
- Set header and finished sill elevations against it, including wall thickness and exterior finish depth.
- Confirm the frame's position in the wall and the clearance around the sash, including below-grade wells.
- Release the order once the framer signs off on the marked opening.
"Make it fit" isn't an installation specification. The opening on the drawing and the opening the crew builds should be the same line on the same sheet.
Request a marked drawing showing opening boundaries, frame boundaries, and the referenced detail. Framer, supplier, and installer then share one target.
Compare Nominal, Test, Clear, and Custom Dimensions
A catalog designation, a laboratory reference size, and an escape opening describe different things. Comparing them as though they were alternative ordering sizes creates avoidable errors.
This comparison separates their purposes.

Reference sizes support ratings, not field ordering
ANSI/NFRC 100-2023 identifies reference products of 600 × 1,500 millimeters for a single casement and 1,200 × 1,500 millimeters for a double casement, as shown in the NFRC reference-size standard. These are test and modeling references, not universal minimums, maximums, or installation sizes.
A nominal designation belongs on the quote only when the supplier also identifies the corresponding actual product dimensions. A custom order needs equally explicit documentation; “custom” doesn't mean unrestricted.
| Dimension system | What it establishes | What it doesn't establish |
|---|---|---|
| Nominal | Product identification | Exact installed fit without clarification |
| Test reference | Basis for rating or classification | Every permissible field dimension |
| Net clear | Usable open passage | Space needed for installation |
| Custom | Requested project geometry | Automatic structural or code approval |
Hardware changes the conversion
Andersen's casement sizing technical data illustrates why the conversion must be product-specific: listed clear-width deductions are approximately 5.81 inches or 6.10 inches, depending on hinge and wash-mode configuration, while the listed clear-height deduction is 4.43 inches.
Those deductions demonstrate the importance of frame and hardware geometry. They aren't a formula to apply to another manufacturer's product.
Nor can you multiply a tested casement's width and assume its performance remains unchanged. The proposed sash proportions, glazing weight, hardware capacity, reinforcement, and mullion arrangement require approval for the actual configuration.
Ask for the drawing that connects the numbers. It should identify the ordered product, its installation dimensions, its clear-opening data where relevant, and the performance documentation applicable to that assembly.
Check Bedroom Egress Before Ordering
Bedroom replacements can pass the catalog check and fail the inspection. The casement arrives tagged for egress, the drawing shows acceptable clear width, then the inspector measures the finished sill above the permitted height or finds a screen with no compliant release. A label describes a product category. Approval attaches to the installed configuration: frame, hinge arrangement, fully open position, floor height, and screen hardware all shape the passage a person must get through.
The commonly cited IRC criteria require simultaneous minimums of 5.7 square feet of net clear area, 20 inches of clear width, and 24 inches of clear height, with a maximum sill height of 44 inches above the finished floor; qualifying grade-floor openings may use 5.0 square feet, according to this IRC emergency escape opening reference.
Where a passing width still fails
Every criterion stands on its own, so surplus clear height cannot compensate for a narrow clear width, and meeting the two linear minimums does not by itself produce the required area. Review the candidate in a fixed order. Confirm which adopted code and local amendments govern the replacement. Match the drawing to the quoted frame, operator, and hinge set. Measure the passage at the approved fully open position. Compare each minimum independently. Establish the sill height from the planned finished floor, not the subfloor.
Screens deserve the same scrutiny as sash size. Confirm the release method with the supplier, then verify that the authority having jurisdiction accepts it.
The well is part of the opening
Below-grade bedrooms move part of the escape route outdoors. The cited municipal basement-egress guidance calls for a window well with at least 9 square feet of horizontal area and minimum 36-inch length and width. Verify local requirements for the well, access provisions, and any cover, and check the outward sash swing against the proposed well before treating the two as approved.
Approval checkpoint: Keep the clear-opening drawing and local review notes with the order, not in a separate email trail.
Determine Safe Maximum Sizes for Large Casements
The largest casement that fits the opening isn't automatically the appropriate specification. A large operable leaf needs documented approval for its geometry, glass, hardware, exposure, and attachment.
A Florida building-code approval document.pdf) lists a tested configuration approximately 48 by 84 inches, with a stated wind-pressure rating of about 70 psf. That example demonstrates product-specific capability, not a universal commercial maximum or approval for a different project.
Review the assembly, not just the rectangle
Ask the supplier to evaluate the proposed unit against the required project design pressure. The review should address sash aspect ratio, frame deflection, operating effort, hardware loading, and glazing weight.
For Texas and Southwest projects, include wind exposure and solar conditions in that discussion. Larger glass areas can increase solar gain and cooling demand, so evaluate whole-product thermal performance alongside structural suitability.
| Specification question | Required response |
|---|---|
| Is the proposed size approved? | Applicable manufacturer size matrix |
| Does the configuration meet project loading? | Product-specific performance documentation |
| Is reinforcement required? | Approved frame and assembly details |
| Can users reach and operate it? | Hardware layout and access review |
| How is it secured? | Installation and anchorage detail |
Compare alternatives before enlarging the sash
A fixed-and-operable assembly may provide the desired overall opening without relying on an unusually wide moving leaf. A different sash arrangement may also be worth reviewing, provided the manufacturer approves the complete assembly.
Mullions and divided-lite options need specific consideration. Don't assume that a decorative glass pattern supplies structural reinforcement or that combining approved individual units automatically approves their connection.
Validate larger dimensions rather than extrapolating them. If the supplier can't document the requested configuration, revise the layout or seek an engineered alternative before preparing the opening around it.
Order Casement Windows Without Measurement Conflicts
A supplier gets a text: "Thirty by forty-eight, left hinge, white." Six weeks later a unit arrives that doesn't match the framed opening, hinges the wrong way for the countertop beside it, and carries no record of whether it was ever checked for egress. Every casement order fails the same way: one dimension traveled without the chain of measurements attached to it.
Release the order from a coordinated package instead. Include a marked-up plan, labeled photographs, the field worksheet, and the proposed installation scope. Give each opening an identifier that stays consistent across the quote, drawings, delivery labels, and installation plan, and separate mandatory requirements from preferences so a supplier doesn't treat a required escape function as an optional feature.
The quote return should confirm the chain in writing: manufacturer, series, nominal designation, and actual frame dimensions tied to each opening identifier; required rough opening, frame depth, attachment detail, and finish interfaces; hinge side, viewing convention, operator, wash mode, screen arrangement, and sash geometry; glass specification, daylight dimensions, finish, and grille arrangement; and verification documents covering clear-opening data, approved sizes, and applicable performance ratings. A structured window and door schedule gives all of those fields one place to reconcile.
Blank fields are where assumptions enter.
Treat any hinge, glass, mullion, or hardware substitution as a review item, since a revised configuration can change dimensions or performance already approved. On new construction, get agreement on the final opening before framing or concrete work closes around it. On replacements, disclose restricted access, concealed conditions, retained finishes, and below-grade constraints before installation is scheduled.
At delivery, match labels to the approved schedule and check operating orientation before units get distributed around the site.
If the delivered frame or prepared opening differs from the approved package, stop. Reconcile the discrepancy rather than trimming structural material or improvising an installation allowance to keep the job moving.
Quick Reference for Measuring and Sizing Casements
Use the following table as the cover sheet for your dimension package. Attach the detailed measurements and approvals behind it so the reviewer can trace each entry to its origin.
Casement Window Dimension Quick Reference
| Reader Task | Required Dimension | Where to Verify | Key Caution |
|---|---|---|---|
| Identify a catalog product | Nominal designation | Manufacturer size matrix | Not necessarily actual frame size |
| Confirm physical fit | Actual frame width and height | Approved product drawing | Exclude applied trim unless specified |
| Prepare the wall | Required rough opening | Installation instructions | Don't assume a universal allowance |
| Preserve exterior proportions | Frame and daylight dimensions | Elevation and section drawings | Equal outer sizes may look different |
| Review emergency escape | Net clear opening and sill height | Configuration data and local review | All applicable criteria must pass |
| Specify a large assembly | Approved dimensions and design pressure | Certified assembly documents | Don't extrapolate another unit's rating |
| Coordinate finishes | Frame depth and installation position | Wall section and field survey | Check interior and exterior interfaces |
Assemble the field package
Before requesting a final order review, confirm that the package contains the following:
- Opening survey: Raw width, height, depth, and geometry observations.
- Site photographs: Labeled interior, exterior, sill, and obstruction views.
- Installation scope: Retained materials, preparation work, and finish limitations.
- Required approvals: Egress review and structural or wind-performance documentation where applicable.
- Returned schedule: Supplier-confirmed dimensions matched to each opening.
Resolve discrepancies before release
Opening out of square: Return to the replacement-measurement procedure and determine whether the condition will be corrected or accommodated.
Large-looking unit with inadequate passage: Revisit the egress review and the selected hardware configuration, rather than judging by glass area.
Insufficient installation space: Rework the rough-opening detail with the installer. Don't omit flashing or alter attachment requirements to recover room.
Wide sash outside the approved range: Follow the large-casement review and compare approved alternative layouts.
The final check is agreement among the field record, supplier drawing, and installation plan. Order only when they describe the same product in the same opening.
Breaking Glass Co. supplies residential and commercial windows and doors, coordinates replacement and new-construction packages, and provides installation services across Texas. Visit Breaking Glass Co. with your opening measurements, site photos, and project requirements to request a quote and discuss the dimensions needed for your order.