
Approximately 20% of tested window installations leaked at the window-to-wall interface in a building-science field study on pan flashing and air sealing. More than 50% of tested window units admitted water through at least one leakage path, and approximately 15% of all cases included leakage through the sill frame itself, according to that same study. Those are different problems, but they lead to the same practical question: when water reaches the opening, where can it go?
For a Texas builder, new construction window flashing isn't a finishing detail. It's the connection that lets the window and wall manage water together, including water that gets past the window itself. A clean bead of caulk doesn't prove that connection works.
Table of Contents
- Why Flashing Is a Drainage Problem, Not a Caulking Problem
- How the Rough Opening Connects to the Wall Drainage Plane
- Choosing Materials for Texas Heat and Wind-Driven Rain
- Installing Flashing in the Right Sequence
- The Pre-Cover Inspection Most Builders Skip
- Common Field Failures and How to Catch Them
- A Texas Climate Checklist Before the Walls Close Up
Why Flashing Is a Drainage Problem, Not a Caulking Problem
A window can look straight, operate smoothly, and still sit inside a poorly drained opening. The flange hides part of the installation, trim hides more, and cladding eventually conceals the connection to the wall. That's why a finished exterior isn't enough evidence of sound water management.
The field findings distinguish window-unit leakage from installation-interface leakage. Replacing a defective window addresses the first problem. It doesn't automatically correct the second, and even a properly installed unit needs a way to discharge water that reaches its sill.
Follow the water beyond the exterior finish
The useful mental model is a drainage system, not a waterproof picture frame. Water reaching the opening must pass onto a continuous collection surface, stay out of the framing, and leave toward the exterior. The surrounding wall needs to deliver water onto that system rather than behind it.
Shingle-fashion integration means upper layers overlap lower layers. A reversed lap creates a route into the wall instead of continuing the route outward. Sealant can close a specified joint, but it can't change the direction of a badly assembled overlap.
Practical rule: Before approving an opening, point to where water enters the flashing system and where it leaves. If either answer requires guessing, the detail isn't ready to cover.
Industry guidance has moved toward this layered approach. IIBEC's field guide to window and door pan flashing describes the progression from flange-installation standards to pan-flashing recommendations and code requirements for outward-directed flashing. Those historical requirements aren't a substitute for checking the code and product instructions governing today's project.
Texas exposure changes the jobsite questions
Hot sun and intermittent heavy rain make material selection and scheduling worth resolving before installation. Don't assume a tape can remain exposed indefinitely, or that adhesion achieved early in the day proves the entire assembly is ready for concealment. Check the selected product's installation conditions and exposure limits.
For owners planning Southwest construction, resources such as Emery Lane Homes' custom built-to-suit homes in Phoenix provide broader project-planning context. The useful flashing question to bring into that conversation is specific: who designs, installs, and verifies the connection between each window and the wall drainage system?
That responsibility belongs in the construction plan, not in a last-minute conversation with the caulking crew.
How the Rough Opening Connects to the Wall Drainage Plane
Start with the wall assembly, then prepare the opening to suit it. The water-resistive barrier, commonly called the WRB, manages water behind the exterior cladding. Window flashing connects the interruption in that barrier to an outward drainage route.
The DOE guide to water management with wall sheathings emphasizes integrating openings with the surrounding drainage plane. That means the relevant surface isn't necessarily the face that looks most convenient for applying tape. With foam sheathing, masonry veneer, stucco, or a rainscreen assembly, identify the actual drainage-plane location before choosing the connection detail.
Prepare the wrap without losing the upper overlap
For the flanged-window sequence described here, cut the housewrap in a modified I pattern. Fold the jamb and sill flaps into the opening, then temporarily secure the head flap above it. Keeping that upper flap out of the way allows the head flashing to be installed before the WRB returns over it.
This diagram shows the relationship between the opening and the folded WRB.
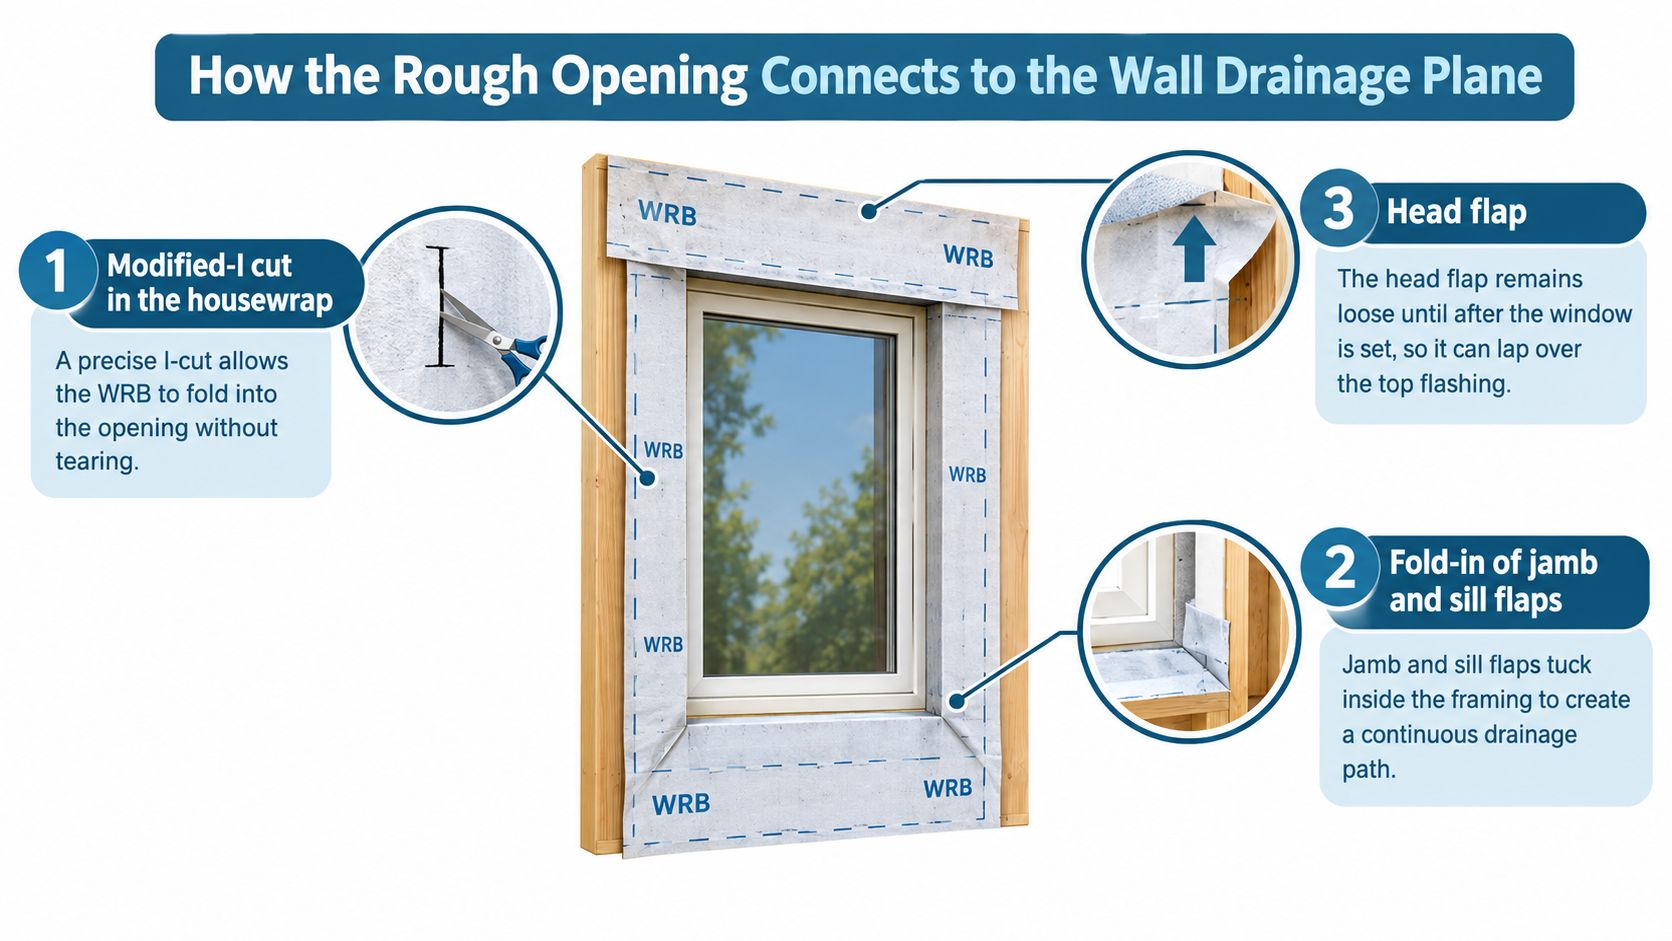
Before cutting, verify the frame dimensions against the window order and manufacturer requirements. The window rough opening sizing guide is a useful companion to that check, but project-specific dimensions still control.
- Framing readiness: Resolve an out-of-square opening before asking flashing or shims to compensate.
- Head-flap control: Secure the flap temporarily so it doesn't fall into the work during a crew change or overnight pause.
- Drainage clearance: Distinguish a designed discharge opening from an accidental gap. Don't fill the former because daylight makes someone uncomfortable.
Coordinate the handoff
On a summer Texas job, inspect the temporarily folded wrap again when the window crew arrives. Treat loose material as an unfinished condition, not an invitation to tape over whatever position it's in.
If windows arrive before the wall underlay, stop and obtain an approved integration detail. Installing first and promising to connect the WRB later leaves a critical operation dependent on another crew's access and judgment.
Choosing Materials for Texas Heat and Wind-Driven Rain
Choose flashing by assembly compatibility and documented installation limits, not by the adhesive family printed on the carton. A butyl membrane isn't automatically suitable for every Texas wall, and a rubberized-asphalt product isn't automatically unsuitable. The selected product has to work with the substrate, flange, sealant, exposure conditions, and planned construction schedule.
The same discipline applies to vinyl windows. When reviewing vinyl new-construction window options, request the installation instructions alongside the product specifications. A window choice isn't complete until the builder knows how its flange, fastening pattern, sealant locations, and drainage provisions fit the wall.
Compare systems rather than labels
Self-adhered membrane and flashing tape aren't entirely separate material families. Many flashing tapes are self-adhered membranes supplied in convenient widths. The meaningful comparison is how the material forms corners, connects components, and survives the specified installation conditions.
| Material approach | Practical advantage | Trade-off to resolve |
|---|---|---|
| Formable self-adhered membrane | Can shape a continuous sill and reduce corner seams | Requires careful corner pressure, suitable substrates, and approved adhesion conditions |
| Non-elastic membrane or tape | Can provide deliberate, visible flange and WRB connections | Corners require planned cuts and patches rather than stretching |
| Preformed rigid or flexible pan | Provides defined collection geometry, back dam, and end dams | Must fit the opening and connect properly to adjacent flashing |
A preformed pan can make the intended geometry easier to inspect. It doesn't eliminate the need to detail its ends or connect its discharge edge to the wall. Conversely, a membrane pan can work well, but only if the installer forms a continuous waterproof surface rather than a collection of loosely patched corners.
A premium roll of flashing won't correct a missing end dam or an outlet buried behind the wrong wall layer.
Specify for the conditions crews will encounter
For Texas projects, ask for written confirmation of allowable application temperatures, substrate preparation, primer requirements, service conditions, and exposure limits. Don't substitute a generic promise of heat resistance for those answers.
- Check the complete contact chain: Confirm compatibility among tape, WRB, sheathing, flange finish, and sealant.
- Plan exterior exposure: Match the material's permitted exposure to the actual cladding schedule.
- Choose inspectable geometry: Prefer a pan arrangement whose corners and discharge connection remain visible until approval.
For masonry veneer or fiber-cement work, my recommendation is to prioritize a clearly defined pan and an assembly-specific outlet detail. The material choice comes after that geometry is resolved, not before.
Installing Flashing in the Right Sequence
Lay out the approved detail where the crew can see it before opening the first roll. The sequence below applies to flanged windows and must be reconciled with the window, WRB, membrane, and sealant manufacturers' instructions.
The graphic gives a visual overview of the layering. Any additional sill membrane shown should follow the selected pan system's instructions, not become an improvised extra layer.

Build from the collection surface upward
Prepare and fold the WRB, then install the sill pan before placing the window. The pan needs a continuous waterproof surface, back dam and end dams, and an outward-draining configuration. Check corners for tears, wrinkles, and unfinished patches while access is still open.
Set the window plumb, level, and square according to its instructions. Protect the pan during placement, especially a rigid back dam that can be damaged while maneuvering the frame. Apply specified sealants and fasteners where the manufacturer requires them, rather than following a universal flange rule.
Install jamb flashing so it overlaps the pan connection and extends above the head flange. Then place head flashing over and beyond the jamb flashing. Finish by folding the WRB head flap down over the head flashing and sealing its seams.
The DOE's fully flashed window installation guidance describes this sequence and stresses preserving sill drainage. Don't run a continuous sealant barrier across the discharge route unless the approved system specifically provides drainage another way.
Crew handoff: Leave the next installer a completed, visible overlap, not a loose edge with a verbal promise that somebody will finish it.
Coordinate masonry and interior work
For Texas masonry projects, resolve the window position and drainage outlet before the veneer crew reaches the opening. Brick ledges, shelf angles, and foam-sheathed walls deserve a project-specific detail showing where collected water discharges. Don't move the outlet to suit trim after the pan is already installed.
The coordination principle also matters at roof-to-wall intersections. For that separate scope, 7 Summits Roofing's Front Range roof flashing steps offer a related trade resource, though roof details aren't interchangeable with window details.
For an additional visual reference, compare the installation demonstration with the approved instructions for your assembly.
Finish the interior perimeter with compatible backer rod or low-expansion foam as specified. Interior air sealing and exterior drainage have different jobs. Keep the air-sealing material on its intended side of the detail instead of filling the sill's water outlet.
The Pre-Cover Inspection Most Builders Skip
A window that opens and closes has passed an operation check, not a flashing inspection. The consequential review happens while the pan, flashing edges, and WRB connections remain visible. Once siding, masonry, or trim covers them, the superintendent can't verify those conditions by looking at the finished window.
A BRANZ investigation of window head flashings examined more than 200 homes under construction and found head-flashing problems in nearly 40% of inspected houses. That was a New Zealand investigation, not a Texas or U.S. failure rate. Its useful lesson is the range of visible workmanship defects, including deficient slope, length, stop-ends, and joints.
Require evidence at every opening
The DOE sill-pan inspection guidance supports checking these critical connections:
- Pan discharge: The pan extends onto the wall-facing drainage layer.
- Back dam: The interior barrier is intact and continuous.
- Jamb connection: Jamb flashing overlaps the pan and WRB.
- Head connection: Head flashing overlaps the jamb flashing and sits beneath the WRB above.
Use the graphic as a field reminder, with the approved product detail controlling overlap dimensions and any water-testing procedure.

Don't treat a generic overlap illustration as a universal specification. Likewise, pouring or spraying water casually isn't a substitute for an approved test method.
Assign ownership before concealment
A workable project protocol gives the framer responsibility for opening readiness and the window installer responsibility for the pan, fastening, and flashing installation. The siding or masonry crew must preserve those connections and drainage clearances. The superintendent releases the opening for cover, with a third-party inspector reviewing the scope required by the project.
Photograph the full opening, each sill corner, the back dam before it becomes inaccessible, and the completed head-to-WRB connection. Label images by opening so the project file doesn't become a folder of unidentifiable tape close-ups. Record defects, repairs, and approval rather than photographing only the finished condition.
Use the window installation steps guide to coordinate the broader installation workflow. For flashing quality control, track documented first-pass inspection compliance per opening before cladding. That's a defensible project metric, not a claim that a checklist guarantees leak-free performance.
Common Field Failures and How to Catch Them
Organize the walk-through by failure mechanism. A superintendent should be able to identify the suspect condition, explain why it matters, and stop concealment until the installer resolves it. Adding tape without identifying the problem isn't a repair strategy.
Overlap and containment defects
Reversed head laps show up as a head strip tucked beneath the jamb strips. The error is sequencing, not a shortage of adhesive. Rebuild the affected connection in the approved order rather than hiding it beneath a surface patch.
Missing or damaged end dams leave an open route at a sill corner. Look for flattened corners, cuts, incomplete patches, or a pan end that never turns upward. Require an approved repair or replacement that restores containment before the frame conceals the defect.
Blocked sill discharge often looks tidy: a continuous bead closes the very edge that should release water. Flag it against the installation detail. Remove or revise the obstruction through an approved repair, not by drilling an improvised drain.
Don't accept “we'll caulk it after siding” as the closeout response to a defective pan or reversed flashing connection.
Adhesion, penetrations, and interrupted details
Check self-adhered materials for loose edges, lifted corners, bridging, and wrinkles. Review substrate preparation and application conditions if those symptoms appear. Pressing a loose strip back down doesn't establish whether it has a sound bond.
- Adhesion failure: Stop cover, inspect the substrate, and follow the membrane manufacturer's preparation and replacement procedure.
- Questionable fasteners: Compare locations with the window and pan instructions. Don't assume side-flange-only fastening is correct for every product, and don't improvise repairs through the collection surface.
- Damaged back dam: Inspect after window placement, not just before it. A previously approved pan can be damaged during setting.
Ganged windows need particular attention because the combined assembly introduces joints that a single-window sketch may not address. Obtain the manufacturer's mullion and flashing detail, including how leakage reaches the pan and exits. Don't assume a field-made kick-out or pan extension is appropriate without that detail.
The red flag is simple: if the installer can't show how the combined assembly connects to the drainage system, it isn't ready for cladding.
A Texas Climate Checklist Before the Walls Close Up
Texas exposure should change the questions you ask, not encourage shortcuts dressed up as extra protection. Verify material limits, coordinate the cladding schedule, and make the window-to-wall detail inspectable. More sealant isn't a substitute for those decisions.
Use this summary card for the crew handoff. Confirm adhesion against product instructions; heat alone isn't proof that an adhesive has bonded correctly.

Release the opening only when the record is complete
- Assembly approved: Window position, foam sheathing, masonry veneer, and drainage-plane connections match the project detail.
- Materials verified: Compatibility, application conditions, and permitted exterior exposure suit the work schedule.
- WRB finished: Cuts, folded flaps, head integration, and repairs are complete.
- Pan accepted: The collection surface, back dam, end dams, and exterior outlet remain intact after setting.
- Connections checked: Jamb and head flashing follow the approved overlap sequence.
- Fastening confirmed: Locations and penetration treatment match the manufacturer's instructions.
- Interior sealed: Specified air sealing is complete without obstructing exterior drainage.
- Evidence archived: Opening-specific photographs, corrections, and superintendent approval are saved before cover.
Give the checklist to the framer, installer, and cladding crew before work starts. Set the inspection hold point in the schedule so nobody has to choose between keeping the masonry crew moving and seeing the flashing.
Treat new construction window flashing as part of the wall drainage system, then verify it before the wall closes. That's a more dependable building practice than judging the work by how clean the caulk looks.
Breaking Glass Co. supplies new-construction window and door packages for residential and commercial projects and provides installation services across Texas. Visit Breaking Glass Co. to request a quote and coordinate your window order, installation scope, and project schedule before the openings are ready to flash.